Implementing ECDP Checkout Tracking in Shopify
Pre-Requirements#
Before proceeding with the implementation, ensure the following conditions are met:
- Enable Special Cookie Settings
- Additional information must be included in cookies.
- Contact the ES team to enable this setting.
- Upload the Tracking Script
- The tracking script must be added to the website.
- API Requirement
- This feature functions only when orders are added to ECDP using the API.
Why Is This Request Needed?#
Shopify restricts the execution of external scripts on the checkout page. Without this script, ECDP cannot determine if a session concludes with a purchase. This can lead to issues like false-positive abandoned carts.
By implementing this request, ECDP is informed that a session successfully ends with an order. The order details must be provided using the API.
How to Implement the Endpoint#
Follow these steps to set up the tracking endpoint in Shopify:
- Log in to your Shopify Admin Panel.
2. Navigate to: Settings → Custom Events → Add Custom Pixel.
3. Name the pixel: «ECDP Checkout Tracking».
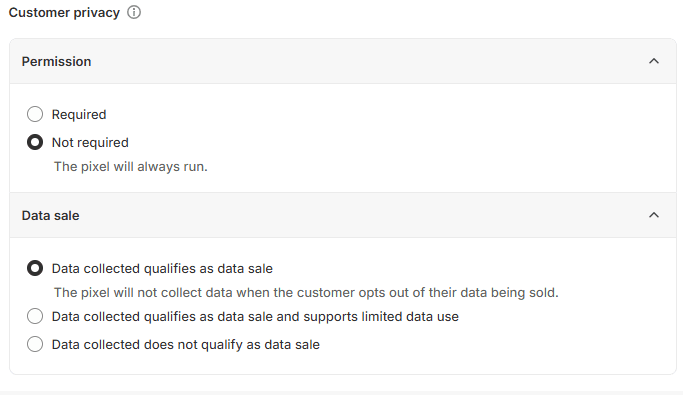
4. Adjust the permissions as per the reference screenshot.
5. Add the following code to the pixel:
const checkoutRequest = async (e) => {
    let t = await browser.cookie.get("__ecdp_visitor"),
        a = await browser.cookie.get("__ecdp_more_info");

    if (typeof t === "string" && typeof a === "string") {
        let r = JSON.parse(t),
            c = JSON.parse(a),
            o = r.vId,
            i = c.uId,
            d = c.wId;

        if (o && i && d) {
            let n = {
                url: init.data.shop.storefrontUrl,
                orderId: e,
                IdentifyRequest: {
                    uId: i,
                    wId: d,
                    vId: o
                }
            };

            await fetch("https://sherlock.ecdp.cloud/registerOrderId", {
                method: "POST",
                keepalive: true,
                body: JSON.stringify(n)
            });
        }
    }
};

analytics.subscribe("checkout_completed", (e) => {
    if (e.data.checkout.order?.id) {
        checkoutRequest(e.data.checkout.order.id);
    }
});
6. Save the pixel and connect it.