Pop-up forms
Pop-up forms are an effective way to connect with visitors to your website. They appear at the right moment, encouraging users to take a specific action, such as subscribing to a newsletter. Unlike intrusive ads, modern pop-ups are thoughtfully designed – aligned with the website’s content, discreet, and genuinely valuable for the user.
Why are they effective? Because they show up exactly when the user might be interested in taking advantage of an additional offer or information.
Their strength lies in simplicity and relevance. With forms, you can:
- Collect information about customer preferences, helping you better match your offer and marketing communication to their needs.
- Survey customer opinions about products, services, or shopping experiences. Implementing changes based on this feedback shows that you value their opinion.
You can also create embedded forms in ECDP. These forms are a permanent part of your website. They stay visible in a chosen spot, for example in the footer or on a contact page.
Requirements
Before you start creating forms, make sure that:
- The Web Tracking channel is properly configured. This step requires installing tracking code on your store’s website.
- You have marketing consents configured in the platform. When filling out the form, customers will need to give consent for contact. In the platform, you can configure the following consents for use in forms: for email messages, SMS, or general consent. You can add consents in Settings > Consents > Create new consent.
- Your website has data layer implemented. This is a layer in the website code that stores and organizes information about your store users’ behavior, such as clicks, form interactions, and placed orders. We send information available in the data layer to the platform using the tracking code.
Pop-up form settings
Click Create form > Pop-up and go to the editor. Adjust the form settings in the following steps:
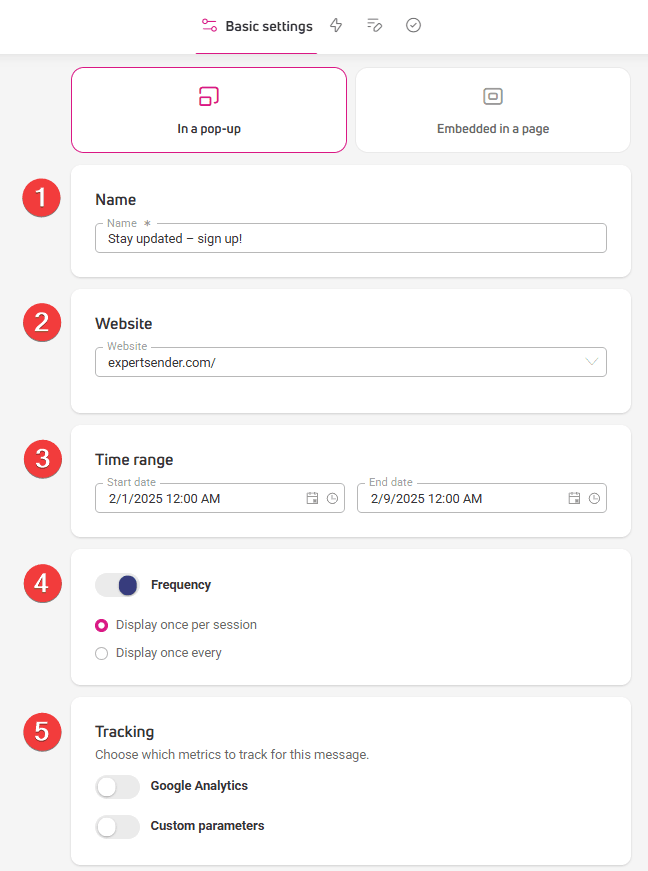
Basic settings
- Give your form a name. It will be visible in the table and make it easier to find the form.
- Choose the website where the form should be displayed.
- Set the time range during which the form should be shown to your website visitors.
- Choose the frequency of form displays: once per session or according to your own schedule.
- Select which indicators you want to track for this form.

Form behavior, display conditions, and audience type
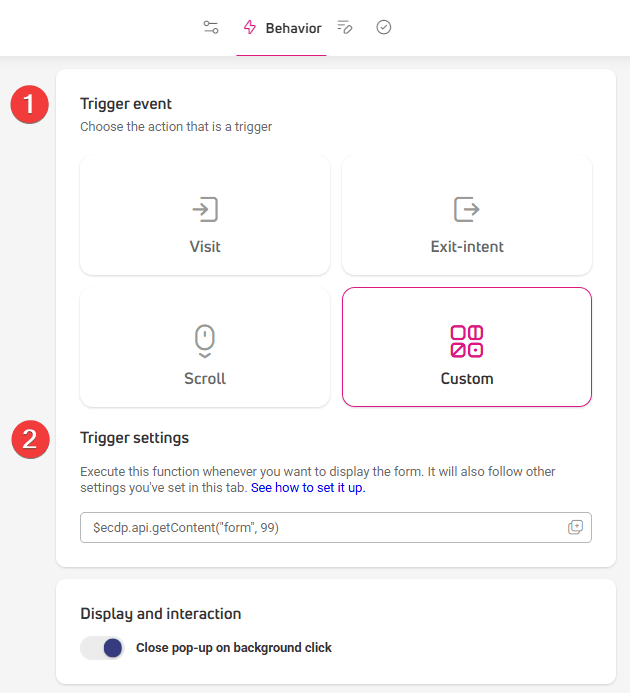
- Choose the event that will trigger the pop-up form:
- Visit – pop-up form will appear when the user enters the page.
- Exit intent – the form will appear when the user moves the cursor outside the store window.
- Scroll – the form will appear when the user starts scrolling the page. Set a threshold (page scroll depth in %) that will trigger the pop-up.
- Custom event — your form will appear when a user takes a specific action in your store, like clicking a button or link, instead of showing up right when they land on the page. To use custom events, you’ll need to complete a few extra steps. You’ll find the instructions in the How to set up a custom event section.

- Decide if users can close the form window by clicking on the background behind it.
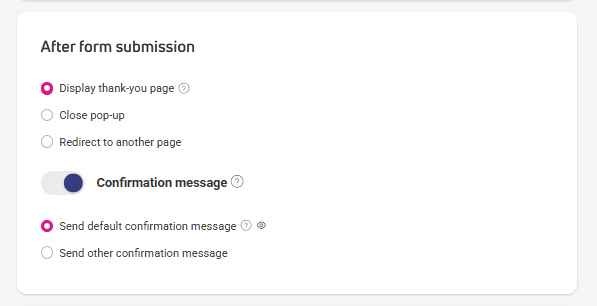
- Decide what happens after form submission.
- In the same section, check the Confirmation message option if you want to send customers an automatic confirmation message after submitting the form:
- Default confirmation available in Settings > Consents > Confirmation messages > Default message
- Other confirmation, e.g., designed specifically for this form.

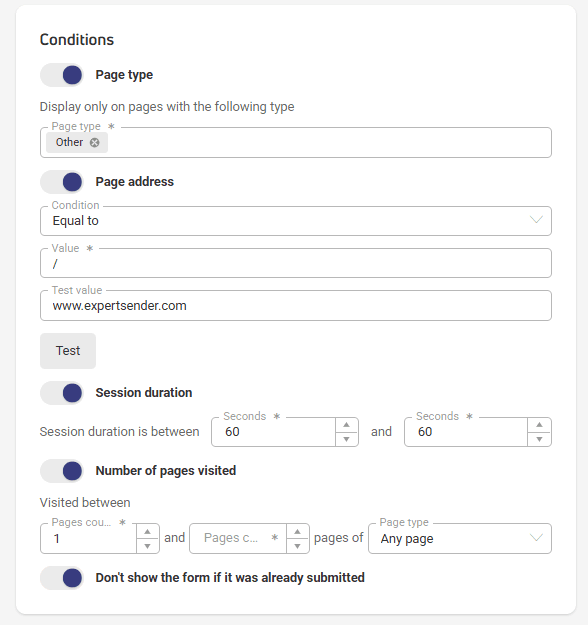
- Set additional form display conditions: page type and address, session duration, number of visited pages, or opt-out from showing the form again to customers who have already submitted it.

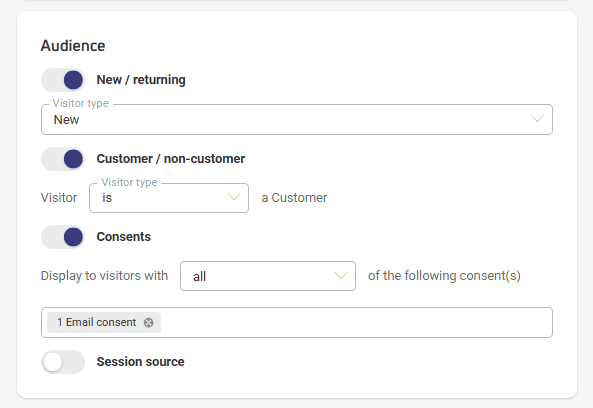
- Decide who will be the recipient, what consents are necessary to display the form, and where the customers you’ll show the form should come from.

How to set up a custom event
A custom event takes the form of a function: $ecdp.api.getContent(type, id, maxWaitTime).
This function contains three parameters related to the content you want to display:
- maxWaitTime – optional parameter (in milliseconds) – determines for how long the system will try to display the banner after a user action. The time range is 0-10,000 milliseconds (defaults to 0 ms). You don’t need to include the maxWaitTime parameter.Add a custom event to your page’s HTML code
- type – required – specifies the content type, e.g. form.
- id – required – specifies the identifier of the specific content you want to display. You’ll find the ID in Automation > Forms > ‘ID’ column.
For the custom event to work correctly and the form to display on the desired action, please wait for our tracking script to load.
You can check this using the function: $ecdp.helpers.websiteIsReady
Add a custom event to your page’s HTML code
You can attach the function to a specific element on your page, like a button or link. This way, your form will appear automatically when someone clicks that element.
Here are two examples. Both use the getContent method, which triggers the form with the specified ID..
Example 1: Button
<button id="myButton">Display a form</button>

<script>
document.getElementById("myButton").addEventListener("click", function() {
    $ecdp.api.getContent("form", 586);
});
</script>
Example 2: Link
<a href="#" id="formLink">Display a form</a>

<script>
document.getElementById("formLink").addEventListener("click", function(event) {
event.preventDefault(); // Prevents the link from navigating
    $ecdp.api.getContent("form", 586);
});
</script>
In both cases, the function:
- «listens» for clicks.
- triggers the form with ID 586 when clicked.
Make sure the selected form has Active status, otherwise it won’t display.
Example 3: Checking if the script has been loaded before triggering the form
// Check if ECDP script is ready and trigger form
if ($ecdp.helpers.websiteIsReady) {
    // Website is ready, trigger the form
    $ecdp.api.getContent("form", 586);
} else {
    // ECDP script not ready yet, wait and check periodically
    const checkReady = setInterval(() => {
        if ($ecdp.helpers.websiteIsReady) {
            $ecdp.api.getContent("form", 586);
            clearInterval(checkReady);
        }
    }, 100);
}
Add a custom event in the drag & drop editor
If you prefer not to edit your page code directly, you can use the HTML content block in the drag & drop editor. This method requires JavaScript code.
In the drag & drop editor:
- Find and add the HTML content block.
- Insert the JavaScript code from the examples above.
- Adjust the element IDs and form parameters to fit your needs.
Important notes
- The form will only load after the function is called.
- It will display only once per page view, for the same combination of type and ID parameters.
- Custom events only work for forms with Active status.
Add a custom event using Google Tag Manager
If you don’t want to manually edit your page code, you can use Google Tag Manager to add a custom event. This solution works well if you’re already using GTM and want to use custom events without developer help.
To use this method, you need a Google Tag Manager account connected to your store.
Create a tag with a custom event that triggers the form
- Go to Google Tag Manager.
- Navigate to the container connected to the page where you’ll place the code.
- Go to the Tags tab.
- Click New to create a new tag.
- Name your tag, for example ‘Custom event – link click’ then click Tag Configuration.
- Select Custom HTML.
- In the HTML section, insert the function with defined type and id parameters, for example: $ecdp.api.getContent(«form», 586); These parameters specify which content created in ECDP will be triggered by the link click.
Set when the tag should fire
- Go to the Triggers section, where you configure the rule that will trigger the tag.
- Select Click — All Elements from the list.
- In the This trigger fires on section, select Some Clicks.
- In the Fire this trigger when an Event occurs and all these conditions are true section:
- in the first field, select Click Text.
- in the second field, set the condition to equals.
- In the last field, enter the text that should trigger the form when clicked.
- Save your changes.
If you don’t see Click Text variable in the dropdown menu, make sure it’s active:
- Go to the Variables tab.
- Click Configure.
- In the Clicks section, check Click Text.
Test if the tag works
- Test if the code was added correctly – click Preview in the upper right corner of the screen.
- Then go to your page and click the text that triggers the form function.
- Return to the preview window and check if the created tag was triggered.
Close the preview window and click Publish.
How to live test an opt-in prompt triggered by a custom event
The function must be called in the browser when you want to test the prompt with a custom event using the «Live test» option:
- Go to your store page and open the Inspect tool:
- using your keyboard by pressing F12,
- or right-clicking and selecting it from the context menu.
- Select the Console tab.
- Type or paste the copied function with the prompt parameters.
- Press Enter to run the script.
This will trigger the prompt directly from the console, which is necessary to activate the custom event.
Form window placement on the page
You can set how the form will display on computer, phone, or tablet screens during the form content design stage.
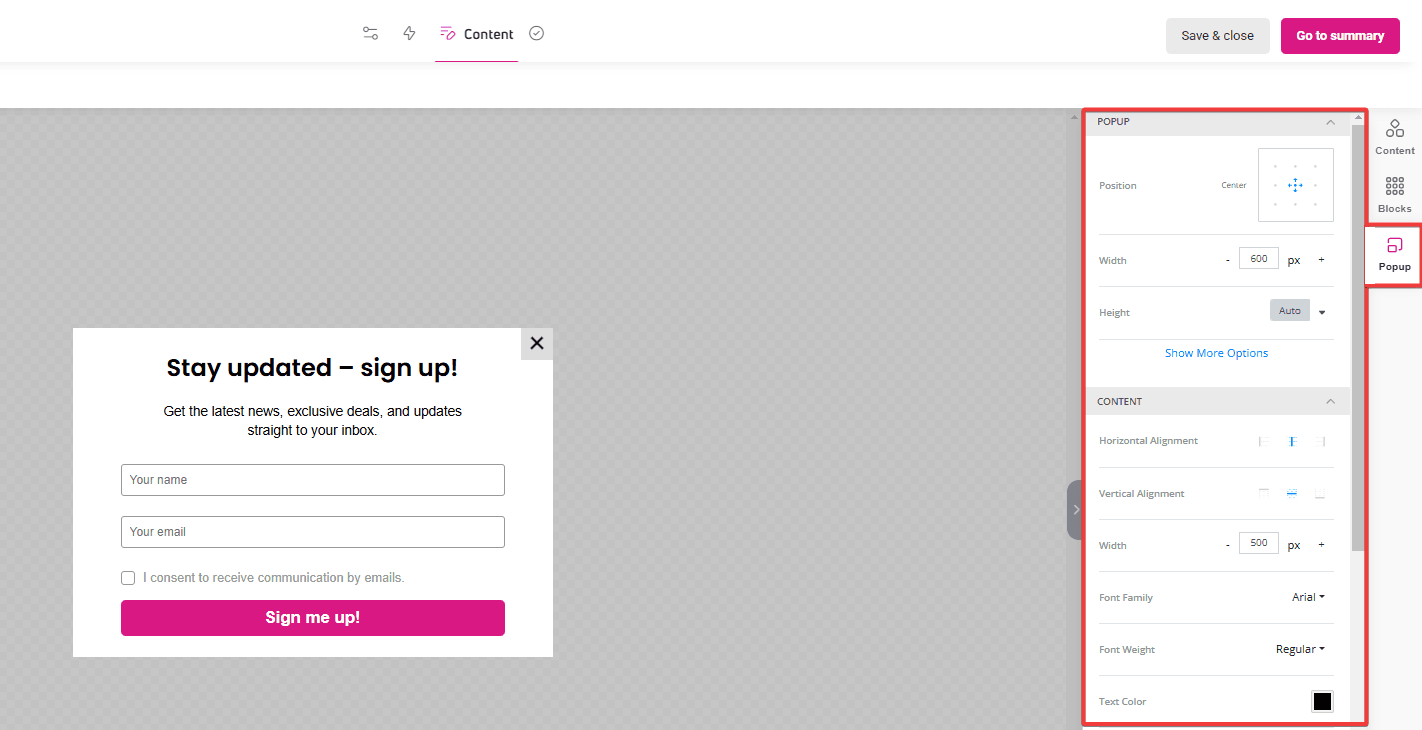
- Go to the Content step.
- Select the Pop-up tab in the right panel.
- In the tab, you can set:
- Form position on screen – center, left, right, top, bottom.
- Form window width and height – in pixels or percentages; you can also choose automatic window adjustment options.
- Rounded corners – this option allows you to round the corners of the displayed form window.

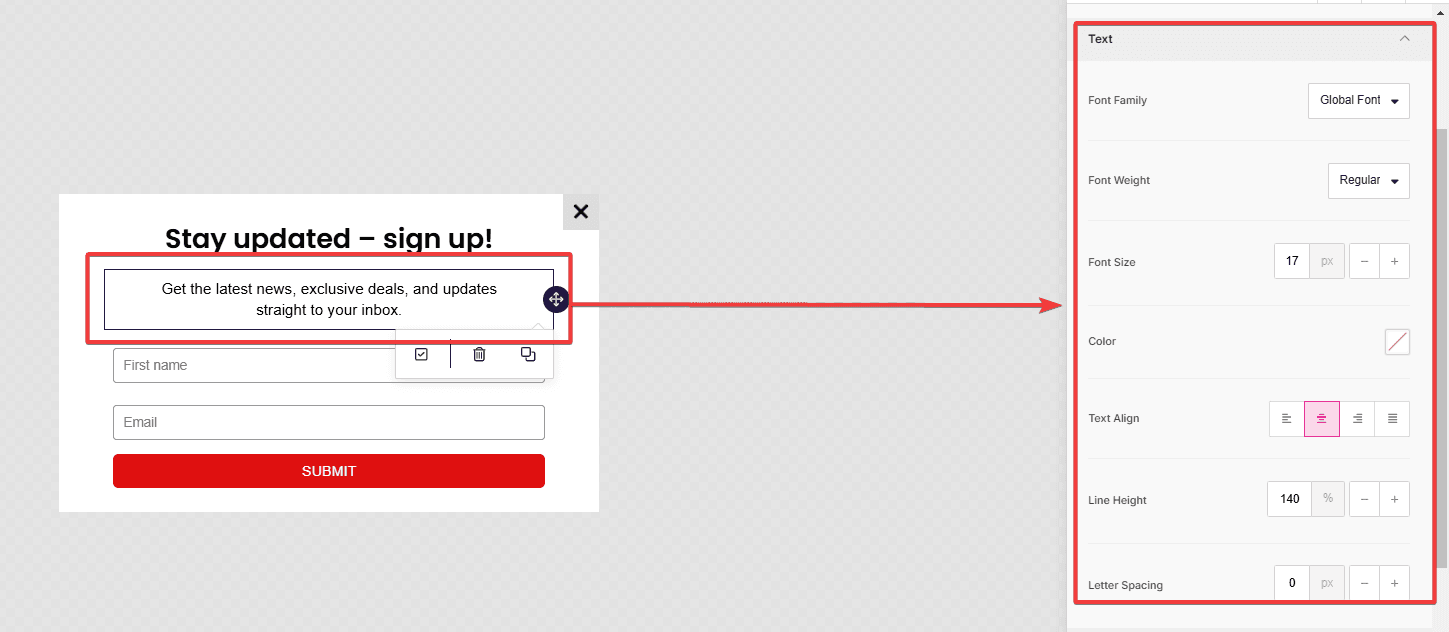
- In the following sections, you’ll set:
- Content – appearance and alignment of content displayed in the pop-up, font type and color, and background color.
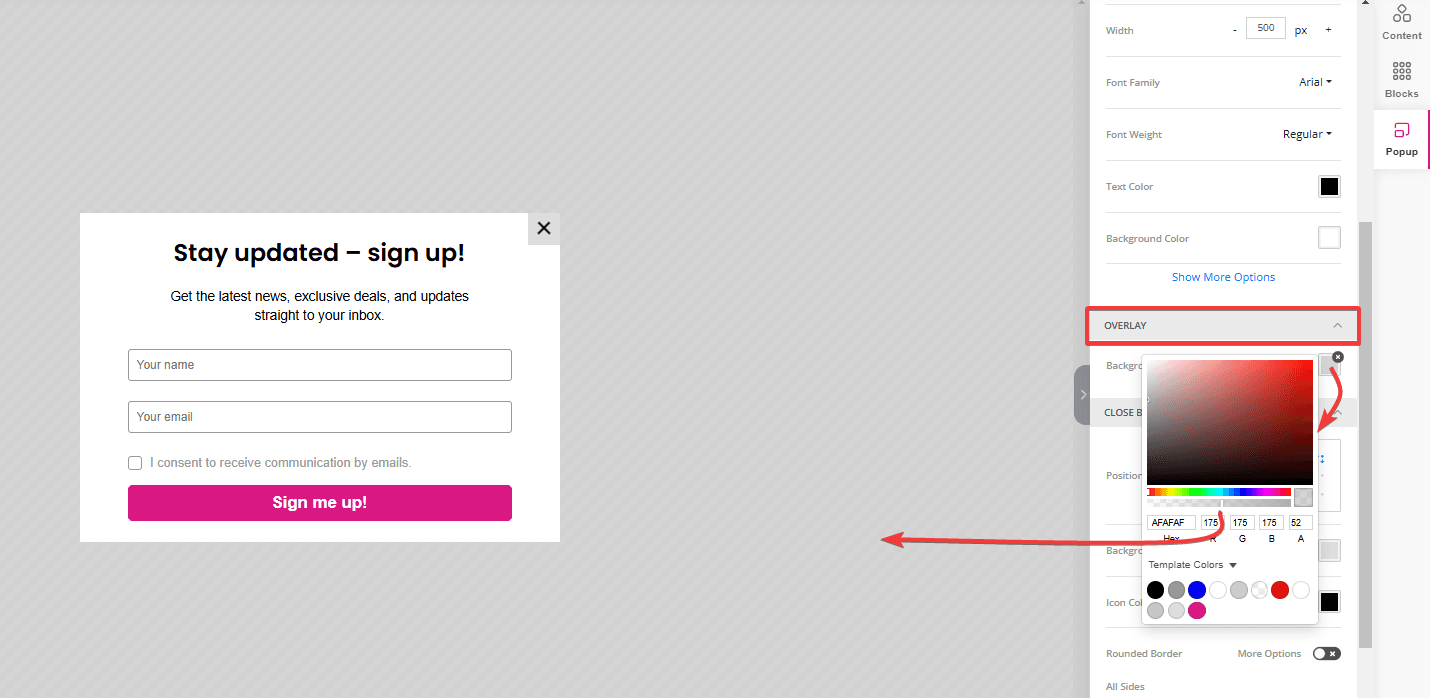
- Overlay – background color that will appear under the pop-up. This makes the form window more visible and helps users focus on the form.

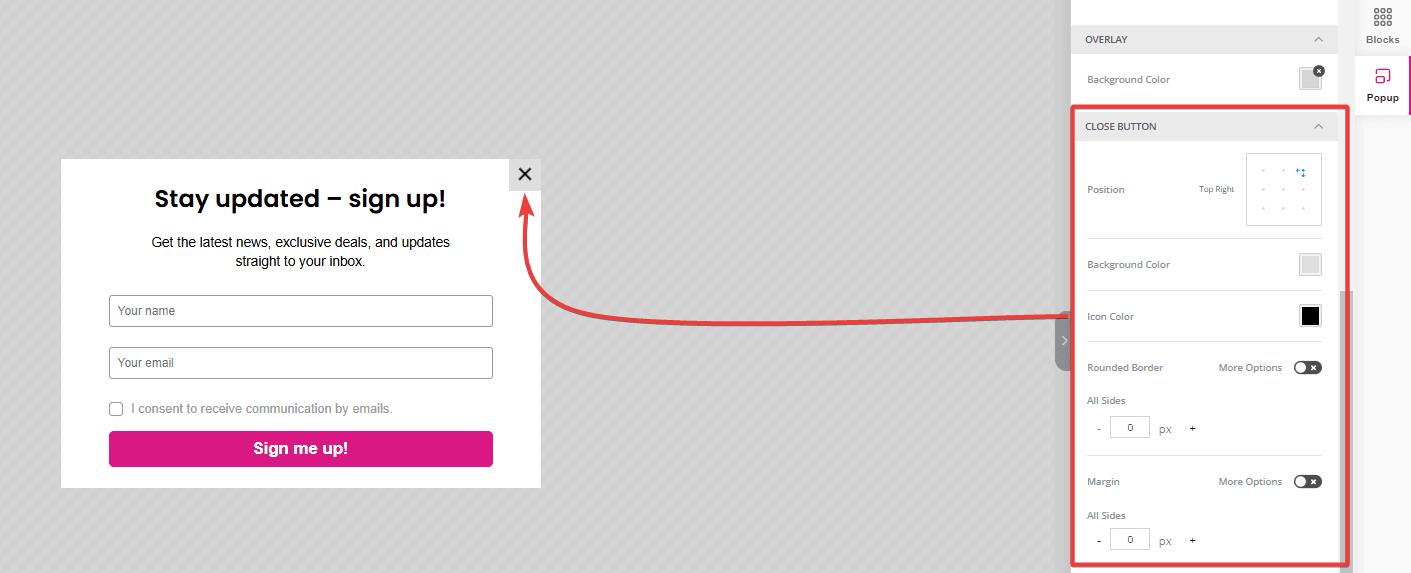
- Close button – appearance and placement of the button to close the form window.

- Links – color, underline, and hover state appearance of links.
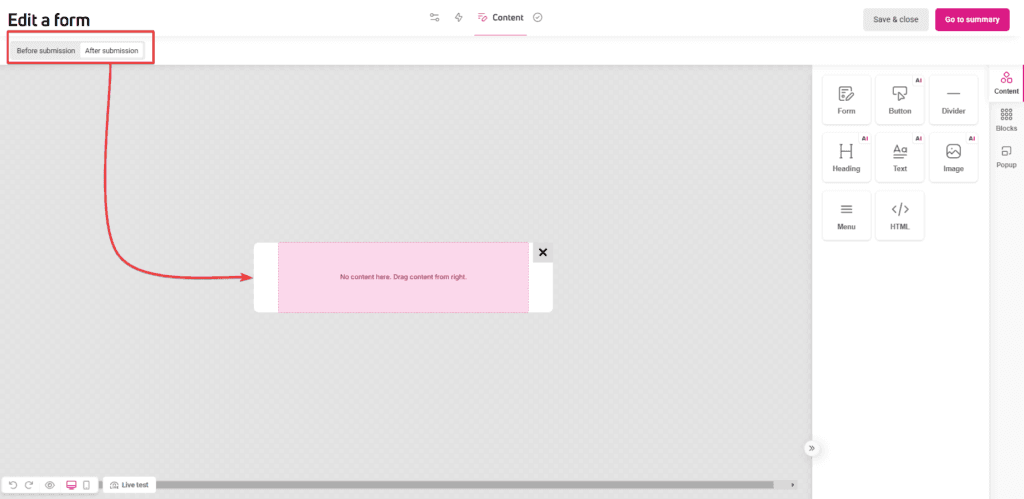
Design form content
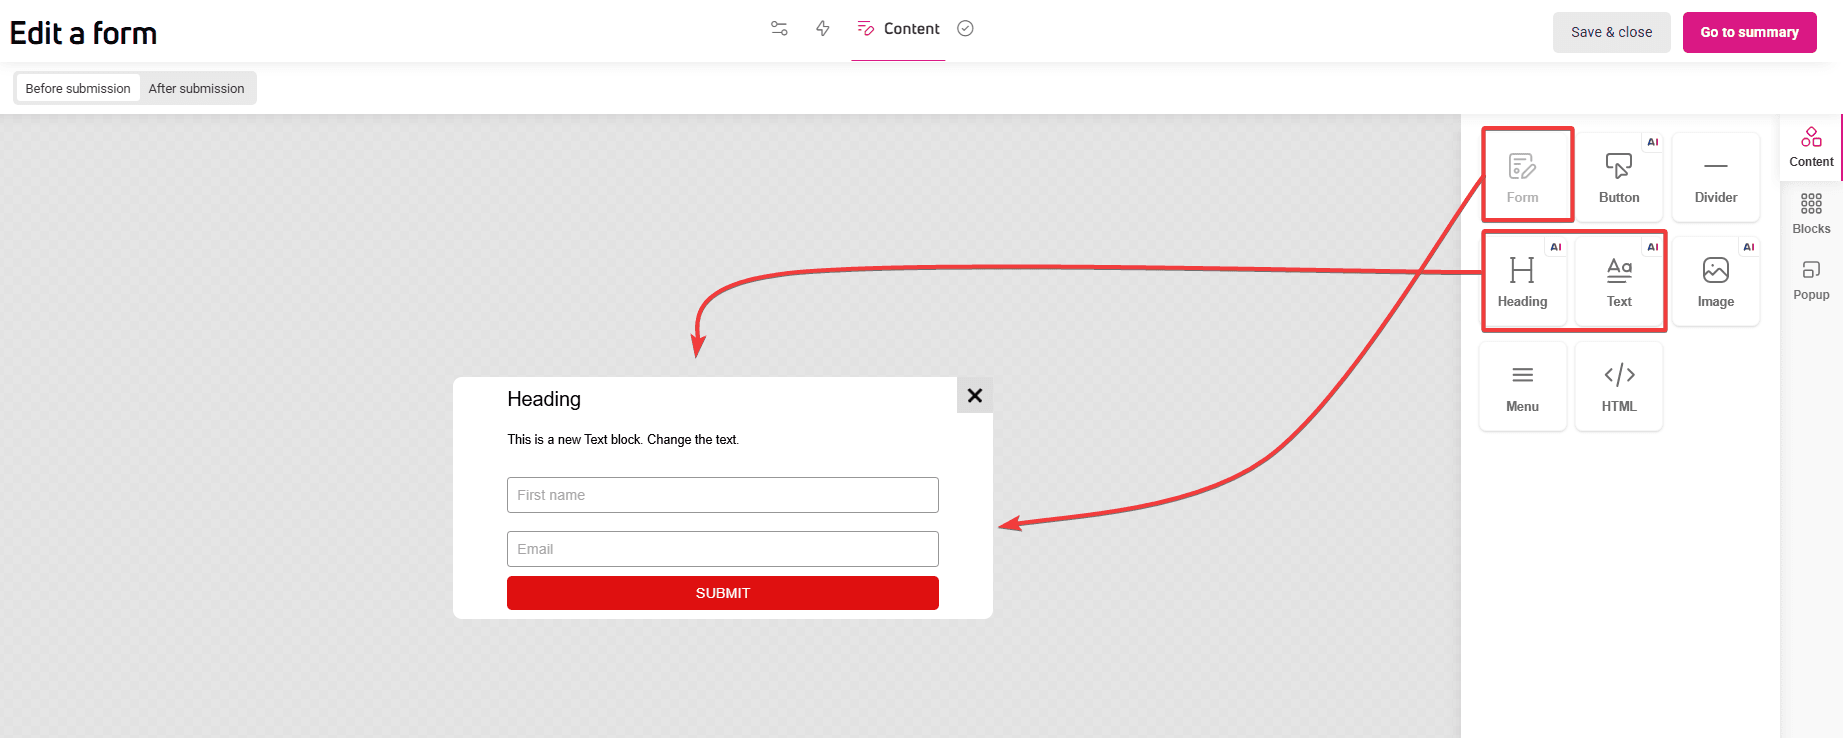
In the editor’s Content section, you’ll design the form’s content and appearance. You’ll find a ready-to-edit template here, but you can also design your own.
- Click the Content section in the right panel.
- Drag and drop the Heading and Text block to the workspace.
- Place the Form block under the Text block.

- Add an engaging copy.

- Click the block to open the editing menu in the right panel.
- In the Display conditions section, you’ll set additional rules for how the form should display. If the options available in the Behavior, Conditions and recipients, and Placement stages aren’t sufficient, you can refine how the form displays and behaves here.
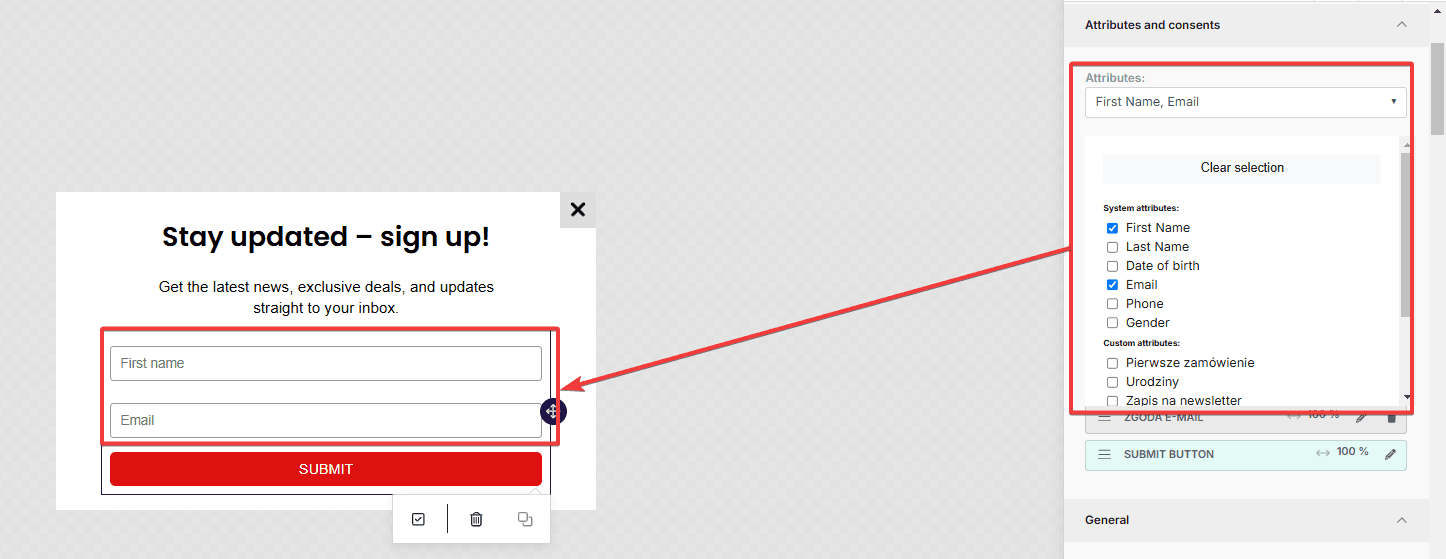
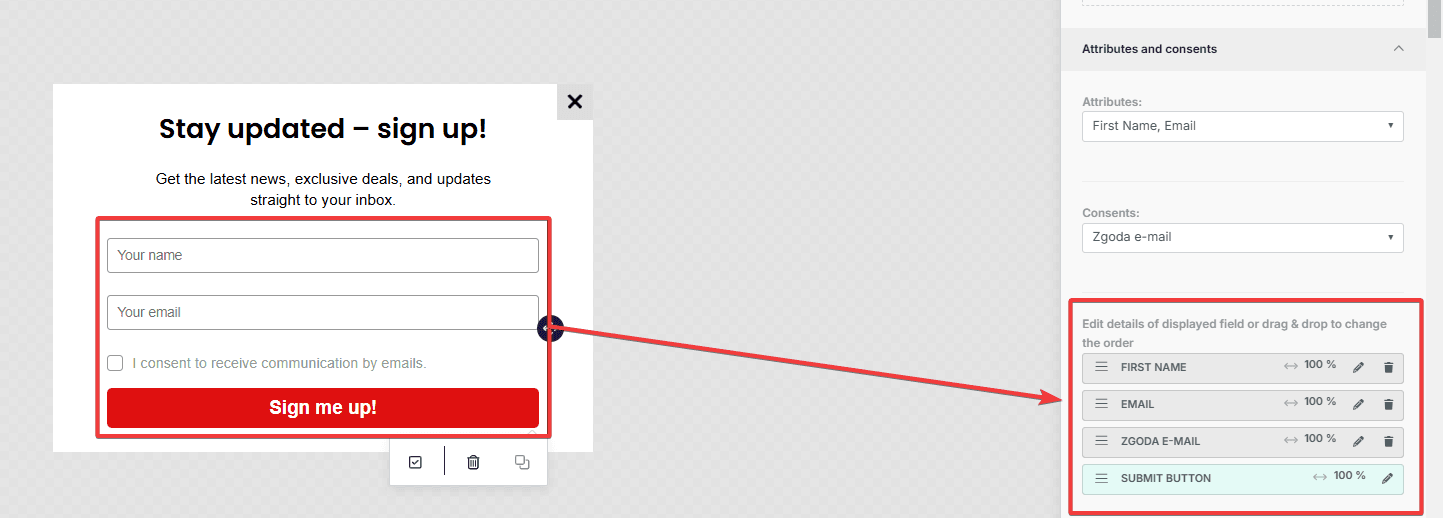
- In the Attributes and consents section, choose:
- Attributes (data) of customers you want to collect through the form, e.g., name, email address. If the attribute you’re interested in isn’t on the list, you can add it here: Settings > Customers > Custom attributes.

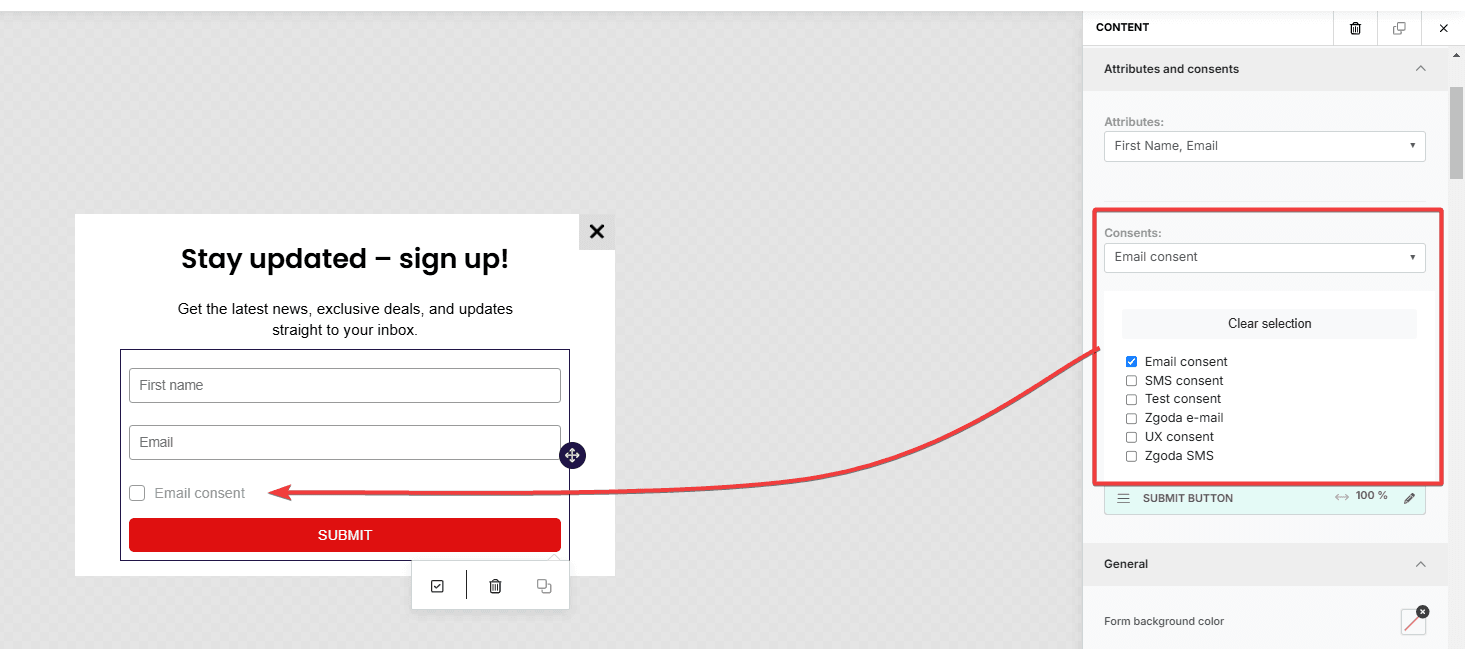
- Consents that customers must give when submitting the form. You can add consents available in the form here: Settings > Consents.

- Attributes (data) of customers you want to collect through the form, e.g., name, email address. If the attribute you’re interested in isn’t on the list, you can add it here: Settings > Customers > Custom attributes.
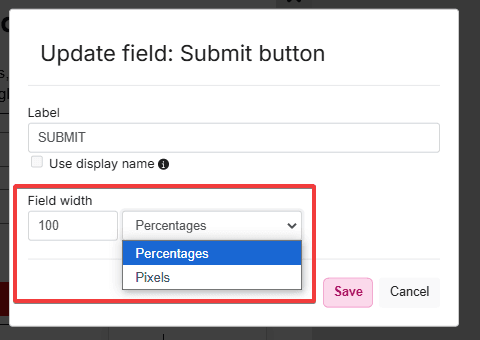
- In the same section, you’ll set the display order and appearance of fields with attributes, consents, and the form submission button.
 What can you do?
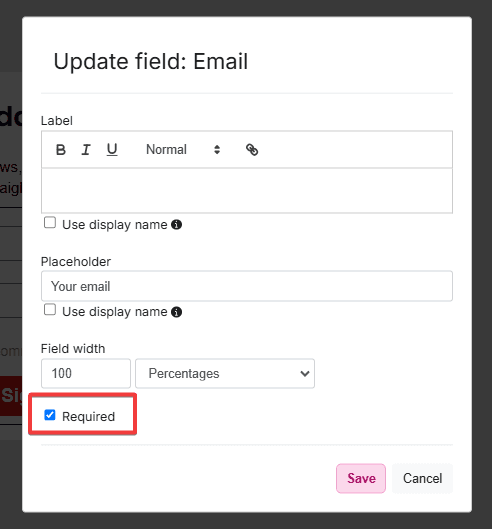
- Add a label displayed above the attribute field, e.g., email address, name.
- Add helper text that will display in the selected field.

- Decide if filling in a particular field is mandatory.

- Add consent name and decide if the consent should be hidden (the consent will be given along with submitting the form, no checkbox and consent statement will be visible int the form).

- Choose how consent should be displayed: radio buttons or switch.
- Set the displayed field width.

 What can you do?

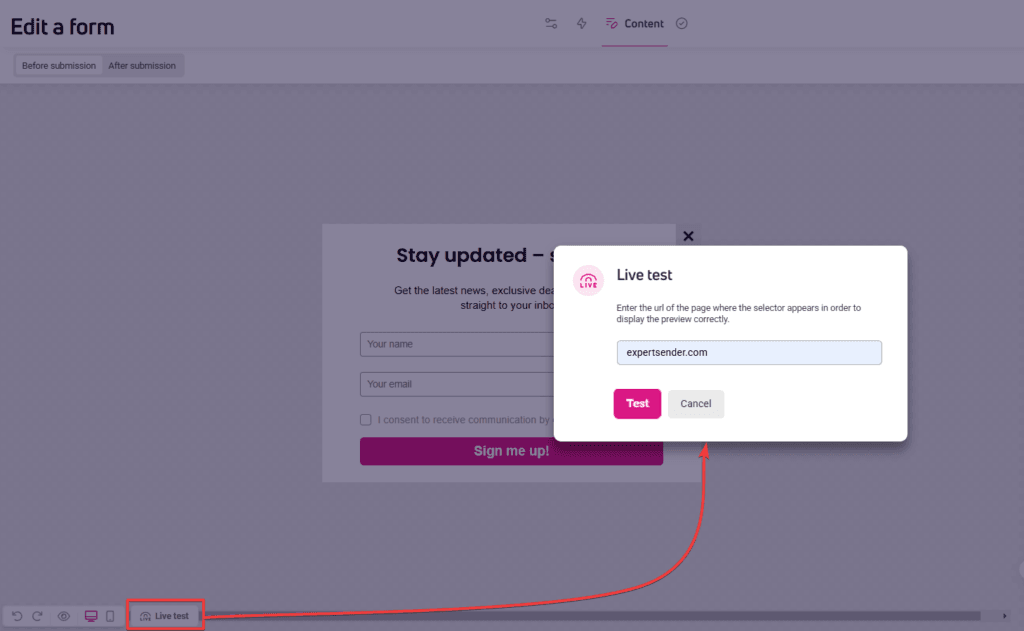
In subsequent sections, you’ll set the appearance of the entire form, individual elements, and whether the form should be displayed in desktop or mobile view. You can also see how the pop-up form will present directly on your page with the Live test option.
You can find a description of other editor functions in the article: How does the editor work?
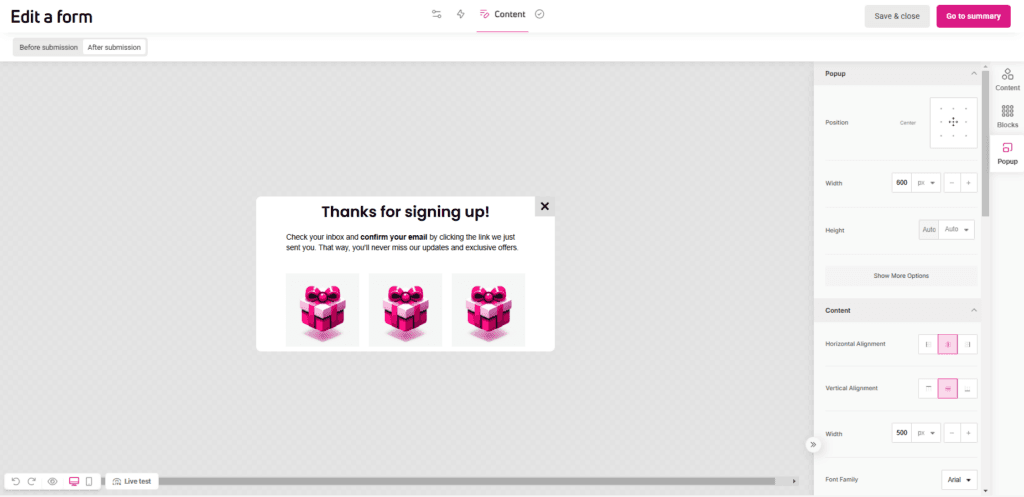
Design the thank-you page
In the editor, you can also design a thank-you page – the view that will appear to customers after submitting the form.
Displaying a thank-you page confirms to customers that their data has been submitted and maintains their positive experience in interacting with your store and brand.
The thank-you page will also help you track conversion and campaign effectiveness through traffic analysis.
You can set thank you page display options in the Behavior > After form submission section.
After selecting this option, go to the Content section. Above the workspace, on the left side, you’ll find a switch.
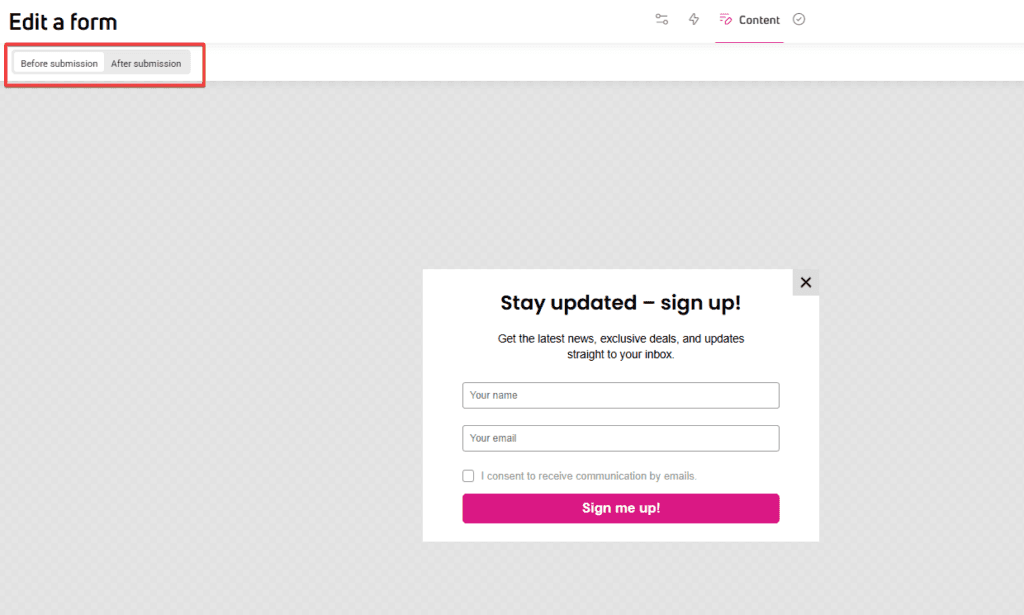
Set it to the After submission position. The thank-you page is ready for editing.
This is what a sample thank-you page looks like, consisting of the Headingr, Text, and Image blocks.
Measuring your results of your pop-up form#
You can track form effectiveness using two metrics:
- Views – shows the total number of form displays in your set time period, across all subpages of your store.
- Submitted – shows the number of forms filled out and submitted by customers.
You can find these metrics in the table available in Automation > Forms.