PrestaShop integration guide
About the module
The ExpertSender Official module is a user-friendly add-on created for e-commerce professionals, enabling seamless integration of PrestaShop-based online stores with ECDP marketing automation platform.
With this module, you can easily configure the synchronization and data mapping parameters in PrestaShop with the corresponding attributes in ECDP.
Module features
- API call setup.
- Adding field mappings from PrestaShop with the fields available on the ECDP side.
- Manual synchronization setup.
- Extended logs.
- Import of existing customer and order data.
- CRON job configuration with a selected frequency to run periodic synchronization at a specified time.
- Automatically adding new customers and orders for synchronization and for resynchronization when this data is updated.
Pre-requisites and compatibility
- PrestaShop compatibility: The module is compatible with PrestaShop versions 1.7.0 — 8.x, accessible via the PrestaShop admin panel.
- System requirements: Ensure you have the necessary API key from ECDP and server credentials if a CRON setup is required.
Before installation checklist:
- Backup your server and database files.
- Obtain the API key from ECDP.
- Have server credentials ready for CRON setup (if required).
Module installation
- Login to PrestaShop admin panel: Go to
Modules > Module Manager. - Backup: We highly recommend backing up your server and database files before installation.
- Upload module: Select
x.x.x-expertsenderofficial.zip, then chooseUpload a module. - Install module: Scroll to find ExpertSender Official and click Install.
- Optional step: Clear cache at
Advanced parameters > Performanceto ensure the module operates smoothly.
Click here to download the plugin.
Module configuration
- Access module settings: Go to
Modules > Module Manager > ECDP > Configure. - Configuration fields:
- API Token: Enter your API ECDP key. (For information on obtaining an API key, see the additional help window below the input field.)
- Website ID: Enter integration-related information, such as your ECDP site ID.
- Mapping setup: Five types of mappings are available: order statuses, order fields, consents, product fields, and customer fields.
- To add a new mapping, go to the Mappings tab, click Add Mapping, and select the PrestaShop field and ECDP attribute.
- Logging options: In the Logs tab, enable Store History Logs to retain synchronization logs for reference. Logs can be downloaded as CSV files.
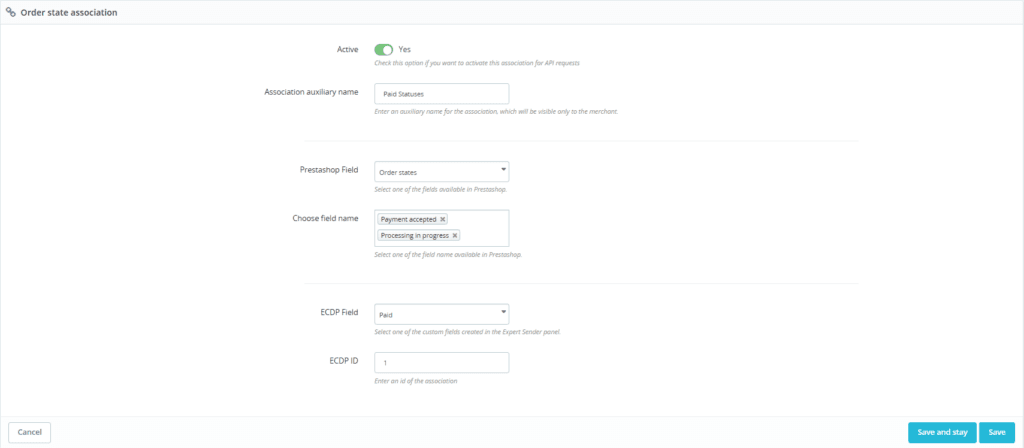
Example mapping setup: To create a common mapping like «Order Status»:
- Go to the Associations tab.
- Click on State Association.
- Select the relevant PrestaShop Order Status and ECDP Order Status.
- Save to apply the mapping.

Running the synchronization process
In the Sync tab, you’ll find two lists: a list of orders and a list of customers pending synchronization. This list updates automatically whenever new customers register, new orders are placed, or data is modified.
Synchronization options
- Automatic sync: Continuous synchronization based on configuration settings.
- Manual sync: For one-time synchronization, click Synchronize.
- Bulk sync: Use Bulk actions for resynchronization of multiple records simultaneously.
Common errors and fixes#
- Phone number format: Ensure all phone numbers include the appropriate country code. ECDP requires to be standardized formatting, or it may return errors.
- Batch size recommendations: Adjust based on server capacity. For large databases, use smaller batch sizes. The default recommended value is 20.
Manual export options
In the Sync tab, users have two options to manually export customer and order data:

Export Orders
In the Export Orders section, you can specify a date range to export all orders placed within that time frame. Follow these steps:
- From: Select the start date to export orders placed no earlier than this date.
- To: Select the end date to export orders placed no later than this date.
Once the date range is set, click Export to add the task to the queue. This task will be executed during the next CRON job or can be started manually from the Sync section by clicking the Synchronize button.

Export customers
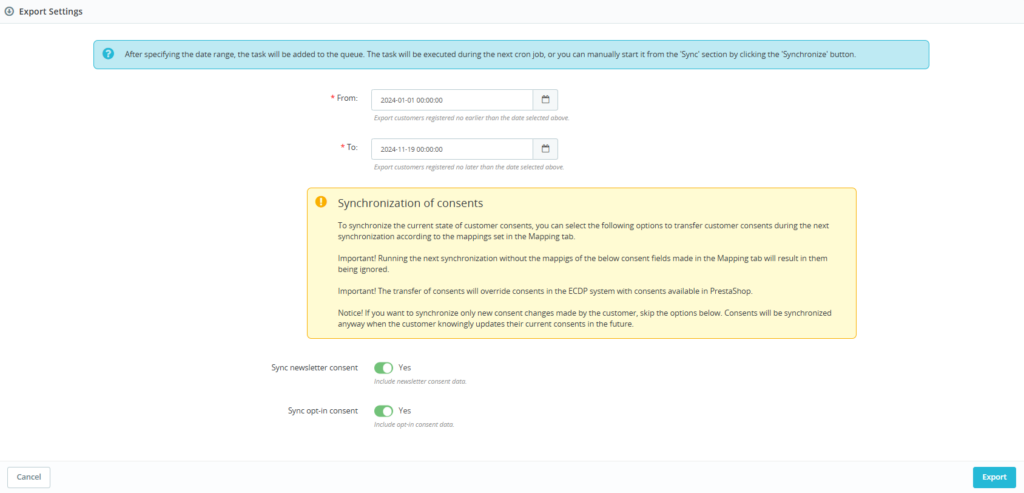
In the Export Customers section, you can specify a date range to export customer data within the selected time frame. Additional options are available for synchronizing customer consents:
- From: Select the start date to export customers registered no earlier than this date.
- To: Select the end date to export customers registered no later than this date.
Synchronization of Consents
To synchronize the state of customer consents, use the options below to export consent data during the next synchronization according to the mappings set in the Mapping tab.
- Sync Newsletter Consent: Toggle to Yes if you want to include customer newsletter consent data during synchronization.
- Sync Opt-in Consent: Toggle to Yes if you want to include opt-in consent data.

Important:
- Running the next synchronization without the mappings of consent fields made in the Mapping tab will result in them being ignored.
- The transfer of consents will overwrite existing consents in ECDP with data available in PrestaShop.
- If you wish to synchronize only newly updated consents, skip these options. Consents will still be synchronized when customers update their current consents.
Once the settings are configured, click Export to add the task to the queue. The task will be executed during the next CRON job or can be manually started from the Sync section.
CRON job configuration
To automate periodic synchronization, configure the CRON job link found in the Sync section.
CRON example:

Frequency recommendation:
- Average-sized stores: Every 4-6 hours.
- High-traffic stores: Every 1-2 hours (based on server performance).