Workflow events
You can include the following events in each workflow:
- Start event
- End event
- Send email
- Send SMS/MMS
- Send Web Push
- API call
- Execute Code
- Delay Event
- Set data
- Data switch
- Winner switch
- Distribution switch
- Comment

Start event#
The Start event describes subscribers’ entry conditions to each workflow. It is a required element to activate each workflow. There can be more than just one Start event in each workflow, which allows to use the same marketing scenario for subscribers entering it due to different business reasons.
Start event settings allow to specify when and which subscribers will enter the workflow, as well as how to identify and handle duplicate subscribers.
How to configure the start event?#
Types of the Start event:#
- Opt-in – a subscriber enters the workflow upon opting-in to a list
- Open – a subscriber enters the workflow upon opening a message
- Click – a subscriber enters the workflow upon clicking a link inside a message
- Goal – a subscriber enters the workflow upon completing a goal tracked by the email platform
- Scheduled – the workflow will commence for selected subscribers at a specified time/date or upon predefined recurring schedule
- Custom event – a subscriber enters the workflow upon an API call triggering a predefined custom event. Custom events must be predefined to appear on the selection list.
List#
Some types of start events require a subscriber list to be indicated. For example, the list is a required parameter for the Opt-in start event type. This, combined with the type of the start event, indicates which subscribers will enter the workflow.
Segment#
As with regular message types, Workflows can be initiated not only for subscribers pulled from specified lists, but also for subscribers defined by lists and segments. Segments use demographic or behavioral restrictions to narrow or broaden the scope of subscribers. In order to use them in a workflow, they need to be predefined in the Subscribers > Segments section.
Handling duplicate subscribers#
In case the same subscriber matches the conditions to enter a workflow, while still going through it due to a previous match, the user allows to determine how a duplicated subscriber should be handled.
There are 3 options to choose from:
- Create new instance – in this case the subscriber enters the workflow again without affecting its earlier state in the cycle. The former instances proceed through the workflow events, while another cycle starts for the subscriber upon meeting the entry criteria.
- Ignore – in this case the subscriber will NOT enter the workflow again. The former instance proceeds through the workflow events unaffected.
- Move to start – in this case the subscriber enters the workflow pipeline again, while his former instance gets reset.
Data field used as an additional duplicate identifier#
By default, an email address is used as the unique identifier of a subscriber within a workflow. It is possible to add at least one data field as an additional identifier in order to distinguish a duplicated subscriber.
When additional data fields are set, the subscriber with the same email address and values of all specified data fields is treated as duplicate according to the Handling duplicate subscribers settings.
The only way to supply the value of data fields is to start a workflow using the Custom event API call.
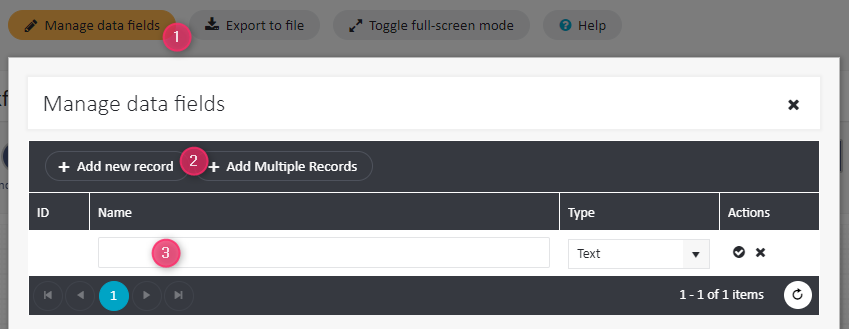
Data fields must be predefined for each workflow before they can be used within it. Click Manage data fields, and choose Add new record or Add multiple records to add new data fields:

End event#
This is a mandatory event that marks the end of the process for the subscribers that entered the workflow. Once reached, it marks the workflow as completed for a given subscriber and any data fields that were associated with a subscriber are removed. It is possible to have multiple End events set up within a single workflow, which is especially handy with more complex workflows.

Send email#
When a subscriber reaches this event in a workflow, an email message is sent to that subscriber. The only setting of this event requires selecting a predefined email message. To select an email message, it must not be in use within the same or other workflows.

Send SMS/MMS#
Send a predefined SMS or MMS message. Note that you may only use a message created as a workflow SMS/MMS message, and, like with email messages, you cannot use the same message more than once.

Send Web Push#
Send a predefined Web Push notification. Note that you may only use a message created as a workflow Web Push message, and, like with email messages, you cannot use the same message more than once.

API call#
This event allows you to send an API call from within a workflow.
How to set up an API call?#
Note that this option was created to enable accessing foreign APIs, rather than the ExpertSender API. If you need to send an ExpertSender API call from within the workflow, analyse what this call is expected to do and use another workflow event which achieves exactly that. In case of doubt, consult your Account Manager.
To configure an API call:
- Click on the API call icon on the workflow diagram. You will see the configuration window.
- Enter the Name and Description of the call.
- Within an API call, select the request type:
- GET – to obtain data
- POST – to create new data
- PUT – to update data
- DELETE – to delete data
- Enter the URL of the call (including query parameters, if relevant).
- Under Header you may add HTTP headers.
- You may choose to save the response in a data field. Note that in order for a data field to be used within a workflow, it also needs to be created within this workflow. To create a workflow data field, click Manage data fields, and choose Add new record or Add multiple records.

- You may also check if the API call returns a desirable response for a given email address. Under the Test Call heading enter any email address which belongs to one of your lists and click the Test Call button.

Execute Code#
This event allows to run a piece of Dynamic Content code.

Delay event#
The Delay event allows to temporarily prevent subscriber from advancing to the next event in the workflow. There are three types of the Delay event:
- Time-lapse – it halts the subscriber for the specified amount of time (defined in minutes/hours/days/weekdays/weeks/months)
- Time-lapse with custom field – it halts the subscriber for a specified amount of time that relates to a date/time stored in the subscriber’s custom field (for instance, one week after the last login, or a month after the last purchase)
- Specific date time – it halts the subscriber until the occurrence of a specified date and/or time

Set data#
It allows to set or change a value of a custom field of each subscriber reaching this event in the workflow. Depending on the type of the custom field, there are following options:
- Set to constant – sets the field to a constant value, such as a predefined text (for fields with the Text type), number (for numeric fields) or True/False (for fields of the Boolean type)
- Increase by constant – increases the field value by a constant, e.g. adds 1 to the number of orders placed by the subscribers (option available for numeric fields only)
- Decrease by constant – decreases the field value by a constant, e.g. subtracts 1 from the number of orders the subscribers can have a discount on (option available for numeric fields only)
- Set to data field value – sets the field to a value provided in an API call which triggers the event
- Increase by data field value – increases the field value by a value provided in an API call which triggers the event (option available for numeric fields only)
- Decrease by data field value – decreases the field value by a value provided in an API call which triggers the event (option available for numeric fields only)

Data switch#
Data switch allows you to divide the stream of subscribers in a workflow into several branches, based on subscriber data. The Data switch event allows to create between 2 and 10 branches, which are added or removed using the + and – buttons below the event on the workflow canvas. Each branch of the switch is assigned to one of the predefined segments or Data Fields.
How are subscribers divided into branches?#
To get into a particular branch, the subscriber must fulfill the conditions of the corresponding segment. Since segments can intersect, the subscriber will fall into the first branch, to the segment of which he or she belongs. This means that the order of branches in the data switch matters.
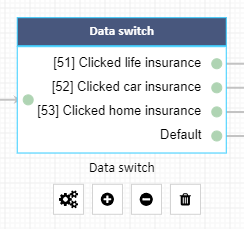
In the example above, we divided our subscribers into three segments: those who clicked a life insurance offer, car insurance and home insurance. Of course, there may be subscribers who clicked two or all three insurance offers. However, our data switch establishes a hierarchy: each subscriber who clicked on life insurance falls into the first branch and is excluded from further analysis, even if he or she clicked car and home insurance.
If the subscriber does not match any of the segments, it will go along the Default branch. This assures that none of the subscribers will “get stuck” inside the switch.

Winner switch#
The winner switch is an option which performs a split test of a message. It sends two (or more) versions of a message to selected test groups of recipients in order to determine which of them is more effective (for example, which of them was opened more frequently). Then, the remaining subscribers receive the winner variant of the message.
How to configure the winner switch event?#
To configure the winner switch event:
- Before you use the winner switch event, prepare between two and five versions of your message in the workflow message wizard. They may differ in subject, content, styling, or anything you may want to test.
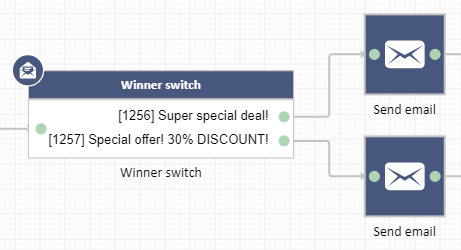
- Link the Winner switch event with the proper number of Send email events (Winner switch cannot be connected with an event of any other type).
- Click on each Send email event and select the right message variant for each.

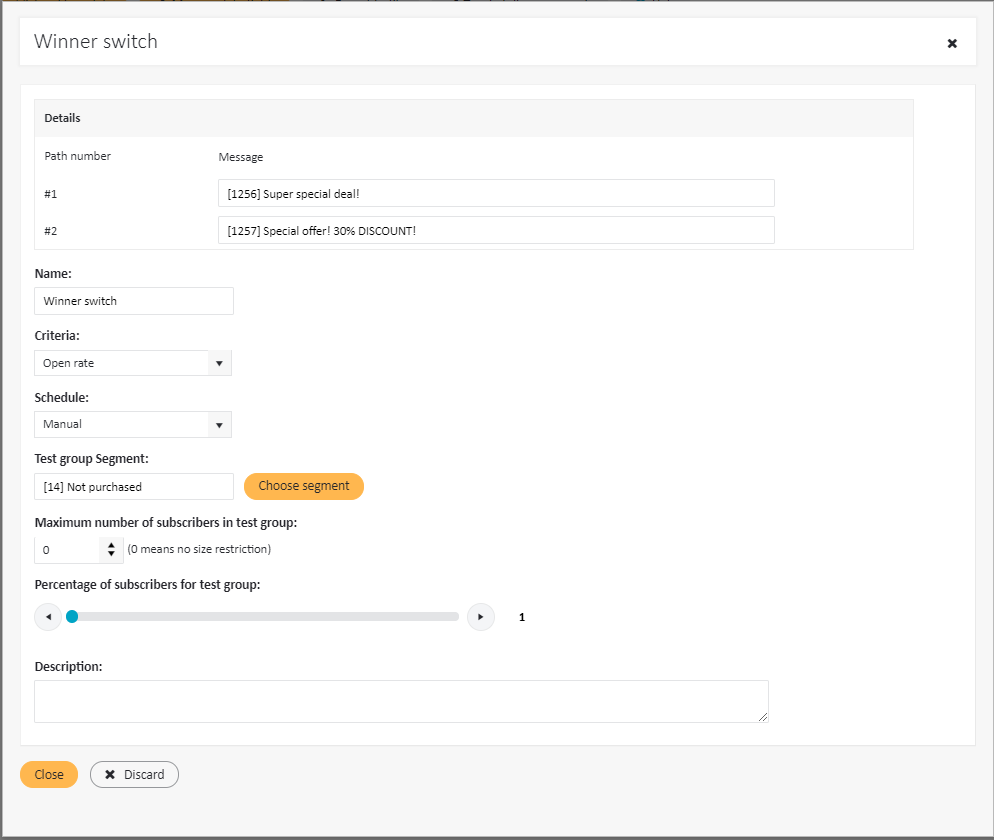
- Click the winner switch event to open the settings window. Under Details you should now see your desired paths along with the corresponding message variants:

- Under Name you may add a custom name to the event.
- Under Criteria determine the condition used for selecting the winner variant:
- Open rate – the variant which was opened most frequently is the winner
- Click rate – the variant which generated the most clicks on embedded links is the winner
- Goal rate – the variant which generated most conversions is the winner
- Goal value summed amount – the variant which generated the biggest profit from conversions is the winner
- Under Schedule you may select the time when the winner will be selected. Note that a workflow always works as long as there are subscribers who fall into the Start event. This is why it is important to decide when the winner should be picked. There are following options available:
- Manual – this option will allow the user to choose the winning message manually at a time considered appropriate by the user
- One time – the decision about the winning message will take place at a predefined date/time
- Continuous – due to the on-going nature of workflows it is possible to have the split-test working on a recurring basis. It allows to constantly test the current winning version (champion) with other split tested messages (contenders). In this mode some randomly selected subscribers (test group) always receive one of the contending split test email messages, while the majority continue to receive the last determined winner. If the results from any contending email message starts performing better than the current winner, it automatically replaces the winner. The winning message is determined once per day at midnight based on the activity ratio indicated in the settings of the Winner switch (opens, clicks, conversions, value of conversions). While making the decision the Winner switch considers data from the previous day (sends from the previous day and activities from the previous day). If there was no sends yesterday, then the decision will not be made.
- Under Test group segment it is possible to select a specific segment as the test group for the Workflow split test. For example, the option could be used to perform the test only at the most active subscribers. This way, in a continuously performed split test the less active subscribers will be always getting the previously selected winner, while the most active subscribers will become members of the test group and will be randomly receiving the other messages that are being tested.
- The Maximum number of subscribers option allows defining the maximum size of the test group. Subscribers selected for the test group will receive one of the split tested versions to determine the winning version based on the selected metric (open rate, click rate, goal rate or goal value). For workflows designed to process tens of thousands subscribers daily it makes sense to setup a relatively high maximum limit. On the other hand, workflows designed to process lower traffic should have the size limit set relatively low, as otherwise determining the winner might take very long or in some scenarios might never be determined. Note that in the Continuous mode of the Winner switch the test group is reset every day at midnight. Pausing or stopping an active workflow also resets the test group as well as the last winner. In case there was no winner previously selected and the test group limit is reached, all of the exceeding subscribers preselected for the test group are put on hold until the winning version is selected.
- Use the slider under Percentage of subscribers for test group to set the ratio of subscribers who has just reached the Winner switch event who will be selected for the test group. When set to 100%, all subscribers are selected until the limit is reached or the winner is selected. With the slider set to 50%, half of the subscribers receive one of the split tested variants, while the other half receive the previously selected winning variant.

Distribution switch#
The Distribution switch event is yet another feature that allows redirecting fixed proportions of the subscribers onto different predefined paths.
It is possible to use the Distribution switch to divert subscribers into between 2 up to 10 directions. The number of directions is set using the + and – icons under the Distribution switch event on the workflow canvas:
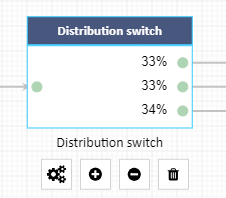
The settings of the Distribution switch event allow to set percentage of randomly selected subscribers to be distributed onto each path. Note that the Distribution switch will not work properly unless all the percentages add up to 100%.

Comment#
This element does not influence the subscriber experience in any way. However, with the Comment element it is possible to leave notes at the workflow canvas that may be later useful in reminding some thought behind the flow of the customer journey.
