Scheduled tasks
Scheduled tasks can be used to import data into a subscriber list, suppression list, blacklist or data table. Import is carried out either from an FTP server or via a direct link to a file.
To access scheduled tasks, select Scheduled Tasks from the left-hand navigation and choose one of the available options:
Imports to Lists#
This option allows you to automatically update your subscriber lists by importing them from ftp or a file at regular intervals.
The table under Imports to Lists displays all of the scheduled imports to lists which are currently active, inactive, deleted or in draft.
To schedule a new import to lists, click Import to subscribers list under Imports to list:

You will see a wizard consisting of 5 steps:
#
Step 1: Source#
In the first step, specify the address of the CSV file from which the data will be imported and provide the credentials necessary to access it:
Uri: the address of the file on a FTP server in one of the following formats:
ftp://domain.com@ftp.esv2.com/subscribers.csv
ftp://domain.com/subscribers.csv
Where:
- domain.com is the user name
- ftp.esv2.com is the host name (optional)
- subscribers.csv is the name of the file in the CSV format
Login: the user name for the FTP server (the same as domain.com in the Uri)
Password: the password for the FTP server
Authentication mode (only for FTP): if the FTP server uses the TLS or SSL technology for authentication, you may specify it here. Otherwise, leave the (none) value.
Use active connection mode: if the FTP server allows you to connect using the passive connection mode, you may leave the checkbox unchecked. If it doesn’t work, check it to try the active connection mode.
Mask for importing multiple files, e.g. *.csv (only for FTP/SFTP): Fill in this field only if you are importing more than one file at once. Mask is a string of characters which reoccurs in the names of all files which should be imported.
How does the mask work?#
For example, you have an FTP server which is replete with data and files. However, you do not want to import all of them, since only a couple are relevant to you. Then it is advisable to rename all relevant files by including a keyword in the name, e.g. import: import_subscribers1.csv, import_key_subscribers.csv etc. Then, using the word import as a mask will help you target only these files which contain in their names.
If you are importing one specific file, leave this field blank.
Delete file(s) from remote server after download (only for FTP/SFTP): when this checkbox is checked, the .csv file is deleted from the server after each import. Since ExpertSender will upload the file each time under the same name, then, in essence, the only difference is in how you will upload the file to FTP. If it is convenient for you to simply write the file, then set the checkbox for deletion. If you can overwrite the file located on FTP, then deletion is unnecessary.

After filling in all fields, click Check file. If the access data are correct and the system finds the file, a pop-up message will inform you that the file is ready for download.
Click Next.
Step 2: Target#
Enter the name of the task, which will be displayed on the list of scheduled tasks, as well as select the list of subscribers with which you want to integrate the data from the file.
Click Next.
Step 3: Import setup#
At this step, all import settings need to be configured in the same way as in a standard import. In the first box under Import settings you will be able to specify what relation the imported data should have to the data already present on the list. When you are creating a brand new list, just leave the default options at the Import settings tab and click Next. Otherwise, you may decide if you want to add new subscribers to the list and/or update or replace the data of subscribers who are already list members. Furthermore, if the imported file contains the data of subscribers who unsubscribed from the list or who were manually removed for some reason, specify if you want to import them again.
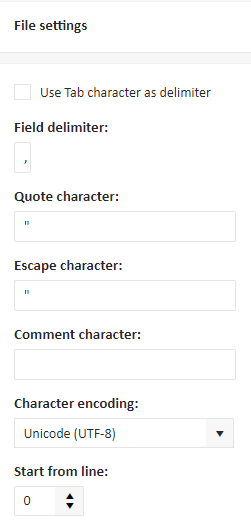
In the window below, specify the delimiter (the character which separates fields in each row) used in the file. If the file contains quotes, escaped characters, or comments, you may also specify a quote, escape and comment character respectively. Select the character encoding used in the file and the line from which data import should start.
Below you will see a column preview with the data extracted from the updated file:
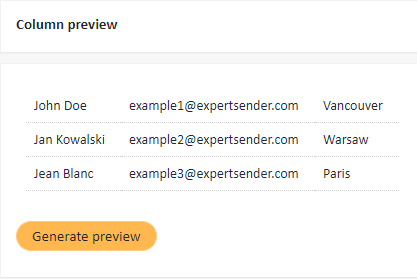
If the division into columns is correct, click Next.
Step 4: Map columns#
In step 4, choose the matching mode:
Matching mode#
If you already have any other subscriber lists, it may be the case the subscriber you are adding is already a member of one of those lists. In such a case, all of the fields which were filled while adding the subscriber will be reused now and updated accordingly. Choose the Matching mode, i.e. the criterion which will be used for comparing subscribers across lists: Email, Phone or Custom subscriber ID. It is important that all three parameters are unique within the whole business unit. Updating one of them will update the other two.
In the next box, map the columns from the file to the fields which will be stored in the database. For example, if the first column contains email addresses, import it as Email. If another column contains the subscriber’s first name, import the column as First name. You may choose not to import certain columns you deem unnecessary.

Click Next.
Step 5: Recurring#
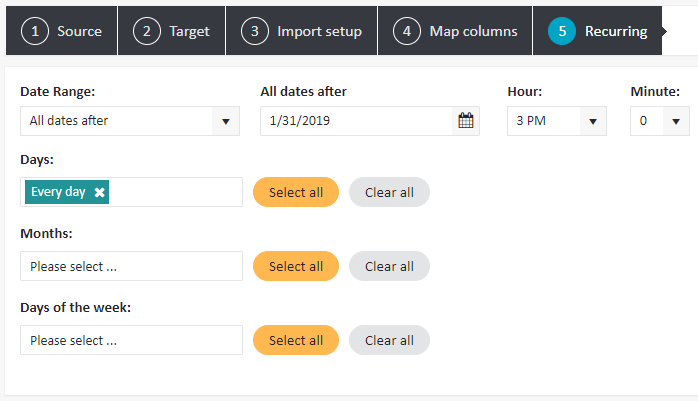
The last step allows you to specify the interval at which the automatic import will be carried out. There are multiple options available which will let you indicate very precisely within what Date Range (e.g. Next 7 days, Next Month, All dates after…, etc.) the imports will take place, at what time, and how often (e.g. Every day, on the 8th day of the month, on Monday, etc.).
For example, in the following configuration the import will take place every day from 1/31/2019 onward, exactly at 3 P.M.:
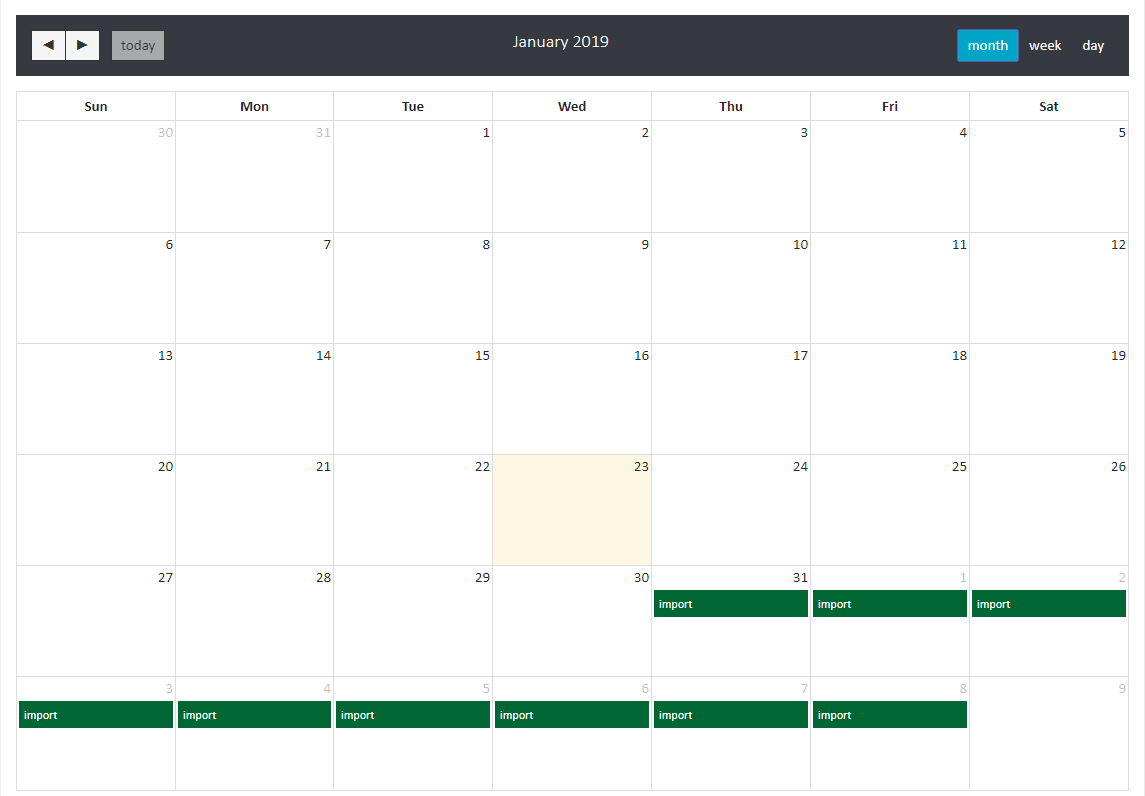
After you specify your time frame, the scheduled import will be put on the calendar displayed below:
Imports to Suppression Lists#
This option allows you to automatically update your suppression lists by importing them from ftp or a file at regular intervals.
The table under Imports to suppression lists displays all of the scheduled imports to suppression lists which are currently active, inactive, deleted or in draft.
To schedule a new import to lists, click Import to suppression list under Imports to suppression lists:
You will see a wizard consisting of 4 steps:
#
Step 1: Source#
In the first step, specify the address of the CSV file from which the data will be imported and provide the credentials necessary to access it:
Uri: the address of the file on a FTP server in the following format:
ftp://domain.com@ftp.esv2.com/subscribers.csv
Where:
- domain.com is the user name
- ftp.esv2.com is the host name
- subscribers.csv is the name of the file in the CSV format
Login: the user name for the FTP server (the same as domain.com in the Uri)
Password: the password for the FTP server
Authentication mode (only for FTP): if the FTP server uses the TLS or SSL technology for authentication, you may specify it here. Otherwise, leave the (none) value.
Use active connection mode: if the FTP server allows you to connect using the passive connection mode, you may leave the checkbox unchecked. If it doesn’t work, check it to try the active connection mode.
Mask for importing multiple files, e.g. *.csv (only for FTP/SFTP): Fill in this field only if you are importing more than one file at once. Mask is a string of characters which reoccurs in the names of all files which should be imported.
How does the mask work?#
For example, you have an FTP server which is replete with data and files. However, you do not want to import all of them, since only a couple are relevant to you. Then it is advisable to rename all relevant files by including a keyword in the name, e.g. import: import_subscribers1.csv, import_key_subscribers.csv etc. Then, using the word import as a mask will help you target only these files which contain in their names.
If you are importing one specific file, leave this field blank.
Delete file(s) from remote server after download (only for FTP/SFTP): when this checkbox is checked, the .csv file is deleted from the server after each import. Since ExpertSender will upload the file each time under the same name, then, in essence, the only difference is in how you will upload the file to FTP. If it is convenient for you to simply write the file, then set the checkbox for deletion. If you can overwrite the file located on FTP, then deletion is unnecessary.
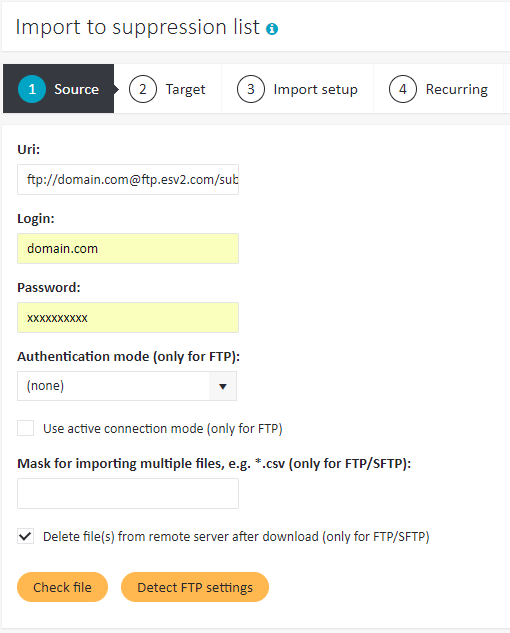
After filling in all fields, click Check file. If the access data are correct and the system finds the file, a pop-up message will inform you that the file is ready for download.
Click Next.
Step 2: Target#
Enter the name of the task, which will be displayed on the list of scheduled tasks, as well as select the list of subscribers with which you want to integrate the data from the file.
Click Next.
Step 3: Import setup#
In the File settings window, specify the delimiter (the character which separates fields in each row) used in the file. If the file contains quotes, escaped characters, or comments, you may also specify a quote, escape and comment character respectively. Select the character encoding used in the file and the line from which data import should start.
Below you will see a column preview with the data extracted from the updated file:
If the division into columns is correct, click Next.
Step 4: Recurring#
The last step allows you to specify the interval at which the automatic import will be carried out. There are multiple options available which will let you indicate very precisely within what Date Range (e.g. Next 7 days, Next Month, All dates after…, etc.) the imports will take place, at what time, and how often (e.g. Every day, on the 8th day of the month, on Monday, etc.).
For example, in the following configuration the import will take place every day from 1/31/2019 onward, exactly at 3 P.M.:
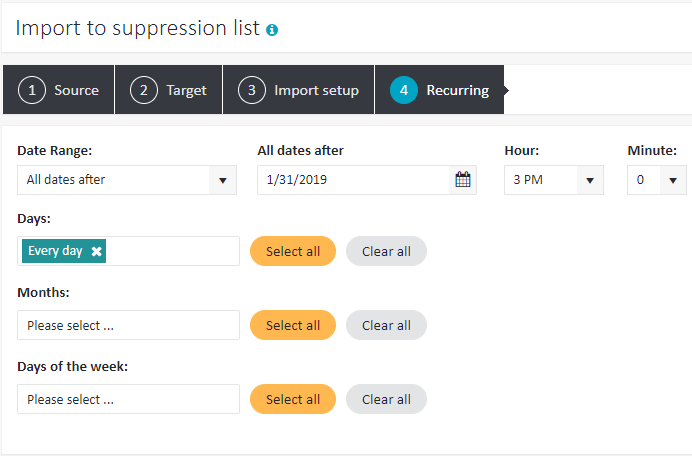
After you specify your time frame, the scheduled import will be put on the calendar displayed below:
Imports to Blacklist#
This option allows you to automatically update your blacklists by importing them from ftp or a file at regular intervals.
The table under Imports to blacklists displays all of the scheduled imports to blacklists which are currently active, inactive, deleted or in draft.
To schedule a new import to lists, click Import to blacklist under Imports to blacklist:
You will see a wizard consisting of 3 steps:
Step 1: Source#
In the first step, specify the address of the CSV file from which the data will be imported and provide the credentials necessary to access it:
Uri: the address of the file on a FTP server in the following format:
ftp://domain.com@ftp.esv2.com/subscribers.csv
Where:
- domain.com is the user name
- ftp.esv2.com is the host name
- subscribers.csv is the name of the file in the CSV format
Login: the user name for the FTP server (the same as domain.com in the Uri)
Password: the password for the FTP server
Authentication mode (only for FTP): if the FTP server uses the TLS or SSL technology for authentication, you may specify it here. Otherwise, leave the (none) value.
Use active connection mode: if the FTP server allows you to connect using the passive connection mode, you may leave the checkbox unchecked. If it doesn’t work, check it to try the active connection mode.
Mask for importing multiple files, e.g. *.csv (only for FTP/SFTP): Fill in this field only if you are importing more than one file at once. Mask is a string of characters which reoccurs in the names of all files which should be imported.
How does the mask work?#
For example, you have an FTP server which is replete with data and files. However, you do not want to import all of them, since only a couple are relevant to you. Then it is advisable to rename all relevant files by including a keyword in the name, e.g. import: import_subscribers1.csv, import_key_subscribers.csv etc. Then, using the word import as a mask will help you target only these files which contain in their names.
If you are importing one specific file, leave this field blank.
Delete file(s) from remote server after download (only for FTP/SFTP): when this checkbox is checked, the .csv file is deleted from the server after each import. Since ExpertSender will upload the file each time under the same name, then, in essence, the only difference is in how you will upload the file to FTP. If it is convenient for you to simply write the file, then set the checkbox for deletion. If you can overwrite the file located on FTP, then deletion is unnecessary.
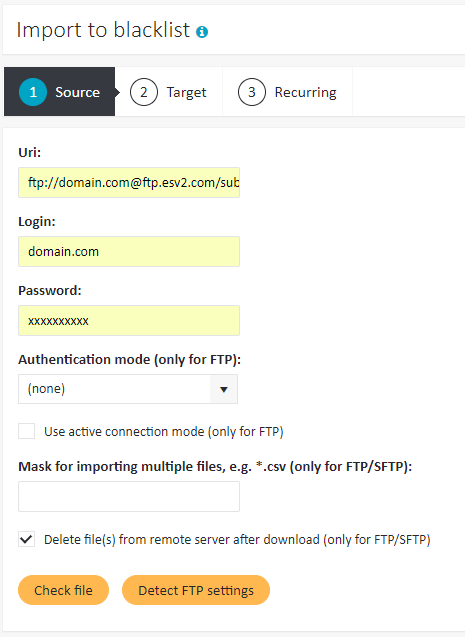
After filling in all fields, click Check file. If the access data are correct and the system finds the file, a pop-up message will inform you that the file is ready for download.
Click Next.
Step 2: Target#
Enter the name of the task, which will be displayed on the list of scheduled tasks, as well as select the type of contact data which will be added to the blacklist: Email/Domain/Md5, Phone number, or Dialing prefix.
Step 3: Recurring#
The last step allows you to specify the interval at which the automatic import will be carried out. There are multiple options available which will let you indicate very precisely within what Date Range (e.g. Next 7 days, Next Month, All dates after…, etc.) the imports will take place, at what time, and how often (e.g. Every day, on the 8th day of the month, on Monday, etc.).
For example, in the following configuration the import will take place every day from 1/31/2019 onward, exactly at 3 P.M.:
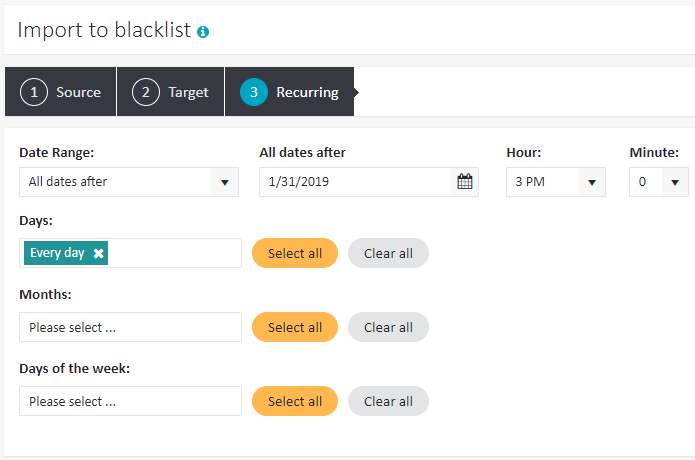
After you specify your time frame, the scheduled import will be put on the calendar displayed below:
Imports to Data Tables#
This option allows you to automatically update your data tables by importing them from ftp or a file at regular intervals.
The table under Imports to data tables displays all of the scheduled imports to data tables which are currently active, inactive, deleted or in draft.
To schedule a new import to data tables, click Import to data table under Imports to data tables:

You will see a wizard consisting of 5 steps:
Step 1: Source#
In the first step, specify the address of the CSV file from which the data will be imported and provide the credentials necessary to access it. Please remember that the file name and the data table name should match so that ExpertSender can recognize which table the import is pointing to.
Uri: the address of the file on a FTP server in the following format:
ftp://domain.com@ftp.esv2.com/subscribers.csv
Where:
- domain.com is the user name
- ftp.esv2.com is the host name
- subscribers.csv is the name of the file in the CSV format
Login: the user name for the FTP server (the same as domain.com in the Uri)
Password: the password for the FTP server
Authentication mode (only for FTP): if the FTP server uses the TLS or SSL technology for authentication, you may specify it here. Otherwise, leave the (none) value.
Use active connection mode: if the FTP server allows you to connect using the passive connection mode, you may leave the checkbox unchecked. If it doesn’t work, check it to try the active connection mode.
Mask for importing multiple files, e.g. *.csv (only for FTP/SFTP): Fill in this field only if you are importing more than one file at once. Mask is a string of characters which reoccurs in the names of all files which should be imported.
How does the mask work?#
For example, you have an FTP server which is replete with data and files. However, you do not want to import all of them, since only a couple are relevant to you. Then it is advisable to rename all relevant files by including a keyword in the name, e.g. import: import_subscribers1.csv, import_key_subscribers.csv etc. Then, using the word import as a mask will help you target only these files which contain in their names.
If you are importing one specific file, leave this field blank.
Delete file(s) from remote server after download (only for FTP/SFTP): when this checkbox is checked, the .csv file is deleted from the server after each import. Since ExpertSender will upload the file each time under the same name, then, in essence, the only difference is in how you will upload the file to FTP. If it is convenient for you to simply write the file, then set the checkbox for deletion. If you can overwrite the file located on FTP, then deletion is unnecessary.
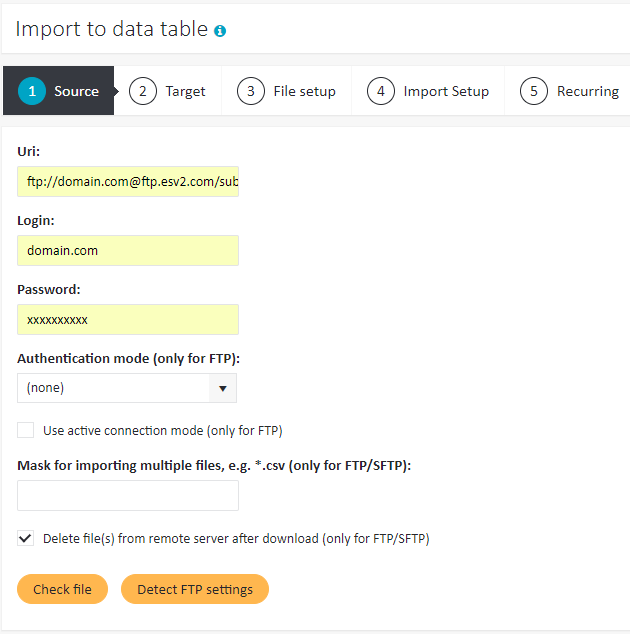
After filling in all fields, click Check file. If the access data are correct and the system finds the file, a pop-up message will inform you that the file is ready for download.
Click Next.
Step 2: Target#
Enter the name of the task, which will be displayed on the list of scheduled tasks.
Click Next.
Step 3: File setup#
In the File settings window, specify the delimiter (the character which separates fields in each row) used in the file. If the file contains quotes, escaped characters, or comments, you may also specify a quote, escape and comment character respectively. Select the character encoding used in the file and the line from which data import should start.
Click Next.
Step 4: Import setup#
Choose one of the three available options for data table update:
- Add new rows – The system will browse the imported file in search of new rows and include them in the data tables
- Synchronize table with import file – The system will update the fields with new values found in the import file
- Add new records or update data of existing records – This option both adds new rows to the data table and updates the fields of old rows
Click Next.
Step 5: Recurring#
The last step allows you to specify the interval at which the automatic import will be carried out. There are multiple options available which will let you indicate very precisely within what Date Range (e.g. Next 7 days, Next Month, All dates after…, etc.) the imports will take place, at what time, and how often (e.g. Every day, on the 8th day of the month, on Monday, etc.).
For example, in the following configuration the import will take place every day from 1/31/2019 onward, exactly at 3 P.M.:
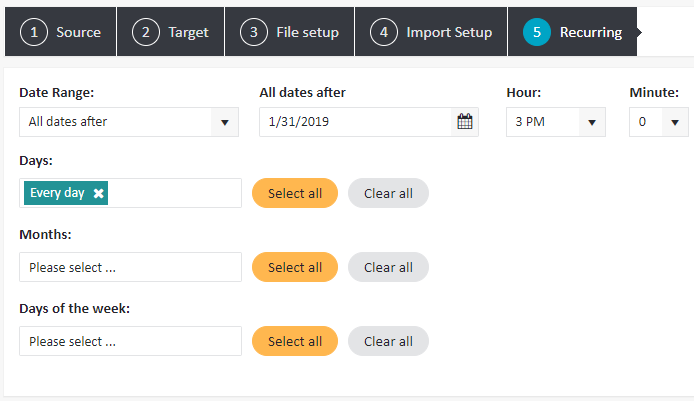
After you specify your time frame, the scheduled import will be put on the calendar displayed below:
Reports Shared Via Email#
The table under Reports shared via email displays all of the reports which were scheduled to be sent via email. In order to learn how to schedule emailing reports, consult the Schedule sending reports via email article.
Calendar#
The calendar provides an overview of all of the automatic tasks which you have scheduled.