SMS/MMS Newsletters
ExpertSender lets you also send newsletters via the SMS/MMS channel.
In order to be able to create and send an SMS/MMS newsletter, you need to have access to the SMS channel granted by ExpertSender, with all the settings properly set. For more information on SMS channel configuration, consult the Setting up the SMS/MMS channel article.
In order to send an SMS/MMS newsletter, follow these steps:
Preparation#
- From the left-hand navigation, select SMS/MMS Messages > Newsletters.
- Click Create SMS/MMS newsletter.
- Unlike for email messages, there is only one type of editor you may compose your message in: the plain editor. It is selected by default. Click Next to proceed.
- At the second stage of the wizard, select the Sender from the list of senders defined at the stage of SMS channel configuration.
- Optionally, add a custom campaign description.
Tworzenie wiadomości
- Możesz stworzyć swoją wiadomość od zera (kliknij Edytor tekstowy) or reuse an old message (click Reuse Message)
- Within the text editor, enter the content of the message. Please note that you may also use personalization tags and dynamic content in the SMS channel.
SMS message length#
The length limit of a simple SMS message is 160 characters (without special characters) or 70 characters (with special characters). SMS messages longer than 160 characters are, in fact, sent as concatenated simple messages and are later reassembled by the recipient’s cell phone. Usually, SMS messages can consist of maximally 6 parts. The relationship between message length and the number of component parts is displayed in the table below:
Parts Without special characters With special characters 1 part 160 characters 70 characters 2 parts 306 characters 134 characters 3 parts 459 characters 201 characters 4 parts 612 characters 268 characters 5 parts 765 characters 335 characters 6 parts 918 characters 402 characters - When your message is ready, click Update.
Polish, test, and preview#
- You should see the content of your message in the content window. At this point, there is a number of additional options which you can explore:
Google Analytics#
If you use Google Analytics, you may integrate it with your ExpertSender messages in order to gain access to the insights offered by this tool. It is enough to check Enable Google Analytics and fill in the fields. To learn more about Google Analytics integration, read Use Google Analytics with ExpertSender.
Send to seed list#
Seed lists are designed to store either test phone numbers or 3rd party phone numbers. Test phone numbers are usually used by our clients to test creatives (mainly their rendering and Dynamic Content) before the actual message is launched. Using seed lists before sending the message to your real-world subscriber is considered good practice.
Live preview#
With the Live preview utility you may verify how your message will be displayed for a specific phone number. Live preview is particularly useful if you want to test your Dynamic Content. For example, you may check if a subscriber will receive a message with his or her name displayed properly.
- If you are not satisfied with the result, continue editing your message. Otherwise, click Next.
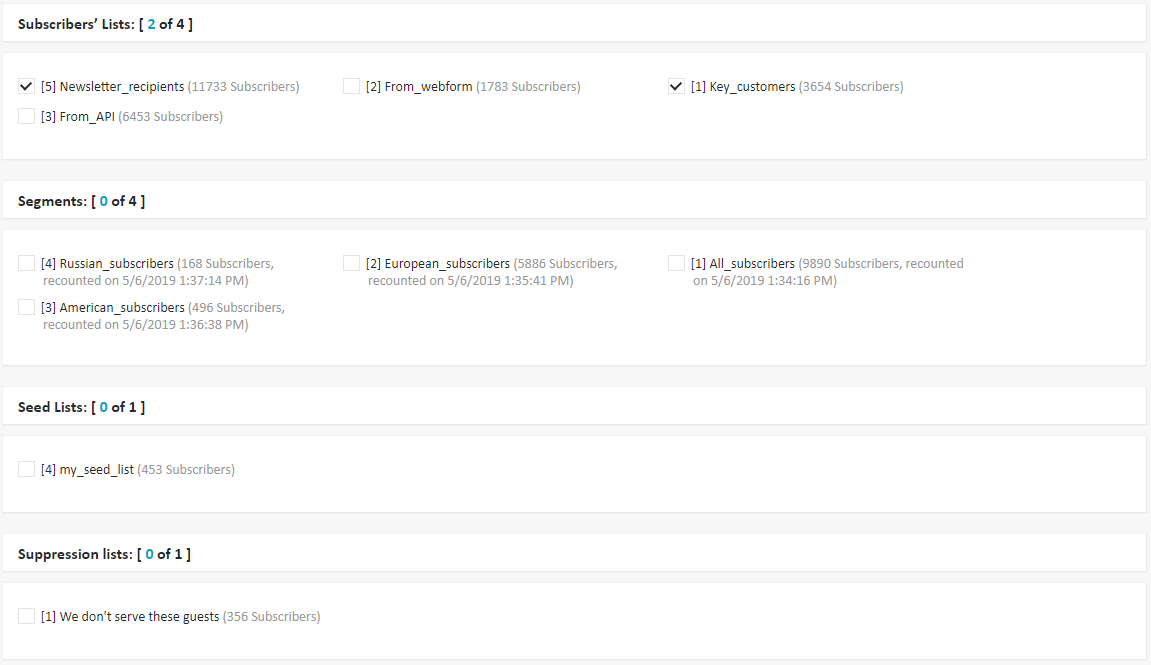
Add recipients
- Select the subscriber lists and/or segments you want to send your message to (you may also include seed lists or suppression lists).

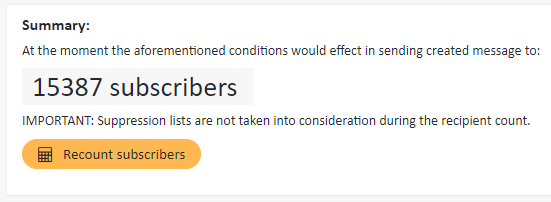
- In order to double-check how many recipients will receive your message, select Recount recipients at the bottom of the page.

- Click Next to proceed.
Choose delivery settings#
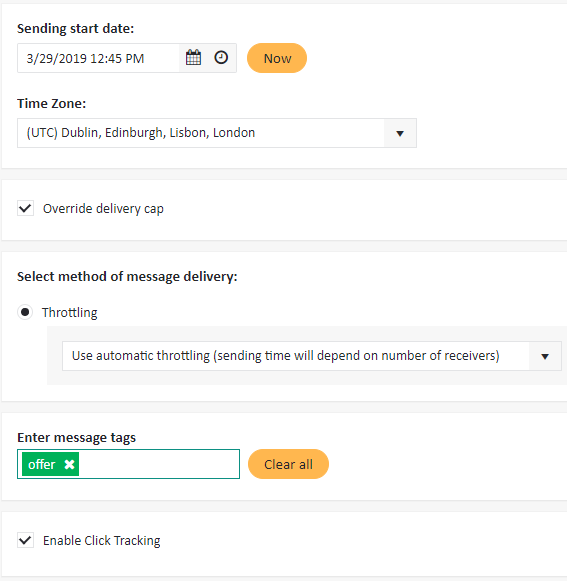
- Select the Sending start date for your message and the Time Zone.
- The option Override delivery cap refers to the limit on the number of messages which may be sent to one subscriber within a given period of time. Delivery capping by default prevents your subscribers from being flooded with too many messages and it is advisable to set a sensible cap for each list (see Managing lists for more information). However, if you need to send more than one message to a subscriber within a short period of time, allow the cap to be overridden so that your message will not be blocked even in case it reaches the limit.
- Select the appropriate method of message delivery:
- Throttling – Throttling slows down the delivery of your email and allows you to adjust sending time to the number of receivers. Since ISPs have certain limits on messages they accept per hour from each IP, by sending too many emails simultaneously you may easily reach the limit and get your message blocked. By choosing throttling you may deliver all of your messages, albeit some of them with a small delay. If you don’t want to use automatic throttling, you may also specify throttling time manually.
- You may also add some tags to your message, such as “discount” or “special offer”. Later on, you may use a tag to find a specific message more easily, or to create a segment of subscribers who, for example, have already received a “special offer” email.

You’re almost there!
- Carefully analyze the summary. If you would like to make any changes to the message content, selection of recipients or delivery settings, feel free to return to any of the previous steps.
- If you are ready, click Finish! Your message will be sent or scheduled shortly.