Popups
Popups are a form of web advertising which consists in presenting a small window with the content of an advertisement, which suddenly pops up in the foreground of a website. The use cases of popup windows are numerous: a popup may contain an advertisement of any product, a reminder about a discount or a web form which encourages the visitor to leave their data and subscribe to a newsletter. A big advantage of popups is that they can target the whole traffic on a website and are not limited to known subscribers only.
Creating a new popup creative#
To create a new popup, follow these steps:
- Select Popups > Creatives from the left-hand navigation in the ExpertSender Web Module.
- Click Create a new popup creative.
- Enter the name of the creative.
- Decide on the purpose of the popup:
- Product advertisement: you may choose to advertise between one and six products, which were placed in an abandoned cart or are suggested by the recommendation engine.
- Generic advertisement: a popup with a coupon code, a call to sign up for a newsletter etc.
- Select the language of the creative.
- Set the display-related properties of the popup:
- Width, Height: specify the width and height of the popup in pixels. There are no technical restrictions here, but it is not recommended to enter large values, because your visitors may view your website on a small screen where the popup won’t be displayed properly. If you want the popup to cover the whole screen (regardless of its size), leave the Width and Height fields empty.
- Position: decide where the popup should be displayed: in the middle of the screen, to the left, to the right, at the top or at the bottom.
- Popup is modal: when this option is checked and the popup appears, the main window of the website will be greyed out and temporarily disabled until the user interacts with the popup.
- Showing animation, Hiding animation: you may choose an animation effect to accompany the popup’s appearing and hiding. ExpertSender offers a wide selection of popup animations – feel free to explore the possibilities!
- Hide when background is clicked: with this option enabled, the visitor can hide the popup by clicking on the background.
- Hide when escape key is pressed: with this option enabled, the visitor can hide the popup by pressing the Escape key.
- Add the content of the popup in the HTML box. Please note that there is no Drag & Drop editor available in the Web Module! The popup has to be built in HTML and styled with CSS. Below the HTML box, you may click the Add personalization tag button to add information about products, recommendations, and promotional coupons. However, it is impossible to use Dynamic Content in this context!
- Click Live test to verify how your popup will be displayed. Continue editing the creative until you are satisfied with the result.
- Click either Save as draft or Save and activate to use the popup in a campaign!
Adding promotional coupons#
To create a new set of promotional coupons to include in a popup:
- Select Popups > Promotional Coupons from the left-hand navigation.
- Click Create new coupon set.
- Enter the name of the coupon set.
- Click Save changes. The set will appear on the list.
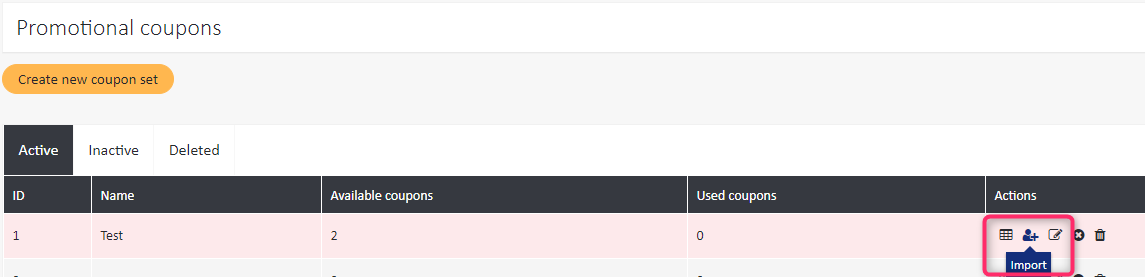
- Find your set on the list of coupon sets and select Import under Actions:

- Click Select file and upload a CSV or TXT file with email addresses to import. The size of the file cannot exceed 30MB.
- That’s it! Return to Popups > Promotional Coupons to view the number of coupons available in the set.
Create as many coupon sets as you will use in your campaigns. For instance, one set will include coupons with a $10 discount, and the other with a 5% discount.
Launching a new popup campaign#
To start a new popup campaign:
- Select Popups > All campaigns from the left-hand navigation and click Create new popup campaign.
- Complete the fields under General popup campaign information:
- Name: the name of the campaign
- Advertised website: select the website which will host the popup
- Select event type this popup campaign will handle: the popup will appear either after a visit to the website, or when an exit intention is detected
- Select who should see the popup: you may choose to display the popup to all visitors, or only to known visitors, or only to anonymous visitors
- Priority: sometimes there may be several campaigns activated for one website and a visitor can meet the criteria for being shown more than one popup. In such cases, the priority setting determines which popup will be displayed (the lower number, the greater the priority). If there are several campaigns with priority ‘1’, the system will choose at random which popup will be displayed.
- Decide on the frequency with which the popup will be opened:
- Only once for each viewer
- Once every few days: you may select the interval
- Once for viewer session on website: the popup will appear once for each viewer session, i.e. it will not be shown again on page reload
- Always when other conditions are met: all other filters (see point 5 below)
- Choose the creative(s) with the content of the popup. If the popup contains only generic content, you select only one version of the creative. For popups which display shopping cart content or information about products with reduced prices, there are different creatives for popups with a different number of products, between one and six (for example, one creative version for a popup with one product, another version for a popup with two products, etc.). Please note that all the relevant versions need to be created first!
- Choose the filters which will introduce complex conditions on when and to whom the popup will be shown. For example, you can show the popup only to customers who have more (or fewer) products than 5, or only if if they were browsing the website for at least 60 seconds. You can also add a condition on:
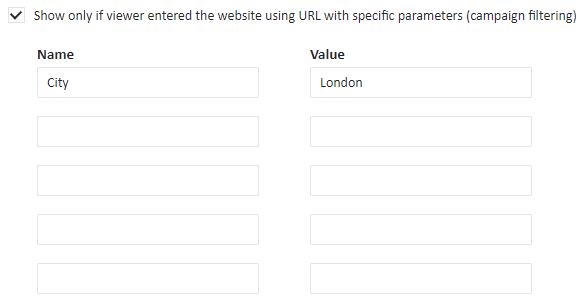
- the specific parameters with which the viewer enters the website. This option is useful when you are using URL integrations and want to filter your viewers by the specific campaigns through which they were redirected to your website, or by other information included in the URL, such as the viewer’s location:

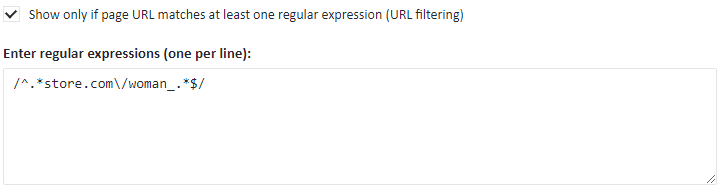
- the content of the URL, which you may parse using a regular expression:

URL filtering#
There are numerous situations in which you may use an URL regex, although it is dependent on the structure of your website.
For example, you are running several online stores, with each containing several categories of products, the names of which are included in the URL: woman_suits, man_suits, woman_shoes, man_shoes, woman_watches, man_watches. The URLs take the following shape:
https://www.your-online-store.com/woman_suits/product1
https://www.another-online-store.com/woman_shoes/product7
https://www.yet-another-store.com/man_suits/product2
You may want to show a certain popup to all viewers who are interested in products for women, no matter what kind of products they are. In this case, you would need the following regex:
/^.*store.com/woman_.*$/
You can also select all viewers interested in suits, no matter if they are men’s or women’s suits:
/^.*_suits.*$/
Please note that regular expressions are an advanced feature and are usually written by experienced users with a technical background. If you face problems with writing a regular expression, the usual solution is to consult an IT specialist or a programmer at your company.
Apart from this, you may want to learn some regexes from one of the available online tutorials. We highly recommend RegExr for this purpose.
- the specific parameters with which the viewer enters the website. This option is useful when you are using URL integrations and want to filter your viewers by the specific campaigns through which they were redirected to your website, or by other information included in the URL, such as the viewer’s location:
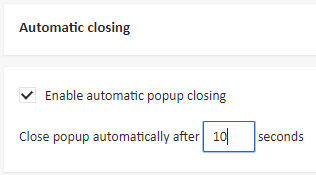
- Specify whether and when the popup should automatically close:

- Optionally, enable adding promotional coupons to the popup. Select the relevant coupon set from the drop-down list and choose the preferred coupon distribution method:
- As quick as possible
- Evenly: you may specify the maximum number of coupons distributed per hour. With this option enabled, visitors who exceed the specified number within one hour won’t be shown the popup.
- Optionally, enable adding Google Analytics tags to URLs.
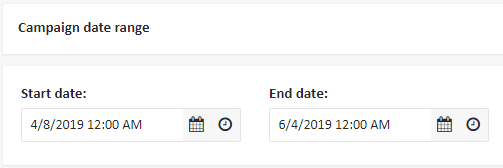
- As the last step, specify the campaign date range:

That’s it! You may now save the campaign as draft or save and activate to get it up and running!