Data Tables
Data tables are designed to store information about subscribers. Unlike custom fields, which store mainly static data (such as subscribers’ gender and date of birth), data tables are made for storing data which may change often, for example, the subscriber’s website activity (purchases, visited pages, etc.).
Data tables, based on the concept of relational databases, are a very powerful feature, since they let you create complex relationships between tables in order to extract behavioral information about your subscribers. You can easily filter out all subscribers who fulfill a list of predefined criteria. For instance, by linking custom fields containing information about gender and age with a data table storing purchase data, you may find all female subscribers between 20-30 years of age who have made at least three purchases with a total amount of at least $500 within the last 3 months.
Creating a data table#
To create a new data table, follow these steps:
- Select Data Tables > Tables from the left-hand navigation and click Create a new data table.
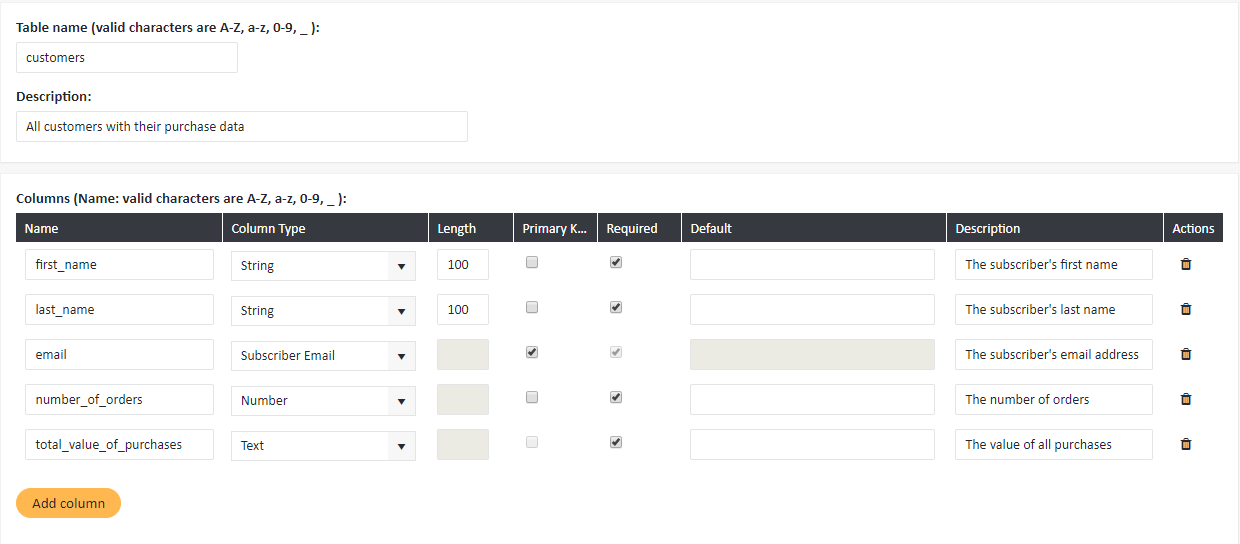
- Specify the table name and description.
- Complete the fields that will characterize the first column of the table:
- Name: describes what is stored in the column
- Column Type: the data type for the column
Column types in data tables#
You may select one of the following data types for a column:
Text: more than 4000 characters
String: the length depends on the value of the textbox length (less than or equal to 4000 characters)
Number: from -2 147 483 648 to 2 147 483 647
Big Number: from -9 223 372 036 854 775 808 to 9 223 372 036 854 775 807
Double: from 1.175494351×10–38 to 3.402823466×10+38
Date: e.g. 11/26/2018
DateTime: e.g. 11/26/2018 10:56:28 AM
Boolean: True/False or 0/1
Custom subscriber ID: string (less than or equal to 256 characters)
Subscriber Email: e.g. john.smith@domain.com
Subscriber phone number: Primarily consists of digits, but you may also enter +, left and right parenthesis ( and ), or zeros. Regardless of the input the phone number will be saved as an integer that is less than or equal to 20 characters. Here is how sample, valid input numbers will be saved in the database:- +48501228855 = 48501228855
- (+48)501228855 = 48501228855
- +48 (501) 228855 = 48501228855
- 0048 501 22 88 55 = 48501228855
- Length: the maximum possible length of the column fields (this parameter cannot be set for all field types).
- Primary key: determines whether this column is a primary key.
Primary and foreign keys#
A primary key is one or more fields (columns) in a data table, the value of which uniquely identifies each entry in the table. The primary key must always have a unique index. The primary key is used to associate a table with keys in other tables.
A foreign key is one or more fields (columns) in a table that contain a reference to a field or primary key fields in another table.
- Required: determines whether this field should be mandatory.
- Default: determines which value should be in the field by default.
- Description: talks about what the column is used for.
- Usually you will need more than one column in your data table. Using the Add column button, you can create additional table columns and set their characteristics.
- Once you add all of the columns, click Save changes.
#
Creating data relationships#
Tables can be related to each other by a specific field or fields. If tables are not linked, the data from them can only be used in messages but not in segmentation. When tables are linked, information from them can be used in both messages and segmentation.
To create a new data relationship, follow these steps:
- Select Data Tables > Relationships from the left-hand navigation and click Create a new data relationship.
- Enter a name and a description for the relationship.
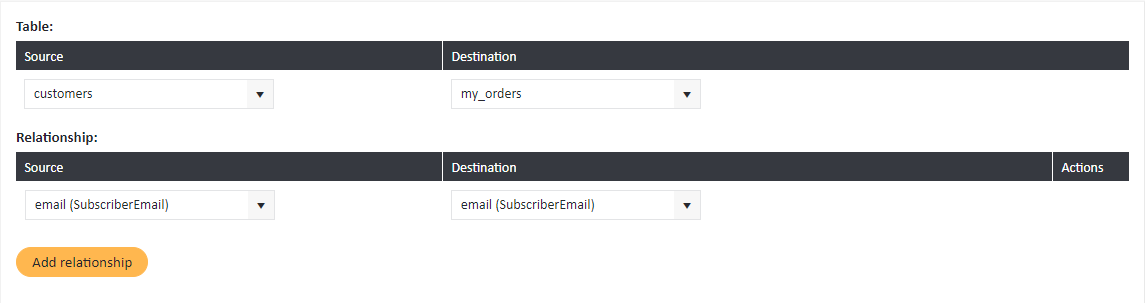
- Select the tables which you intend to link through a relationship: the source table and the destination table.
- Specify the fields in both tables which will be related. Remember that only fields with the same data type can be in a relationship, i.e. you can only relate a field of the type Number with another field of the type Number.
- Sometimes you may want two tables to be linked through more than one relationship. In such a case, click on Add relationship to create another relationship.
- Once you are done, click Submit.
The following figure shows how to create a relationship between a database table which contains information about orders and a database table storing subscriber data. We may link the two tables via the subscriber email field:

#
Importing information to a data table#
After creating a data table, you can import data from a file into it.
To import data to a data table, follow these steps:
- Select Data Tables > Tables from the left-hand navigation and click Import to data table.
- Select the file containing data to import. The file must comply with the following criteria:
- the file name must match the name of the table into which the import is being performed
- extension: CSV, TXT, XLS, XLSX, or a ZIP archive with a file with one of the listed extensions
- file size should not exceed 30 MB
- encoding type: preferably UTF-8
- format: delimited (preferably with “,”)
- dates must be sent in the format YYYY-MM-DD [hh:mm:ss]
- the number of columns in the file must match the number of columns in the data table
- values containing reserved characters (double quotation marks, comma, semicolon, new line) are surrounded with double quotation marks (“). If quotation marks appear in the value, they are represented in the file as two quotes in a row.
- At the bottom of the page you can see what the imported data will look like in the data table. If you are satisfied with the result, click Next.
- Select the desired type of import:
- Add new rows: the rows imported from the file will be added at the end of the table as new rows (if such rows are already present in the table, they will be skipped)
- Synchronize table with import file: the entire contents of the table will be deleted and replaced with the imported rows
- Add new records or update data of existing records: the rows imported from the file will be added at the end of the table as new rows if they are not present in the table yet. If they are already present, their values will updated with the imported values.
- Click Finish. Note that if you are importing from a large file, the process can take some time to complete.