Web Module newsletters
Web Module newsletters are quite similar to standard newsletters sent from ExpertSender, but they are directed at your website visitors and sent as part of a Web Module campaign.
Web Module newsletter creatives#
To access a list of all your newsletter creatives, select Campaigns > Creatives from the left-hand navigation. You will see the following view:
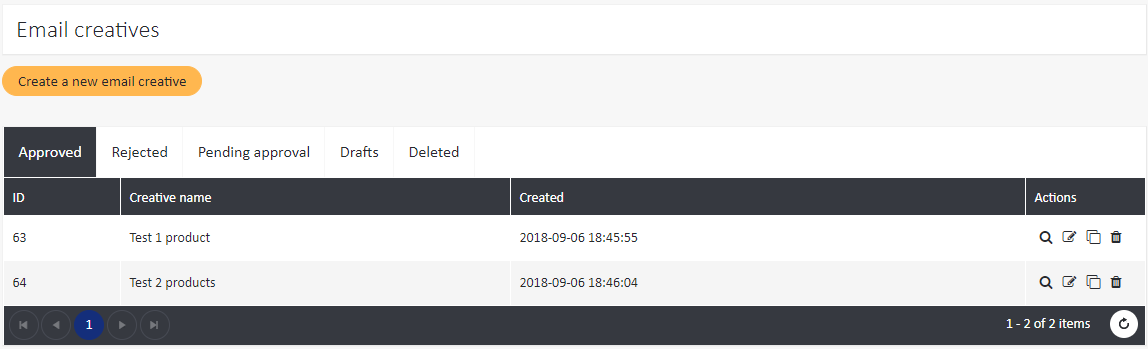
The creatives are distributed among five tabs:
- Approved: creatives which have been approved and are ready to use
- Rejected: creatives which have been rejected and cannot be sent in the present form (if you have any rejected creatives, please contact your Account Manager for more information)
- Pending approval: creatives which are still awaiting approval
- Drafts
- Deleted
For each creative, there are a number of actions which you can perform (see the Actions column):
- Preview
- Edit
- Reuse/Clone
- Delete
To create a new newsletter creative, follow these steps:
- In the Email creatives view, click Create a new email creative.
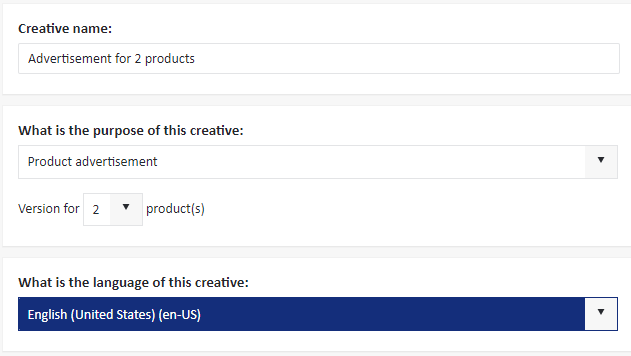
- Enter the name of the creative.
- Select the purpose of the creative:
- Generic advertisement: an email which contains general information about your company or your offers
- Product advertisement: an email which advertises specific product(s). You have to specify how many products will be advertised in this creative (between 1 and 6). Please note that you have to create separate creatives for each number of products which you want to advertise in Web Module newsletters! For example, one creative for a newsletter with 1 product, another creative for a newsletter with 2 products, etc.
- Choose the language in which the creative is composed.

- Add the following tags:
- The industries which match your creative's content
- The content type of your creative
- The companies advertised by your creative
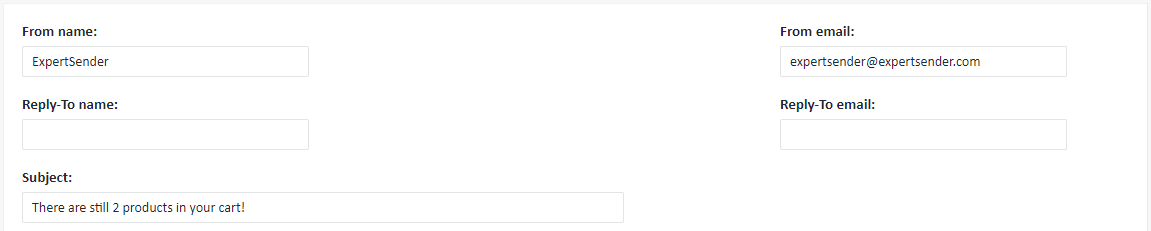
- Complete the From name field with the name which you want to appear in your subscriber's From column. In the From email column enter the email address from which you intend to send your message. You may also add another name and another email address for your subscribers' reply emails – in this case, complete the Reply-To name and Reply-To email fields.
What sender name should you choose?#
The sender name entered in the From name field is typically the name of your company. We recommend using the same name and address in all your emails, as consistency helps with brand recognition. Furthermore, email messages from known addresses are more likely to be placed in the inbox folder, and any pictures included in them are more likely to be displayed.
- Enter the Subject of your message.

- The most important step of the email creation process is composing the message:
- In the HTML tab, enter your message in the HTML code. Please note that familiarity with HTML is indispensable to complete this task!
- Subscribers may try to read your message on a simple device which cannot display HTML correctly. To cater for this, you can also create a plain text version of your message. Switch to the Plain Text tab and enter your content in plain text.
- Optionally, in the window at the bottom of the page, type your comments on the creative. They will be visible to the reviewer.
- As the last step, save the message as draft or save and send to approval.
Sending Web Module newsletters
To access a list of your Web Module newsletters, select Campaigns > Newsletters from the left-hand navigation. Your newsletters will be divided into the following categories:
- In progress: the category includes the currently active newsletters, with detailed statistics on the number of recipients, suppressed and blacklisted subscribers, etc.
- Scheduled: all newsletter which have been scheduled for later
- Sent: the category includes all closed, inactive campaigns, with detailed statistics on recipients, suppressed and blacklisted subscribers, etc.
- Drafts
- Deleted: newsletters which were deleted by a user
To send a new newsletter:
- In the Newsletters view, click Send a new newsletter.
- Choose a friendly name for the newsletter.
- Select one of the creatives which you have created.
- Select a segment to which your newsletter will be sent. At this point, you may also use the Cost Calculator to estimate the cost of your campaign.
- Enter the billing data:
- Payment type: for the time being, only CPM (cost per mille) is supported
- Maximum bid: enter the biggest amount you are able to pay for your email
- Select the method of message delivery. By default, we use throttling. Throttling slows down the delivery of your message and allows you to adjust sending time to the number of receivers. Since ISPs have certain limits on messages they accept per hour from each IP, by sending too many emails simultaneously you may easily reach the limit and get your message blocked. By choosing throttling you may deliver all of your messages, albeit some of them with a small delay. You may either use automatic throttling or specify throttling time manually.
- Select the send date for your newsletter.
- Save the message as draft or save and send it.