A/B testing in email messages
A/B testing is a powerful tool that allows you to make decisions based on data, not guesswork. Instead of wondering which email version will appeal to your audience, you can check it empirically and choose the one that brings better results.
In this article you’ll learn:
- What exactly A/B tests are in email campaigns.
- Which message elements are worth testing.
- How to interpret results and implement changes that will increase the effectiveness of your emails.
Requirements:
Before you start creating A/B tests in email messages:
- Set up the email channel. You can do this in Settings > Email > Domain authentication.
- Create audience segments to which you want to send the test message. Segments should contain only addresses of recipients who have given consent to receive such correspondence.
- Make sure the recipient group is large enough for the test result to be reliable. 500 people for each tested version is a good minimum for one variable (e.g., message title).
- Prepare at least two versions of the test message.
What do you want to test?
Before you start an A/B test, build a hypothesis that the test will verify. Clearly define what you want to achieve – are you testing new campaign ideas, new branding, or improved ways of communicating with recipients?
The more variables you test simultaneously, e.g., title and sender, the larger the recipient group should be and the longer the test duration.
In ECDP, you can test up to 5 versions of an email message for:
- Message subject.
- Preview text.
- Sender.
- Message content.
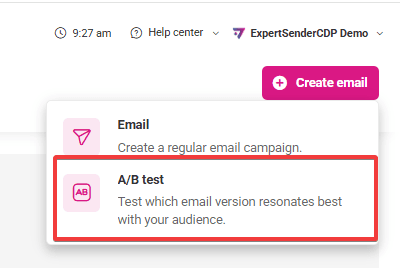
Create an A/B test for email messages
Go to the email creator. In the Campaigns section, in the Email subsection, click the Create email button in the upper right corner of the screen. Select A/B test from the list.
Adding test versions and navigating between them
On the left side of the workspace, under the page header, you’ll find a button with a dropdown list. This is where you’ll add additional message versions for testing, delete them, and switch between them.
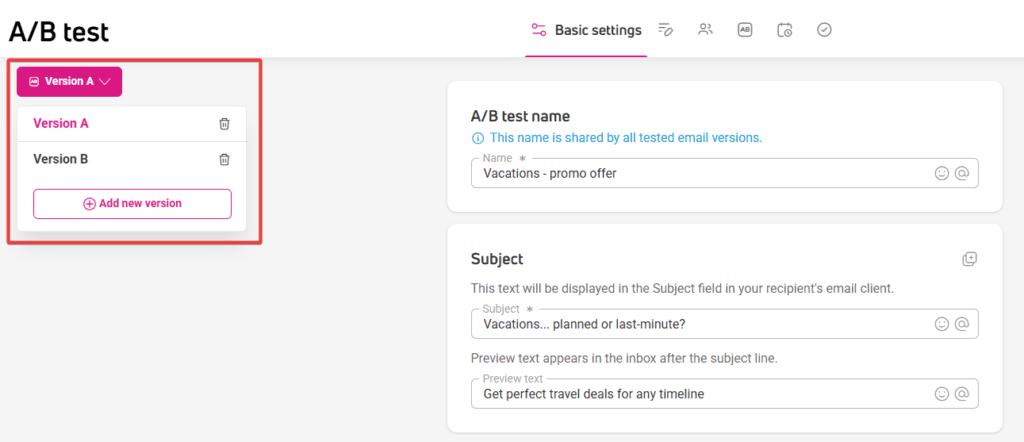
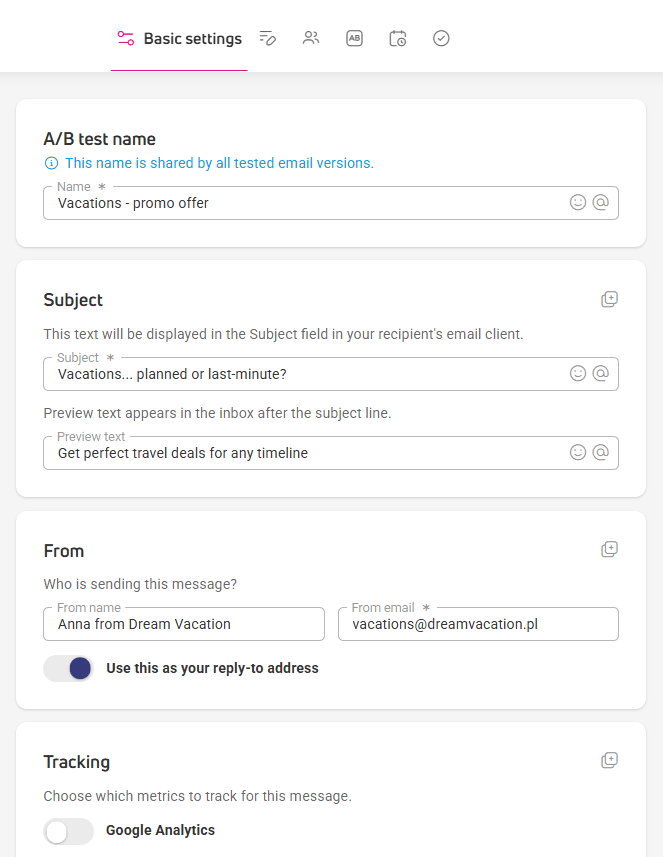
Stage 1: Basic settings
In the Basic settings tab, add:
- A/B test name – common for all message versions, making it easier to find the test in statistics.
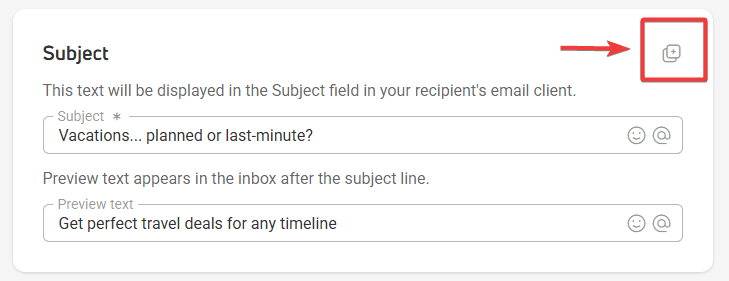
- Message subject – you can test it across all versions.
- Sender – you’ll set it in the From section.
- Tracking – define what you want to track: opens, link clicks, or specific UTMs?
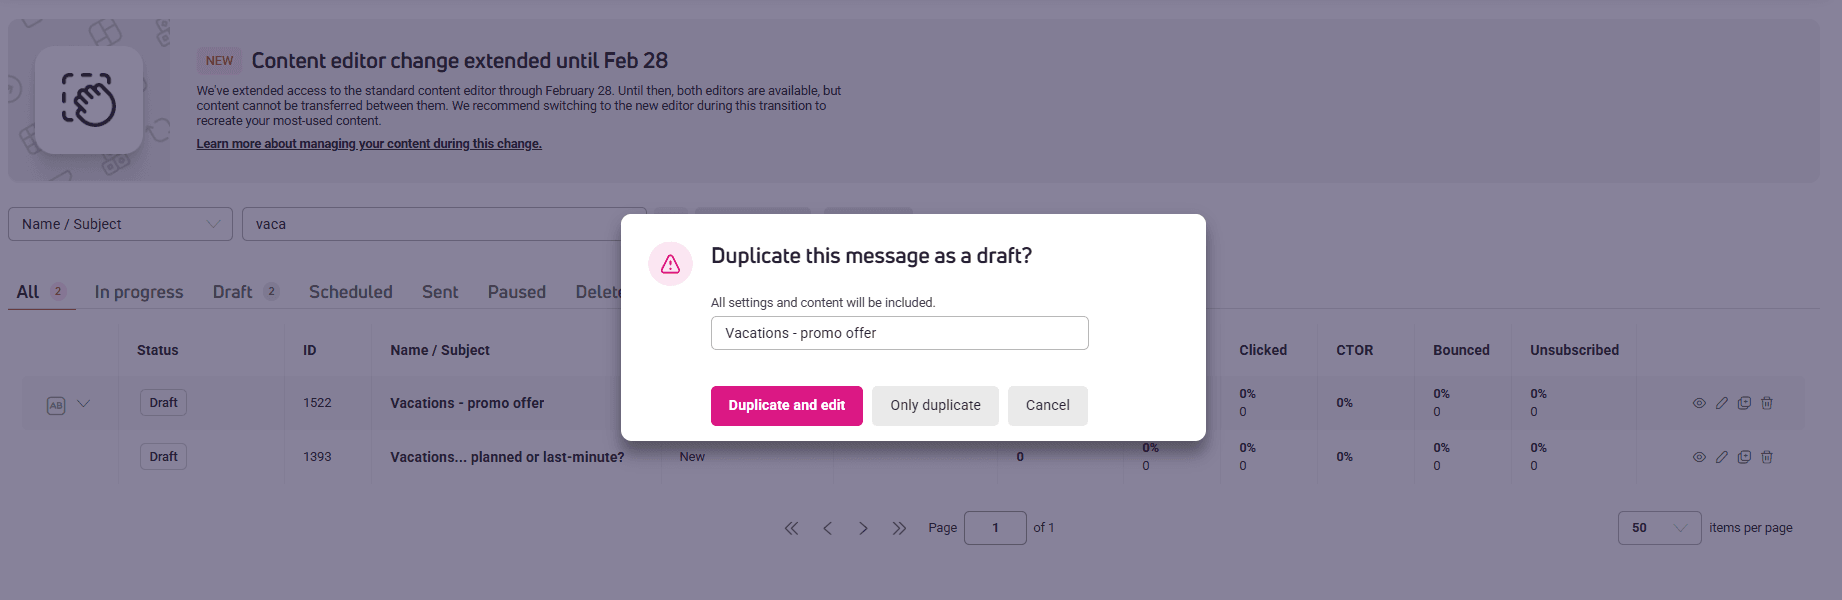
Copying the test and selected test settings
You can copy the entire test or only selected elements.
- Entire A/B test – use the Duplicate action from the table in Campaigns > Email.


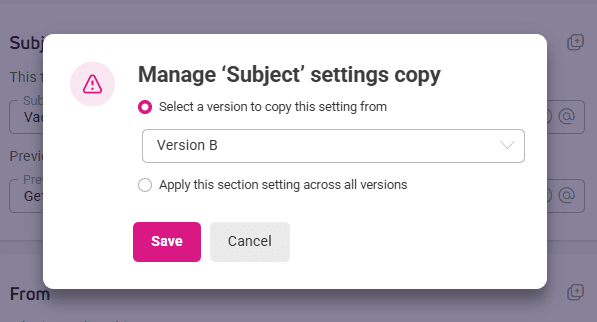
- Individual elements (Subject, From, Tracking):
- From another version to the current one.
- From the current version to other versions.


- Message content – use the Reuse action in the Content tab.


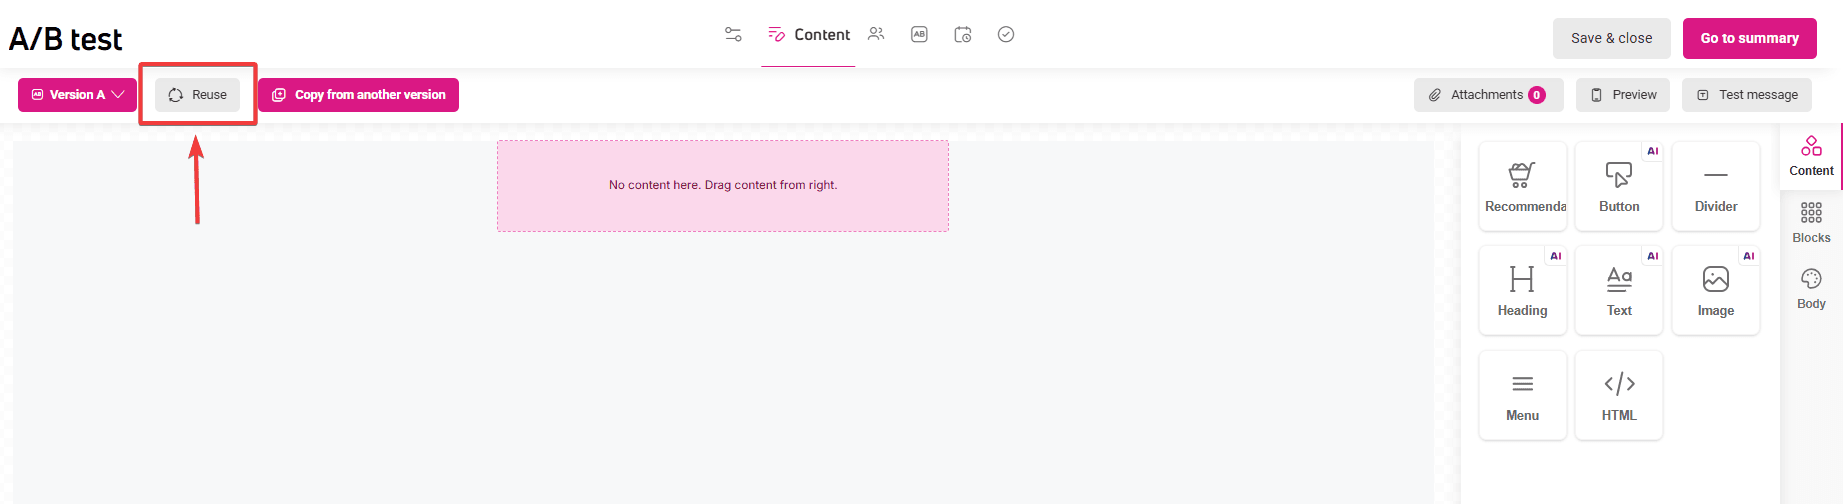
Stage 2: Content
An intuitive graphic editor working on a ‘drag and drop’ basis is used to design the content and appearance of emails. A detailed description of all editor functions can be found here: How does the content editor work?
Stage 3: Recipients
Here you’ll specify information about the recipients of your email messages.
- Send to field: select All customers if you’re sending an email to your entire customer base. If you’re interested in only a specific group of recipients, click the Select segment field and choose the segment you’re interested in or create one using the Create new option. You can find more about this feature in the Segments section.
- Required consents field: select from the dropdown list the consent or consents for contact.
- If you select multiple, we will only send the email to customers who have given all the consents you specified. The number of recipients meeting this condition will appear in the field below.
- From this level, you can also add a new consent. We described the method in the How to add consent? section.

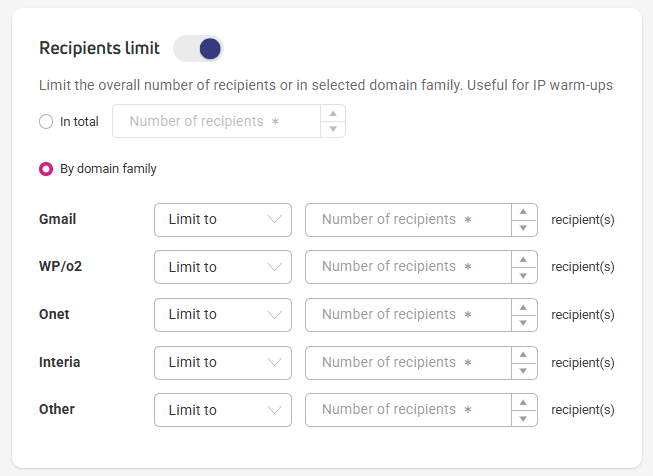
- In the Recipients limit section, you can limit the total number of recipients, or the family of domains used to deliver email messages. This option is useful in the IP warming process, which is a standard procedure for email marketing beginners.

- In the next section, the number of recipients meeting all previously selected conditions will appear:
- They belong to the selected segment.
- They have given all the consents for contact that you indicated. You can select one specific consent or several at once.
- This means that the message will be sent to customers from the segment selected above.

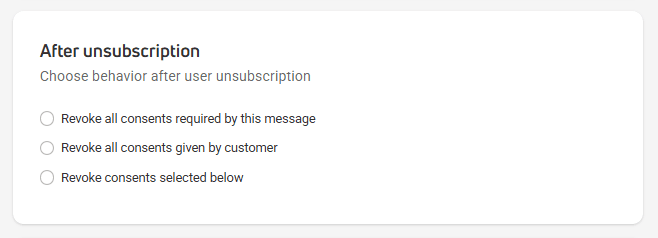
- In the After unsubscription field – specify what will happen to the customer’s consents after they unsubscribe. The settings in this section will only be saved if you previously placed an unsubscribe link in the message content. If you add it after selecting this option, go back to it and select the chosen item again.

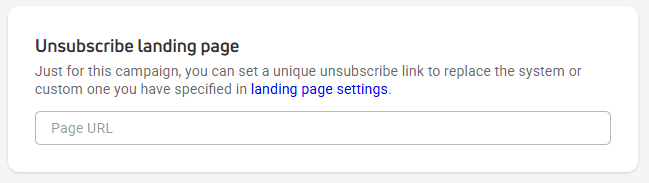
- In the Unsubscribe landing page field, place a link to the page to which we will redirect the customer after they unsubscribe from the email. This step is not mandatory. You can find more about landing pages in the article How to add an unsubscribe link to your emails?


Stage 4: A/B test settings
Here you configure the size of test groups and conditions for selecting the winning message.
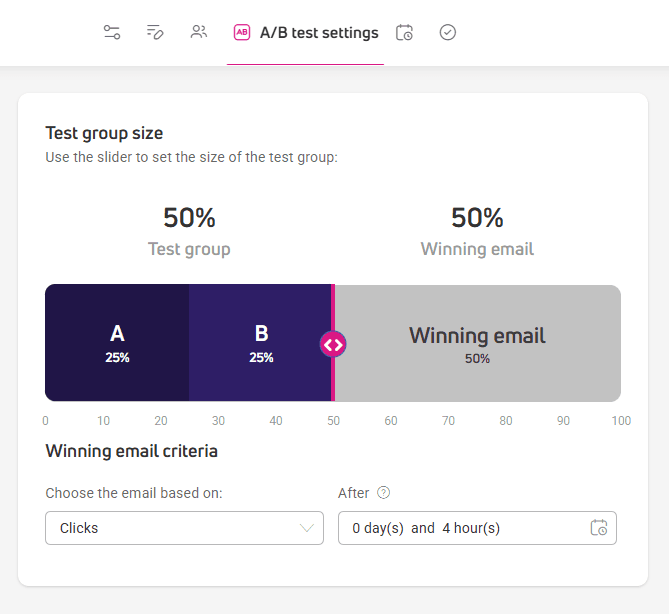
Test group size
The selected percentage of recipients from the previously defined pool participates in the test.
Test group size can be:
- Minimum 10% of recipients.

- Maximum 100% of recipients.

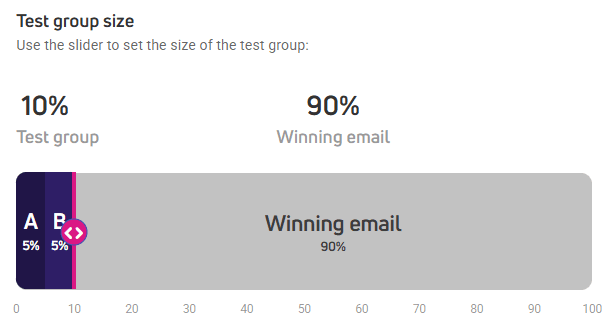
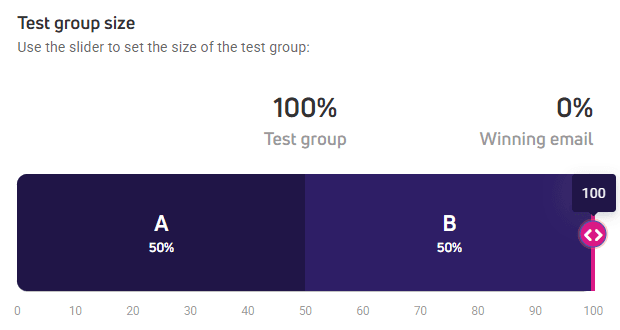
Recipients who will receive the tested message versions (A – E) are evenly distributed among each version.
How large should the test group be?
To get reliable results:
- Assume a minimum of 500 recipients for each tested message version.
- The smaller the difference in results you want to detect, the larger the test group needed.
- The conversion rate also affects the minimum sample size:
- For low conversion rates (e.g., 1-2%), you need a larger group.
- For higher rates (e.g., 10% and above), you may need a smaller group.
- The test should last long enough to gather at least 100 conversions for each version. In most cases, 1 week is enough to collect reactions from different groups.
If you have a smaller recipient base, you can still conduct A/B tests. In such a situation, it’s best to:
- Test only one variable at a time.
- Look for bigger differences in results (e.g., 20% instead of 5%).
- Conduct tests for a longer time or on a larger part of the base.
Keep in mind that the above recommendations are based on good practices for testing email messages. They are a good basis if you’re just starting email testing.
Test duration
An A/B message test can last up to 7 days (168 hours). You can track the current test stage in the table in the Campaigns > Email section.
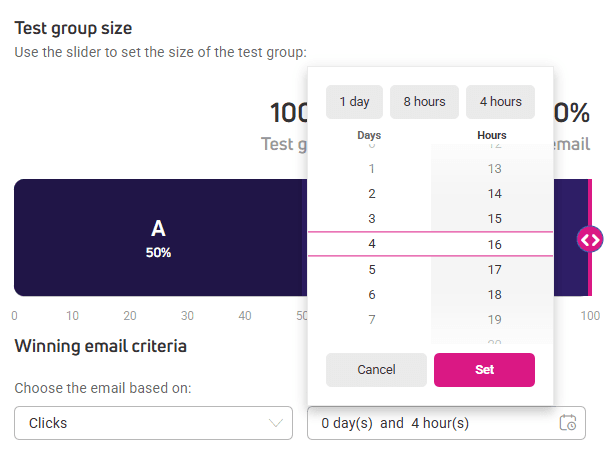
Selecting the winning message
The winning message is selected after the specified time has elapsed, based on one of the metrics:
- Opens
- Unique opens
- Clicks
- CTOR (Click-to-Open rate)
- Unique clicks
- Revenue
- Orders
- Average order value
The version with the best result for the selected metric wins.
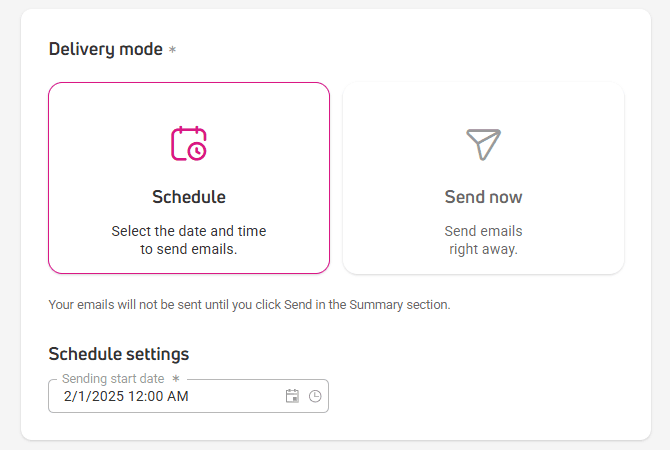
Stage 5: Delivery
Planning an A/B test send follows the same process as for a standard newsletter. You can choose:
- Immediate sending
- Sending according to a schedule you choose.
To make it easier for you to track the progress of the test, in the message preview available in the table, you’ll find statuses describing the stage the sending is at:
- Scheduled,
- Sending to test group,
- Winner selection in X hours / days,
- Paused,
- Sending winner,
- Fnished.
A/B test results
You can find A/B test results in the table located in Campaigns > Email, and in the message report available in the Campaigns > Email > Reports table (available in the last column of the table).
How to interpret drops in key metrics?
Drops in results are often as valuable as increases. It’s worth combining their analysis with behavioral data to better understand recipient behaviors.
Case 1: Drop in open rate, but increase in clicks
Such a situation may mean that the message subject was less attractive, but it reached a more engaged group of recipients.
Check the segments of recipients who opened the message. Additionally, analyze the long-term conversion value from this message. Sometimes a smaller but more engaged group of recipients generates higher revenue.
Case 2: Increase in click rate, but decrease in conversion
Suggests a mismatch between the promise contained in the message and the information available on the landing page. To get to the real cause:
- Check where abandonment occurs – on the product page or while filling out the form?
- Analyze additional metrics like time spent on the page and page scroll depth to understand what discourages users.
- Investigate whether the conversion drop affects all segments or just some recipient groups.
Case 3: Drop in all metrics
A drop in all indicators doesn’t always mean failure. Their analysis helps eliminate ineffective communication strategies.
Examine the impact of external factors such as season, day of the week, market events. Also check if the drop is uniform across all devices. Perhaps there’s a technical problem on one of the platforms that has affected the results?
Using behavioral data allows you to move from the simple question “which version won?” to a deeper understanding of “why did it win and what does this tell us about our recipients?”.
Best practices for A/B testing email messages
The success of email campaigns often depends on small details that can affect recipient engagement:
Ensure deliverability
Before starting tests, make sure your messages reach inboxes. Regularly monitor deliverability rates and maintain a good sender reputation.
Test one element at a time
When planning tests, focus on testing one element. This way, you’ll know exactly what influenced the results. Imagine sending two versions of a message – one with an emoji in the subject, the other without. If the emoji version achieves better results, you’ll be sure that this element made the difference.
Choose the appropriate test duration
Short tests may give random results, especially when some recipients open messages with a delay. For most campaigns, consider a minimum of 5-7 days of testing to capture different patterns of recipient behavior.
If you’re testing more than one message element, a longer test duration will allow you to get a more reliable result.
FAQ
Can I test different parts of my message in a single A/B test?
Yes, you can simultaneously test the message subject, preview text, sender, and message content.
Can I schedule A/B tests?
Yes, you can schedule the date and time of the test send. You can do this in the Sending section in the content editor.
What to do if the differences in results between versions are minimal?
The causes of minimal differences may be:
- Test group is too small.
- Test ran for too short a time.
- Tested elements did not have a big impact on recipients.
- Tested versions were not diverse enough.
How often should A/B tests be conducted?
Tests should be a constant element of your email marketing strategy. Each major campaign should include test elements, and the results should inform your future decisions.
How to avoid errors in test result interpretation?
Set goals and decisive metrics before starting the test. Avoid changing evaluation criteria after seeing the results. Remember also that correlation doesn’t always mean causality – always look for explanations for the observed differences between versions.
A good practice is to combine results analysis with analysis of recipient behavior, e.g., on your website. You’ll gain a broader perspective and draw conclusions based on data.
How to test different content versions without affecting sender reputation?
Sending significantly different content versions can increase complaints about your campaign and thus lower domain reputation.
If you’re testing two message versions, e.g., a short, direct promotional email (a few lines, large CTA) and a longer message with product description:
- Monitor the number of complaints – if it increases for one version, stop the test.
- Test the message on loyal recipients to avoid the risk of blocks and complaints.
How to test the optimal email message length?
Shorter message content isn’t always more effective. Its length should match the goal of your campaign:
- Short email, up to 100 words, works better for quick, short promotions.
- Medium email, between 100 and 300 words, will work well in newsletters.
- Long email, over 300 words, will be appropriate for case studies and educational B2B content.
You can also test content length on two segments:
- New customers – shorter, dynamic content.
- Loyal customers – longer, more educational emails.
How to test different content layouts in a message?
The order in which you arrange content in an email matter, especially when your recipients use different devices. Suppose you test two message layouts:
- A – classic: header > image > text > CTA
- B – storytelling: story > benefits > CTA
Monitor scroll depth to check how far readers get in each version. If you’re testing on mobile traffic, version B might perform worse because it requires scrolling.
If the open rate is high but clicks are low, the problem might be the content layout.