Scenarios
Scenarios are automated communication sequences that help you reach customers at the right moment with the right message.
Instead of manually sending hundreds of emails, you can set up a scenario once and let it work for you – from welcome messages to abandoned cart reminders.
Requirements
Before creating a scenario, make sure that:
- Web tracking is properly configured.
- If you plan to use price drop notifications, you have added a product feed.
Scenarios – statuses and marketing metrics#
Each scenario has a status that shows what stage it’s in:
- Drafts – scenarios in progress. You can preview, activate, edit, duplicate, and delete them.
- Active – scenarios currently in use.
- Stopped – scenarios paused by you. You can edit and activate them.
- Deleted – you can restore deleted scenarios at any time.
Marketing metrics help you evaluate how effective your scenarios are, along with the email, SMS, and web push content used in them.
- Revenue – amount generated by the scenario, displayed in your account currency.
- Started – number of customers who entered the scenario.
- Active – number of customers currently in the scenario.
- Removed – number of customers who no longer meet the scenario conditions.
- Completed – number of customers who successfully went through the entire scenario.
- Sent – number of emails, SMS messages, or web push notifications sent to customers in the scenario.
- Displayed – number of web push notifications displayed.
- Opened – number of opened emails.
- Clicked – number of link clicks in SMS messages or web push notifications.
- Bounced – messages that didn’t reach recipients.
- Unsubscribed – number of customers who opted out of receiving messages.
How to interpret data: If you have a high number of “started” but low “completed”, check if there are delays that are too long between steps or if messages aren’t engaging enough.
Content types and custom events in scenarios
You can use three communication channels in scenarios:
- Email – the most common channel, perfect for longer content and offers.
- SMS – for quick contact, great for urgent notifications.
- Web push – for instant browser notifications.
You create content for scenarios directly within them– you cannot use ready-made campaigns from other sections of the application.
Custom events are useful elements for recording non-standard actions and activities performed by a customer on your store’s website. You can use them as the starting point for a scenario – the
Custom event trigger.
Create a scenario
Each scenario consists of elements connected in a logical sequence:
Scenario settings
Before you start building, establish the rules for how it works:
- In the Duplicates handling section, decide what happens if a customer is already in the scenario and enters it again.
- Create new instance – customer goes through the scenario from the beginning. This option is selected by default. It’s worth keeping for scenarios focused on orders.
- Ignore – the next attempt to enter is ignored. This option won’t work for customers who completed the scenario and found themselves in it again. This solution is good for welcome scenarios.
- Move to start – previous information about the customer’s presence in the scenario is deleted and replaced with new information. The customer returns to the scenario’s starting point, and information about their previous presence is deleted.
- In the Remove from scenario when section – choose when to automatically remove a customer from the scenario. You can select one or both options:
- After an order is finalized.
- After visiting a specific page, like a thank you page.
Helpful tips:
- If a customer completes a scenario and enters it again, they won’t be treated as a duplicate.
- If you’re running an abandoned cart recovery scenario, choose Ignore or Move to start.
- To limit how often customers enter the scenario, choose Ignore and add a Delay element before the endpoint in your scenario, setting the interval to 1 day, for example.
Start points – when to trigger scenarios
A start point is the moment a customer enters the scenario. You can trigger it manually (at a chosen time), based on customer actions like abandoned cart, or through events registered in the platform.
Start points available in scenarios are divided into main triggers and website activities.
Main triggers
Sign-up
Only customers who meet these conditions will enter the scenario:
- they have given all consents selected in the start point,
- they belong to the chosen segment (you can select only one).
Example: if your form collects only the newsletter consent, but in the scenario you also select the marketing consent, then customers without the second consent will not enter the scenario.
The scenario will start only if the sign-up information comes from:
- a form on your website (created in ECDP or another one, if it uses our script),
- or from the API.
Customers added manually in the Client 360 panel or imported from a file, even if their consents are filled in, will not enter the scenario.
Scheduled
Customers from the selected segment will enter the scenario at regular intervals:
- Daily at a specific time.
- On selected days of the week.
- Once a month on a specific day.
- According to your own schedule (cron expression).
Date
The scenario runs once, on a specific date and time for the selected customer segment.
Custom event
The scenario starts when a customer performs a specific action on the site, like downloading an e-book or watching a product video. You need to define this event beforehand in Scenarios > Custom events > Create new custom event.
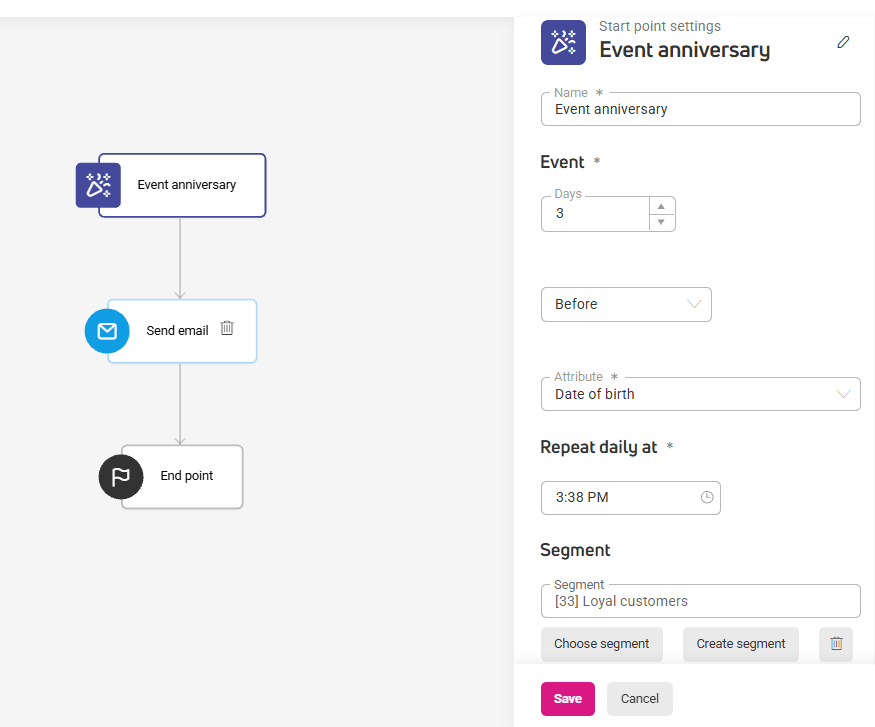
Event anniversary
The scenario will target customers celebrating a specific event at a specific time, exactly on the day of the event, or a certain number of days before or after the event.
This starting point is ideal for automated communication with customers whose birthdays are, for example, in 3 days.
Website activities
Abandoned browsing
Customers who viewed a product but didn’t add it to their cart will enter the scenario.
Example use: Send an email with product information and other customers’ reviews.
Abandoned cart
Customers who added a product to their cart but didn’t complete the purchase will enter the scenario:
- When customers add a product to their cart but don’t visit it.
- When customers visit their cart but don’t make a purchase.
Example use: Send a series of 3 emails – cart reminder, purchase support, discount code.
Add to cart
Customers will enter the scenario after adding any product to their cart.
Example use: Suggest complementary products or shipping information.
Order
Customers will enter the scenario as soon as they land on the order confirmation page. The order’s status isn’t important.
Example use: Send a thank you email or suggest additional products.
Price drop
Customers will enter the scenario when the price of products they’re interested in drops. We compare the current product price with the price the customer saw on your site.
Configuration:
- Price reduction by at least
Specify the minimum reduction value and type – percentage or amount reduction in your store’s currency.
You can choose one or both conditions. If you select both conditions, the scenario will trigger when both are met, for example, product prices drop by 10% but by no less than 10 PLN.
- Price reduction applies to customers
Specify the conditions a customer must meet to enter the scenario and get information about the reduced price. Choose one of two conditions:
Customers have the product: in cart, on favorites list. You can choose both options. This means the customers will be notified about the reduction when they have the product on their wishlist and in their cart.
Customers: viewed product, added product to cart, added product to wishlist. You can choose all options and limit the time customers viewed or added the product – up to 60 days.
- Check price reductions
Set the schedule for checking reductions in the product feed:
- Daily – how often reductions will be checked in days. You can set a range from 1 to maximum 31 days.
- Weekly – reductions will be checked weekly on selected days. You can choose one or multiple days.
Don’t check prices too often – frequent changes can generate spam. Optimally once daily or every few days.
- Ignore products purchased within the last
In this section, exclude customers from the scenario who have already ordered the desired products within a maximum of 30 days.
After selecting the starting point, the side panel will display a list of channels and events you’ll use to build the scenario.
Communication channels
Channels are ways to communicate with customers in the scenario. You have three ways to reach them:
- Send email – create messages directly in the scenario. You can use personalization and dynamic content.
- Send SMS – short, specific messages. Remember about SMS marketing consents.
- Web push – instant notifications. Set delivery time for offline users (maximum 72 hours).
Custom events – what else can happen in scenarios
Events are actions you want to initiate for customers in the scenario.
Delay
Pauses progression to the next step for a specified time.
Examples: Wait 2 hours before sending a cart reminder, or 3 days before offering a discount.
Segmentation
Splits the scenario into different paths based on customer characteristics.
You can add a maximum of 10 segments. One segment will always be marked as All others – it collects customers who didn’t meet the conditions of other segments.
Example: New customers get a 20% welcome code; loyal customers get exclusive access to new products.
Set data
Changes customer information – attributes or consents – based on their actions in the scenario.
For consents, you can change their status to:
- Given.
- Not given.
For attributes, you have operations depending on their type:
For String, Text, Single select, URL, Yes/No (boolean) attributes:
- Set to a constant value – overwrites the existing attribute value with one you provide in the field below. The attribute value will change for every customer who enters this element in the scenario.
- Clear value – removes the value of the selected attribute for every customer in this element.
For Date, Date and time attributes:
- Set current date/date and time – changes the existing attribute value to the date and time when the customer entered this scenario element.
- Set to a constant value – overwrites the existing date and time with one you provide in the field below. The date and time will change for every customer who enters this scenario element.
- Clear value – removes this attribute’s value for every customer in this element.
For Money, Number attributes:
- Increase by a constant value – increases the attribute value by a constant, for example, adds 1 to the number of orders placed by customers.
- Decrease by a constant value – decreases the attribute value by a constant, for example, subtracts 1 from the number of orders customers can receive discounts on.
- Set to a constant value – overwrites the existing value with one you provide in the field below. The date and time will change for every customer who enters this scenario element.
- Clear value – removes this attribute’s value for every customer in this element.
How to use the ‘Set data’ element?
Example 1: Updating attributes based on customer reactions
Send a satisfaction survey, then mark customers based on their reactions. Create an attribute “Completed survey” (type: Yes/No), then use segmentation after sending the survey email. In each path, add a “Set customer data” element:
- For customers who completed the survey → set value to Yes.
- For customers who didn’t complete it → set value to No.
This creates segments for future campaigns based on engagement, like discounts for active customers or reactivation for inactive ones.
Example 2: Recording last purchase date
When a customer places an order, set the “Last purchase date” attribute (type: Date) to the current date. Later you can segment customers by when they last purchased – for example, send a reactivation campaign to those who haven’t bought anything in 90 days.
Example 3: Marking product preferences
After purchasing a specific product category (like sportswear), set the fixed value of the “Interest category” attribute (type: choice list) to “Sports”. This lets you send personalized campaigns with sports products to the right customers.
Templates
In the template library, you’ll find the most popular scenarios used in e-commerce. You can expand them freely. Remember that the selected template will overwrite the current scenario you’re working on.
Templates are divided into categories:
- All
- Abandoned cart – templates based on email or web push communication.
- Abandoned browse – scenario useful when customers browsed products in your store but didn’t add them to their cart.
- Price drop – scenarios starting from favorites lists or recently viewed products.
Click Preview next to a template to see how it works and evaluate if it fits your strategy.
Editing active scenarios
You can edit active scenarios without losing data, but consider the consequences:
What you can do safely:
- Add new elements.
- Change delay settings – this affects both new customers and those already in the scenario.
What requires caution:
- Removing elements – customers at that step will be removed from the scenario.
- Moving elements – customers “follow” the moved element.
Each edit of an active scenario creates a new version. Save changes only after making all modifications.
You’ll find statistics for individual versions in reports available in Automation > Scenarios > Statistics. The table available in Automation > Scenarios displays summary statistics for all scenario versions.