Business unit setup
A business unit is a company account assigned to a single sending domain, from which you can manage multiple websites. You can use the business unit alone or along with your co-workers. Each of you will operate then with their individual user account.
This guide will help you to set your account within your company’s your business unit in ExpertSender CDP, which is an essential step to unlock the full potential of the platform’s functionalities for effective communication with your customers.
Let’s get started!
The account setup is simple, and consists of two steps:
- Business unit registration and basic configuration – after registering the business unit, we’ll provide basic configuration and set up your account.
- Channels configuration – next, we send you an activation email. Log in to your account to complete the setup process for:
- the email channel
- the web tracking channel.
Once you’ve completed the configuration, we’ll confirm that your user account is ready to use.
Email channel configuration
You can configure the email channel yourself, or ask the IT department at your company for help. Here’s how to do it:
- Open the email you have received after account setup. It contains the activation link to your account within your company’s business unit.
- Click the link to enter ExpertSender platform.
- Open the main menu and go to Settings > Email.
- Open the Domain authentication tab. There you will find a notification regarding DNS settings for your domain. Set up the DNS records directly in your hosting service. Follow these instructions: How to set up the DNS records?

- After the DNS setup, go back to Settings > Email > Domain authentication.
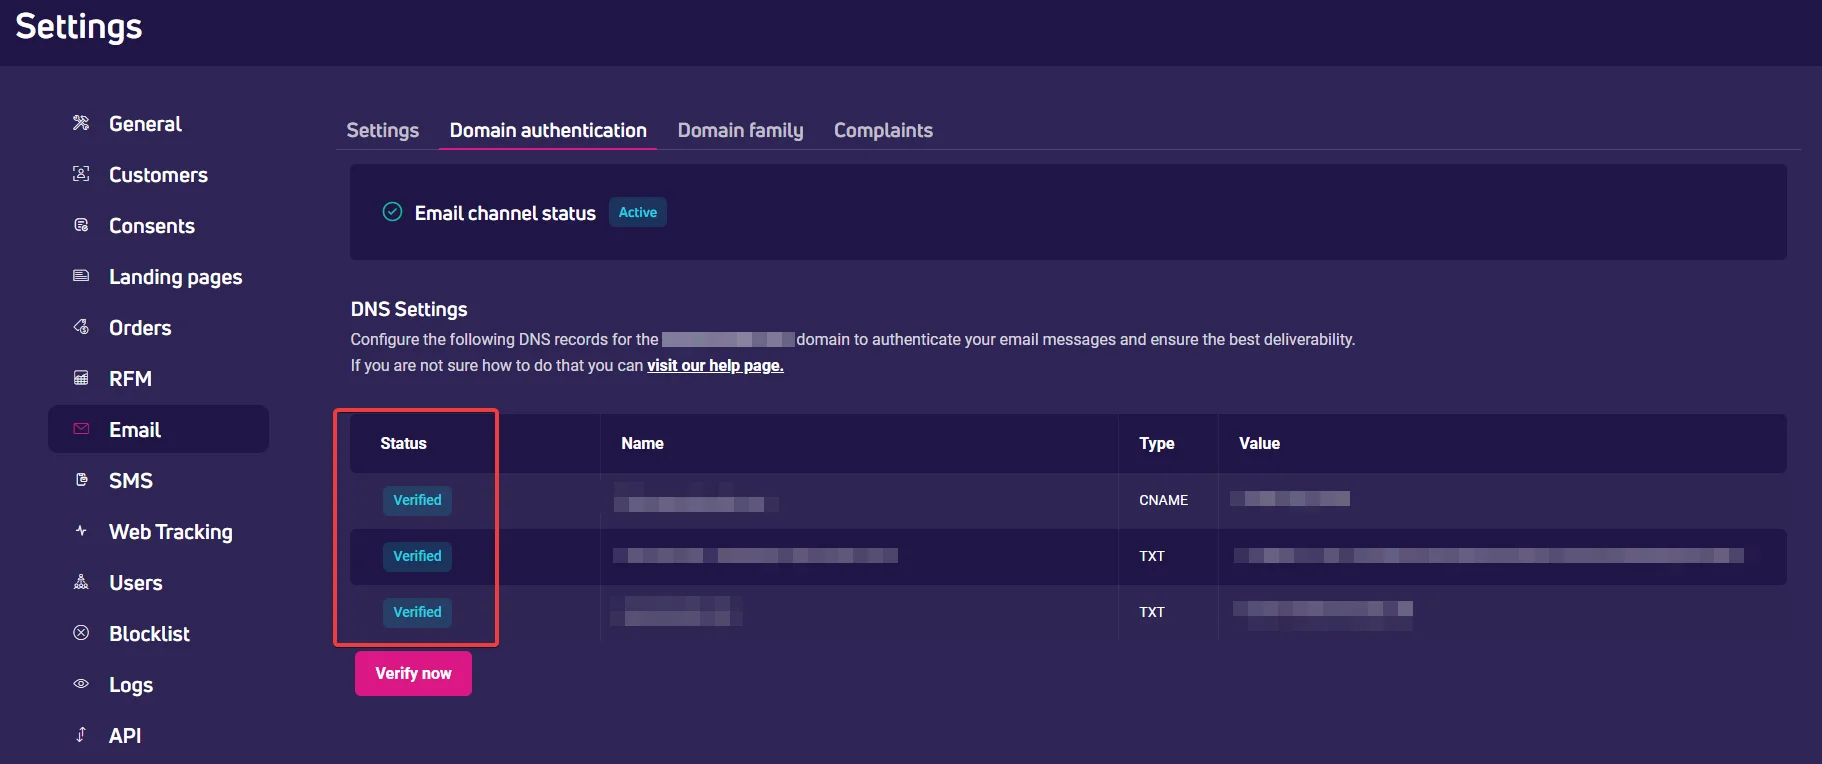
- Click Verify now to check the DNS status. The verification may take up to 48 hours.
- If the verification was successful, the DNS status will change to Verified and your account will be ready to use.
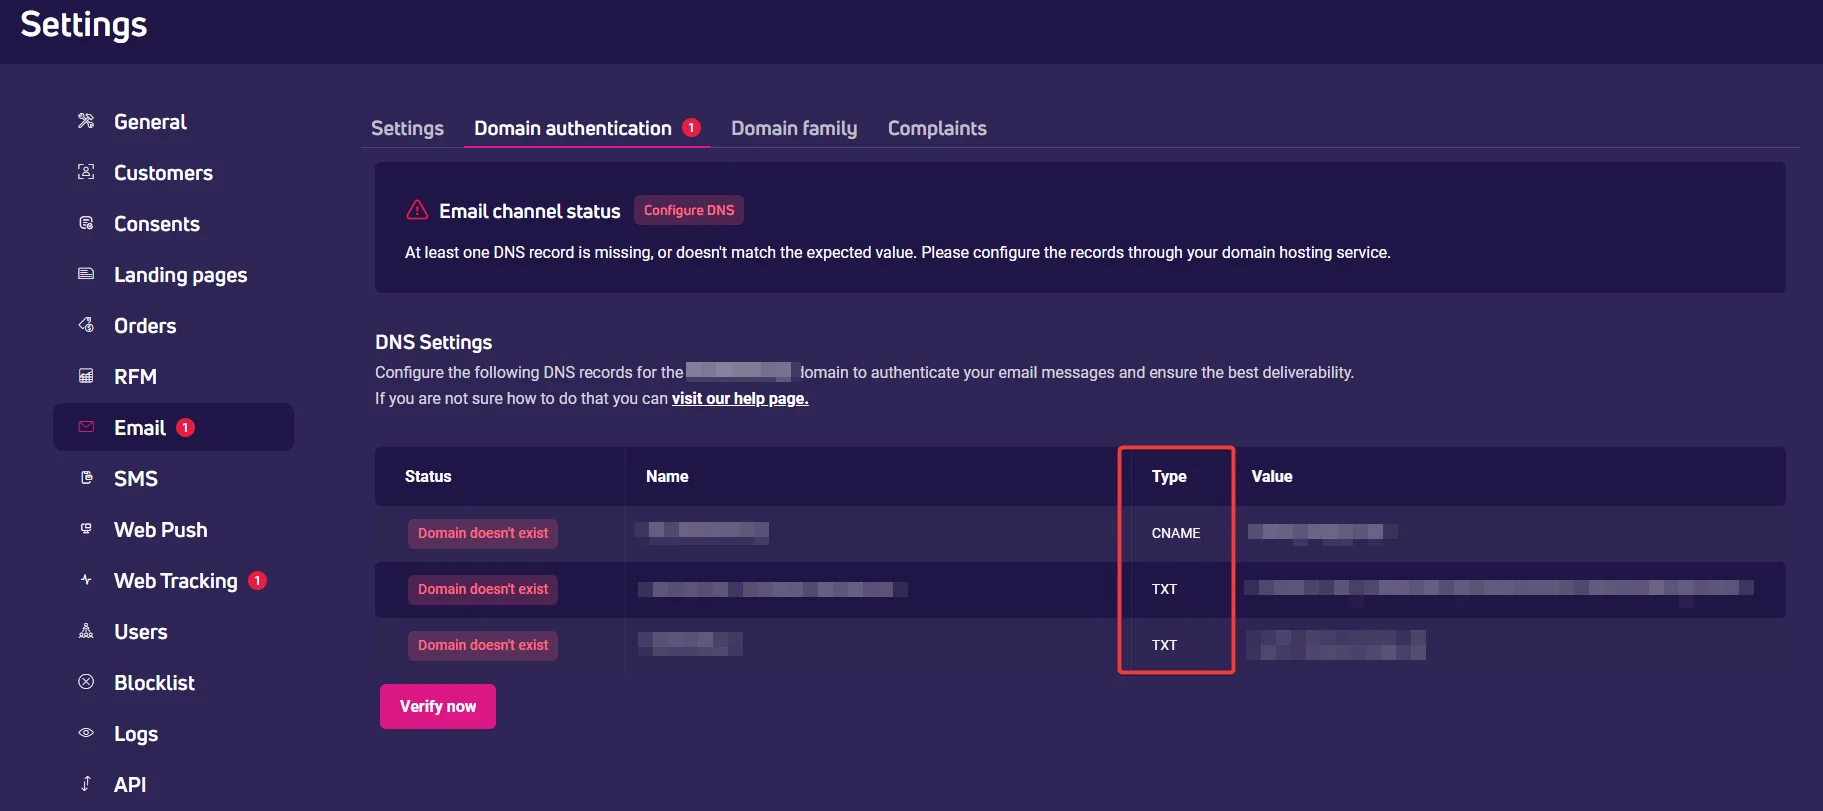
If the verification failed, the status will inform of the cause:
- Wrong value
- Domain does not exist
- Record not found
- Error

What to do if the DNS records verification failed?
- Check if the domain name is entered correctly and if there are any spelling mistakes. Double-check the settings in your hosting service for any errors.
- If all data are correct, report the error directly to your hosting service provider.
How to set up the DNS records?
- Login to your hosting service.
- In the domain settings enter the DNS records, e.g., a, txt, mx. You will find them in Settings > Email > Domain authentication.
- Repeat the steps for each domain you are using within your ExpertSender CDP business unit.
- Save changes.
DMARC policy in sender’s DNS – enhanced protection against cyberattacks#
Starting from February 2024, Gmail and Yahoo will require senders to publish a DMARC policy in the DMARC record within the DNS zone of your domain.
The DMARC policy serves to authenticate email messages and provides additional support to other fundamental authentication protocols. Implementing DMARC offers stronger protection against domain abuse, spoofing, or phishing attacks.
As the domain owner, you need to set the DMARC policy, which is a way of dealing with forged emails. This policy is available as a TXT instruction and informs the receiving server how to handle a message that fails the DMARC test.
The absence of a DMARC policy not only increases vulnerability to cyberattacks but can also lead to delivery issues. Therefore, we recommend configuring the basic parameters of the DMARC policy that must be included in the DNS record:
- Parameter v=DMARC1: This identifier enables the receiving server to run the DMARC test on the email message.
- Parameter p (policy): The policy can have one of three values:
- p=none – does not instruct the receiving server on what to do with a message that fails the DMARC check.
- p=quarantine – suggests placing such a message in the spam folder.
- p=reject – recommends outright rejection of a message not accepted by DMARC.
An example DMARC record may look like this: v=DMARC1; p=reject
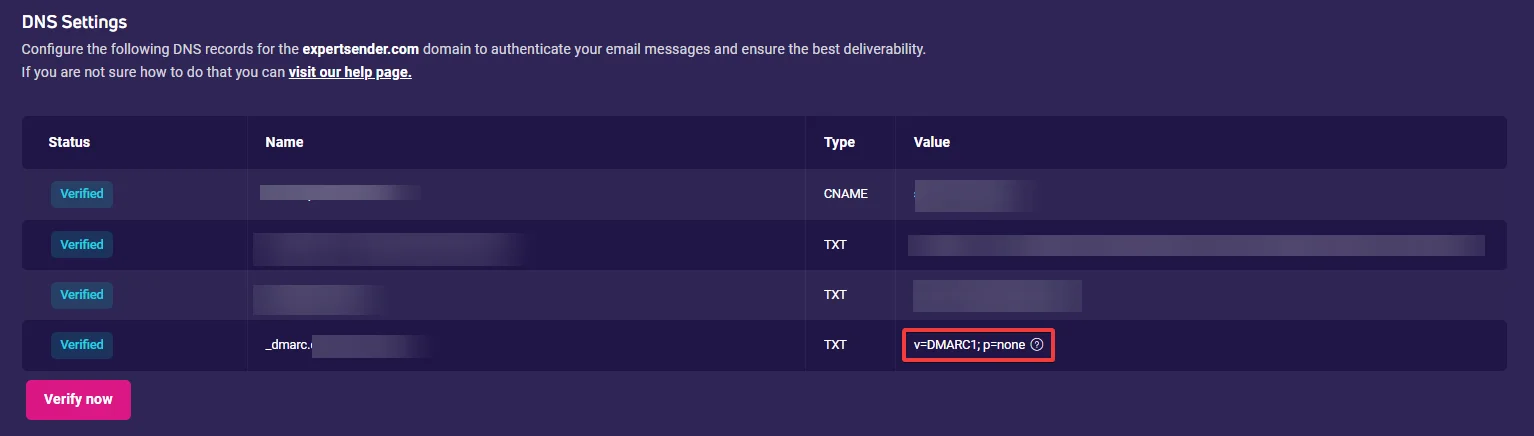
In the ‘p‘ parameter, you can set your preferred value, but we will always display ‘none‘ in Settings > Email > Domain authentication. This ensures compatibility with existing email infrastructure.
Web Tracking channel configuration
To use the Web Tracking, you need to place a piece of tracking code on your website. You can ask your website admin for help, or do it yourself:
- using the CMS plugin,
- placing it directly in your website’s code,
- with Google Tag Manger.
To ensure the Web Tracking channel works properly, place the tracking code in your website before the </footer> tag.
Where do I find the tracking code in ExpertSender platform?
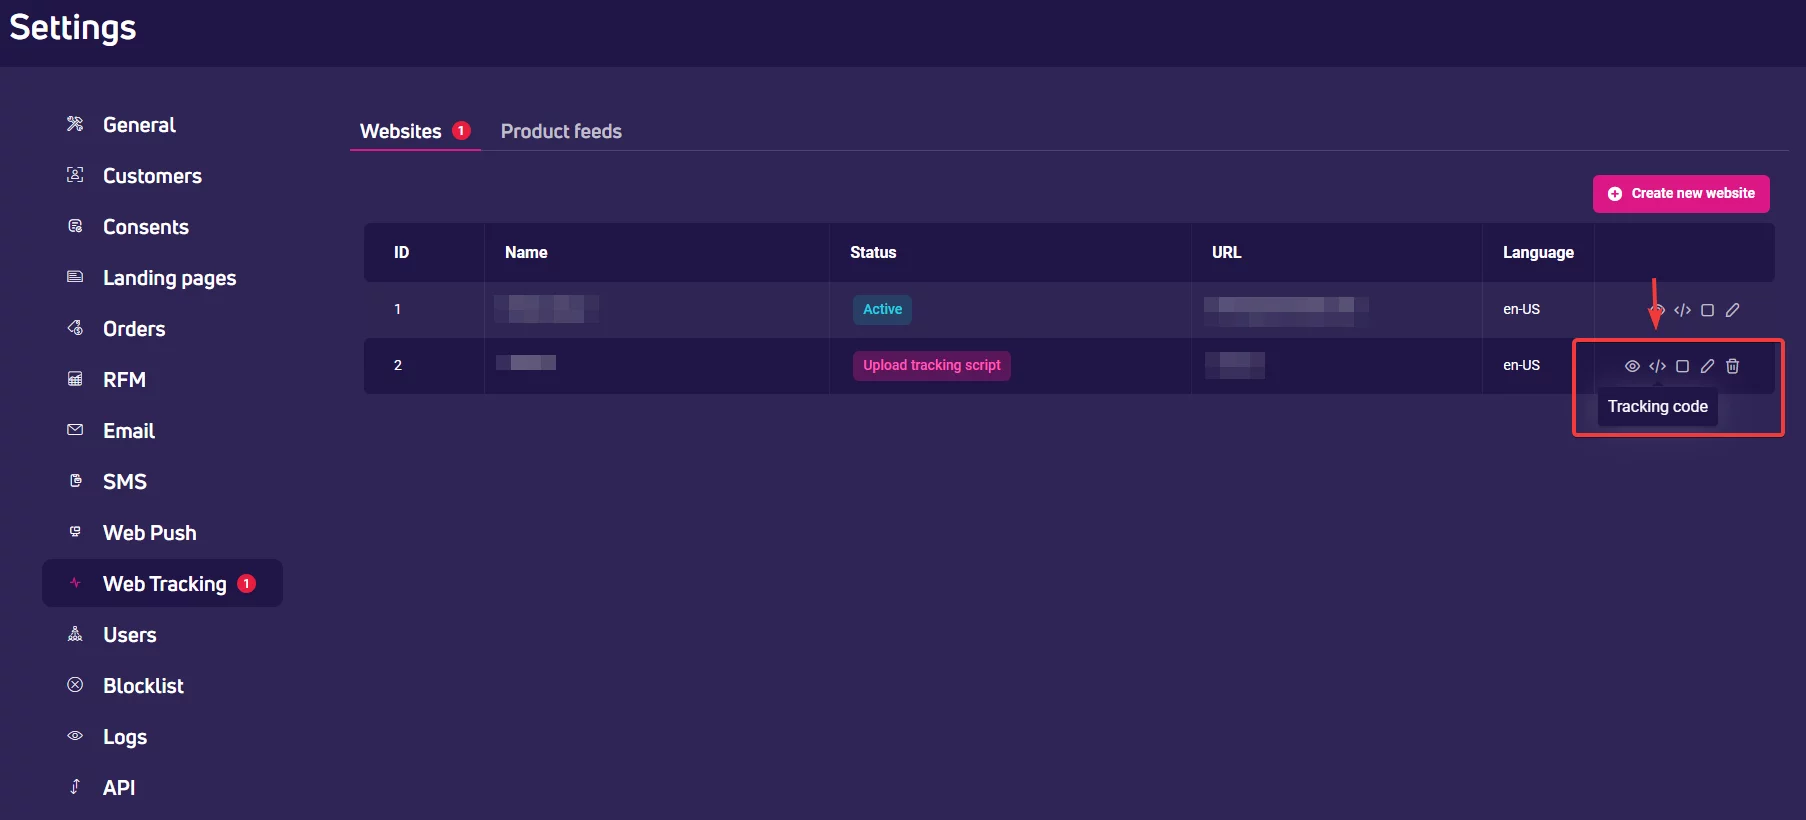
- Log in to ExpertSender CDP.
- Open the main menu and go to Settings > Web tracking > Websites.
- Find the website you want to add the tracking code to and click thttps://help.expertsender.com/wp-content/uploads/2024/02/unit-setup-web-tracking-code.png.webphe Tracking code icon.

- Copy the code to clipboard or download as TXT file.

The tracking code is ready to be added to your website with one of the following methods.
How to add tracking code with the CMS plugin?
- Login to your CMS account.
- Install the code management plugin.
- Run the plugin.
- Paste the tracking code in a respective place in the plugin – it is usually labeled as Footer or Header & Footer.
- Save changes.
How to add tracking code directly in the page code?
- Login to your CMS account.
- From the side menu o to the Appearance > Theme Editor section.
- Find the functions.php file in the Theme files list.
- Open it and paste the tracking code at the end of the file.
- Save changes.
How to add tracking code with Google Tag Manager?
For this method you need an active Google Tag Manager account linked to your website. You can carry out the installation of our tracking code yourself or ask your IT department for help.
Choose the installation scenario depending on whether you are going to collect customer data inside or outside EU.
I collect data from EU customers
If you operate in the European Union, please ensure you install the code that includes Google Consent Mode v2.
Google Consent Mode was developed to enhance the protection of internet users’ data and its implementation is required by EU law. This means that every visitor to your website must provide consent for the collection and processing of their data, which is stored in cookies. Only after obtaining this consent, you can activate our tracking code.
These instructions will guide you on how to link the activation of the ECDP tracking code to the user’s consent.
- Log in to the ExpertSender CDP platform.
- In the left panel, go to the Settings > Web Tracking.
- In the last column, find and click the Tracking code icon.
- Copy the code or download it as a text file.
- Go to Google Tag Manager.
- Access the container linked to the website where you will place the code.
- Go to the Tags tab.
- Click New to create a new tag.
- Name the tag, e.g., ‘ECDP tracking code’, then click on Tag Configuration.
- Select Custom HTML.
- In the HTML section, paste the tracking code copied from the platform.
- In the Consent Settings > Additional Consent Checks > Require additional consent for tag to fire, select the type of consent required to activate the tag on your site. If the visitor does not give this consent, the tracking code will not fire.
- Go to the Rules section.
- Find the rule (trigger) you use for Consent Mode v2. The rule name may vary depending on the Consent Mode v2 implementation tool you use. If you do not use any tool, read How to create a rule.
- Save the changes.
- Test if the code was added correctly – click Preview in the upper right corner.
- Then go to your website, provide the required consent to activate the script, and perform an action, such as adding any product to the cart.
- Return to the preview window and check if the created tag was fired.
- Close the preview window and click Publish.
How to create a rule
- In the sidebar menu, click Rules.
- Click New.
- Name the rule, e.g., “cookie consent update”.
- Click the Configure Rule section.
- Select the Custom Event rule type.
- Enter the event name. The name must be associated with the mechanism you use on your store’s website for managing cookies. Use only lowercase letters when entering the event name.
- Select the condition All Custom Events, which must be met for the rule to activate.
- Name the rule and click Save.
- Go to the tag that should trigger the ECDP tracking code on your site.
- Click the Rules section.
- Select the rule you just created from the list.
- Save the changes made to the tag.
- Test the created tag according to the instructions above – start from step 17.
- If the tests are successful, click Publish.
I don’t collect data from EU customers
If you operate outside the EU market, you do not need to support Google Consent Mode on your website. In this case, install the code according to these instructions:
- Close the preview window and click Publish.
- Log in to the ExpertSender CDP platform.
- In the left panel, go to the Settings > Web Tracking.
- In the last column, find and click the Tracking code icon.
- Copy the code or download it as a text file.
- Go to Google Tag Manager.
- Go to the container linked to the website where you will place the code.
- Go to the Tags tab.
- Click New to create a new tag.
- Name the tag, e.g., ‘ECDP tracking code’, then click on Tag Configuration.
- Select Custom HTML.
- In the HTML section, paste the tracking code copied from the platform.
- Save the changes.
- In the Rules tab, set when the ExpertSender code will fire on your site.
- Choose the Page View rule and select the All Pages option. This setting ensures the code fires on every subpage.
- Save the changes.
- Test if the code was added correctly – click Preview in the upper right corner.
- Then go to your website and perform an action, such as adding any product to the cart.
- Return to the preview window and check if the created tag was fired.