WooCommerce integration guide
Below is a detailed step-by-step guide to integrate the WooCommerce plugin with ExpertSender CDP, explaining each tab and feature.
Download WooCommerce ECDP integration from GitHub repository
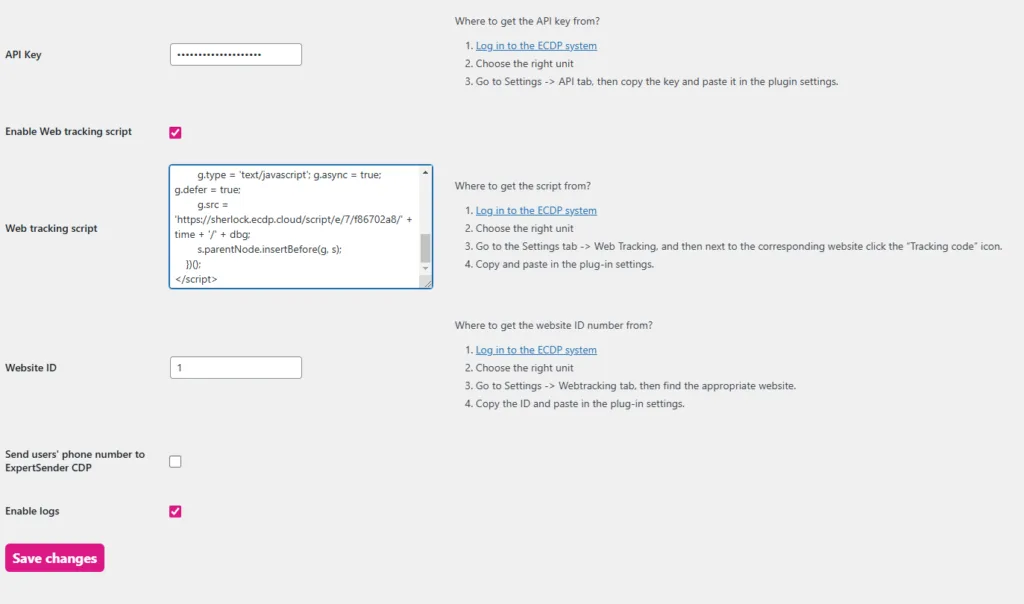
General Settings tab
Steps to configure General Settings
- API Key: Enter the API key obtained from ExpertSender CDP. To get the API key in ECDP platform:
- Navigate to Settings > API.
- Copy the API key.
- Enable Web Tracking script: Check this option to enable tracking. To get the tracking code in ECDP platform:
- Navigate to Settings > Web Tracking > Websites.
- Find your website and click the Tracking code icon
- Copy and paste the code in the designated field.
- Website ID: Enter the website ID associated with your account in ExpertSender CDP. To get the website ID:
- Navigate to Settings > Web Tracking > Websites in ExpertSender CDP.
- Copy the website ID and paste it here.
- Send users’ phone number to ExpertSender CDP: Enable this if you want to sync phone numbers.
- Important note: This checkbox should be selected only if the store stores phone numbers in an international format (with a country prefix, e.g., +1 for the USA). If phone numbers are stored in a local format (without the prefix), we recommend leaving this option disabled to avoid synchronization issues.
- Enable logs: Enable logging to track plugin activity.
Field mappings tab
The Field mappings tab is used to map custom WooCommerce fields to corresponding attributes in ExpertSender CDP.
We automatically map the following fields:
- Relating to customers:
- E-mail,
- CRM ID,
- Phone number, if selected in Settings > Customers > Customers > Minimum customer data.
- Relating to orders:
- ID,
- Date,
- Time zone,
- Status,
- Currency,
- Order value.
- Relating to products:
- ID,
- Name,
- Price,
- Quantity,
- URL,
- Image URL,
- Category.
Field mapping options
- Product field mappings: Map custom product fields (e.g., size, weight) to ECDP product attributes.
- User field mappings: Map WooCommerce user fields (e.g., registration date, custom metadata) to ECDP custom attributes.
- Order field mappings: Map custom order fields (e.g., store ID, delivery preferences) to ECDP order attributes.
Example use case
If a WooCommerce store stores custom user information (like “user tier”), it can be mapped to a ECDP custom field.
Consent mapping tab
This tab allows mapping of WooCommerce forms (e.g., registration, checkout) to consents in ExpertSender CDP.
Steps to configure consent mapping#
- Click Add to create a new mapping.
- ECDP Consent: Select the consent created in ExpertSender CDP.
- Default: “Email Consent” for email subscriptions, “SMS Consent” for SMS marketing.
- To create custom consent in ExpertSender CDP, go to Settings > Consents and note the ID of the consent.
- Location: Choose where the consent checkbox should appear.
- Examples: Registration page, checkout page.
- Consent text: Enter the text to display next to the checkbox.
Form settings with consents tab
This tab customizes the behavior of forms where marketing consents are collected.
Form configuration options
- Text displayed before consents: Add a custom heading above checkboxes (e.g., “Marketing Consents”).
- Optional: This field can be left blank if you prefer not to display any text above the consents.
- Form mode: Choose between:
- Single opt-In: Immediately accepts the consent upon submission.
- Double opt-in: Sends a confirmation email or SMS to verify consent.
- Confirmation message ID in double opt-in mode: If double opt-In is selected, provide the message ID configured in ExpertSender CDP.
Example use case#
- With text: If you want to group consents under a heading like “Marketing Consents,” add the desired text.
- Without text: Leave the field empty to display only the checkboxes without any additional text.
Supported types of forms
- Registration form.
- Profile edit form.
- Checkout form.

Order status mapping tab#
In this tab, you can map WooCommerce order statuses to order statuses in ExpertSender CDP.
Default configuration
- Placed: Mapped to standard order statuses like “Pending” or “Processing.”
- Paid: Mapped to “Completed.”
- Cancelled: Mapped to “Cancelled.”
These mappings fit most stores but can be modified if custom statuses are used.
Customization
- Add custom WooCommerce statuses if necessary.
- Map them to corresponding ECDP statuses.

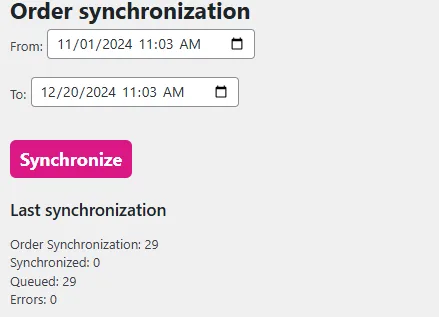
Order synchronization tab#
This feature is used to sync historical orders with ExpertSender CDP. It is primarily used at the start of cooperation to ensure all previous data is included.
Steps to synchronize orders
- Select the date range for synchronization using the From and To fields.
- Click Synchronize.
- View synchronization results, including:
- Total orders synchronized.
- Any errors or issues.