Shopify – konfiguracja wtyczki
Wtyczka ExpertSender CDP dla Shopify umożliwia:
- Przesyłanie informacji o zamówieniach (wraz ze statusami) do ECDP.
- Synchronizowanie danych klientów (dla subskrypcji korzystających z natywnej integracji Shopify).
- Śledzenie ruchu na stronie za pomocą warstwy danych (data layer).
- Mapowanie niestandardowych pól Shopify z niestandardowymi cechami w ECDP.
- Obsługiwanie sklepów wielorynkowych.
Wtyczkę znajdziesz pod adresem https://apps.shopify.com/ecdp
Konfiguracja wtyczki
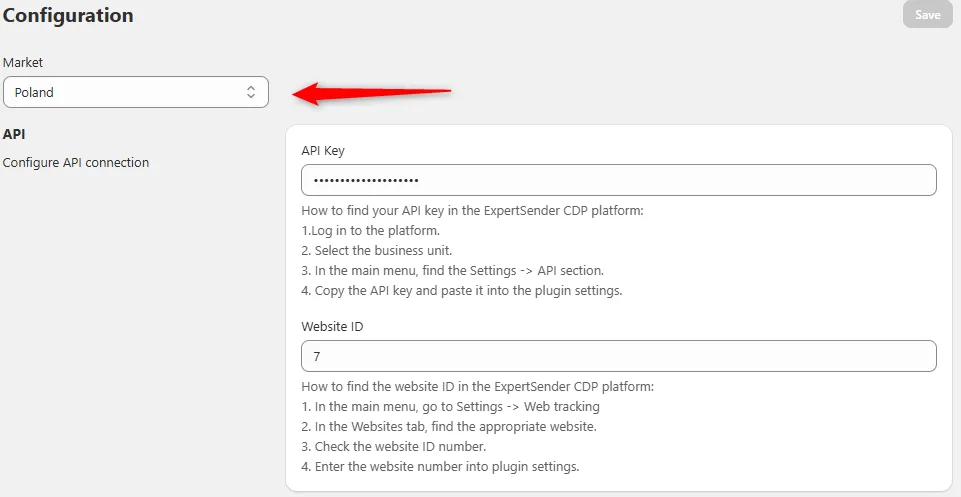
Konfiguracja API i strony internetowej
- Przejdź do Ustawienia > API w panelu administracyjnym Shopify.
- Wprowadź swój klucz API i ID strony internetowej dostępne w ECDP. Gdzie je znaleźć?
- Klucz API: Ustawienia > API.
- ID strony internetowej: Web Tracking > Strony www. W pierwszej kolumnie tabeli znajdziesz ID strony www.

Obsługa wielu rynków
Wtyczka obsługuje sklepy działające na wielu rynkach. Możesz skonfigurować opcje specyficzne dla rynku, wybierając odpowiedni rynek z menu rozwijanego Market na stronie ustawień.
Konfiguracja Web Tracking
Aby prawidłowo skonfigurować śledzenie internetowe i obsługiwać zdarzenia warstwy danych w sklepie opartym na platformie Shopify, wykonaj następujące kroki:
Kod śledzący
Krok 1: dodaj kod śledzący
- W panelu administracyjnym Shopify przejdź do Ustawienia > Web Tracking.
- Wklej kod śledzący ECDP r do głównej sekcji ustawień Web Tracking. Gdzie znajdziesz kod śledzący?
- Zaloguj się do ExpertSender CDP.
- Przejdź do Ustawienia > Web Tracking.
- Wybierz swoją stronę internetową i skopiuj skrypt klikając ikonę </>.
- Zapisz ustawienia.
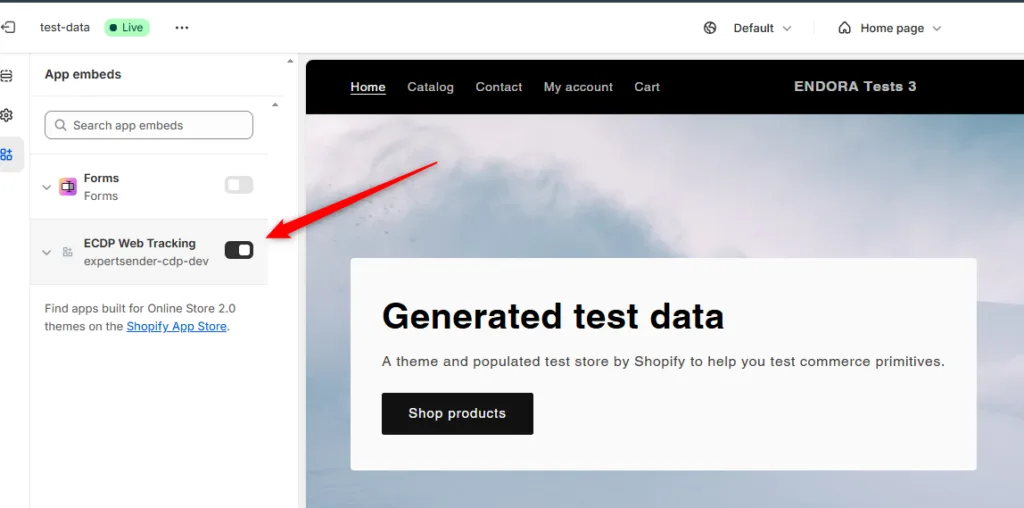
Krok 2: uruchom śledzenie w ustawieniach motywu
- Przejdź do Sklep online > Motywy > Dostosuj.
- W Osadzenia aplikacji znajdź i aktywuj ECDP Web Tracking, aby upewnić się, że skrypt śledzący został połączony z motywem Twojego sklepu.
Obsługa warstwy danych do śledzenia zdarzeń
Po skonfigurowaniu skryptu śledzącego uruchom dodatkowe śledzenie zdarzeń, np. zdarzenie „add_to_cart”:
- Przejdź do Ustawienia > Zdarzenia klientów > Dodaj niestandardowy piksel.
- Nazwij piksel „expertsender-cdp”.
- Skopiuj kod piksela z głównej strony ustawień klikając „Kopiuj kod”.
- Wróć do Ustawienia > Web Tracking i wklej kod piksela w odpowiednie pole.
- Zapisz ustawienia, aby upewnić się, że piksel jest prawidłowo skonfigurowany do śledzenia zdarzeń.
To umożliwi śledzenie dodatkowych zdarzeń dataLayer niezbędnych do monitorowania ruchu internetowego.
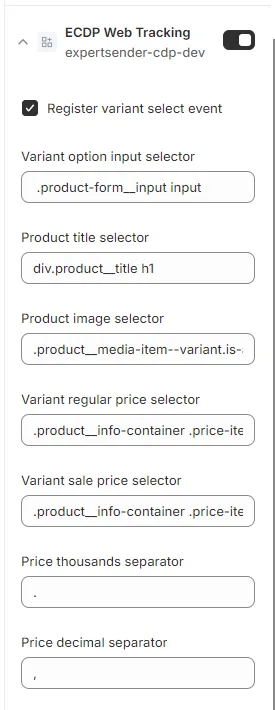
Śledzenie produktów wielowariantowych (obsługa zdarzenia „select_item”)
Jeśli Twój sklep sprzedaje produkty z wieloma wariantami, np. w różnych rozmiarach lub kolorach, skonfiguruj dodatkowe śledzenie dla zdarzenia „select_item”.
- Przejdź do Sklep online > Motywy > Dostosuj > Osadzenia aplikacji > ECDP Web Tracking.
- Wypełnij wymagane selektory CSS do wyboru wariantów, w tym:
- Selektor pola wyboru wariantu: menu rozwijane lub przycisk jednokrotnego wyboru (radio buton), gdzie klienci wybierają wariant produktu.
- Selektor tytułu produktu: selektor nazwy produktu.
- Selektor obrazu produktu: selektor obrazu produktu, który aktualizuje się wraz z wybranym wariantem.
- Selektor regularnej ceny wariantu: selektor pola ceny dla regularnej ceny.
- Selektor ceny promocyjnej wariantu: selektor dla ceny po rabacie (jeśli dotyczy).
Jak znaleźć selektor CSS:
- Kliknij prawym przyciskiem myszy na element w swoim sklepie Shopify.
- kliknij Zbadaj.
- Skopiuj unikalną ścieżkę selektora dla tego elementu.
Przykładowy zestaw danych:
| Pole | Wartość |
| Selektor pola wyboru wariantu | .product-form__input input |
| Selektor tytułu produktu | div.product__title h1 |
| Selektor obrazu produktu | .product__media-item–variant.is-active .product__media img |
| Selektor regularnej ceny wariantu | .product__info-container .price-item–sale |
| Selektor ceny promocyjnej wariantu | .product__info-container .price-item–sale |
| Separator tysięcy w cenie | . |
| Separator dziesiętny w cenie | , |
Konfiguracja danych klientów
Sekcja Dane klientów na głównej stronie ustawień pozwala skonfigurować sposób zbierania i wysyłania danych klientów, szczególnie numerów telefonów i zgód, do ExpertSender CDP.
Skonfiguruj zbieranie tych danych według instrukcji poniżej:
Adres, z którego pobierany jest numer telefonu klienta
- Adres rozliczeniowy: domyślnie numer telefonu klienta będzie zbierany z adresu rozliczeniowego w Shopify.
- Jeśli chcesz zbierać numer telefonu z adresu dostawy, wybierz tę opcję z menu rozwijanego.
ID zgód ECDP
Aby upewnić się, że zgody klientów (e-mail i SMS) są prawidłowo wysyłane do ECDP, musisz skonfigurować ID zgód w tej sekcji. Zgody odpowiadają tym utworzonym na platformie ExpertSender CDP.
- ID zgody ECDP dla e-mail:
domyślnie to pole ma wartość 1, co w ECDP oznacza ID zgody na otrzymywanie wiadomości e-mail.
Jeśli w ECDP utworzone są niestandardowe zgody, zaktualizuj to pole odpowiednim ID zgody dla wiadomości e-mail. - ID zgody ECDP dla SMS:
domyślnie to pole ma wartość 2, co w ECDP odpowiada ID zgody na otrzymywanie wiadomości SMS.
Podobnie jak w przypadku zgody na e-mail, jeśli używasz niestandardowych zgód w ECDP, upewnij się, że wprowadzisz poprawne ID zgody dla wiadomości SMS.
Znajdowanie ID niestandardowych zgód w ECDP
- Zaloguj się do swojego konta w ExpertSender CDP.
- Przejdź do Ustawienia > Zgody.
- Znajdź utworzone zgody i skopiuj odpowiadające im ID.
- Wklej poprawne ID zgód w pola E-mail i SMS na stronie ustawień wtyczki Shopify.
Eksport historycznych danych zamówień i klientów
Na początku współpracy z ExpertSender CDP zalecamy wyeksportowanie historycznych zamówień lub danych klientów ze sklepu Shopify do ECDP. Umożliwi to prowadzenie kampanii marketingowych na podstawie pełnych danych.
- Przejdź do strony Główne ustawienia we wtyczce.
- W sekcji Eksportuj dane możesz wybrać:
- Eksport danych z określonego okresu.
- Eksport wszystkich danych historycznych (zamówienia lub klienci).
Eksport możesz wykonać ręcznie na początku integracji, mając na uwadze, żeby wszystkie istotne dane były zsynchronizowane z ECDP i tym samym gotowe do dalszego użycia.
Mapowanie pól niestandardowych
Wtyczka pozwala mapować niestandardowe pola Shopify z odpowiadającymi im cechami w ECDP.
- Przejdź do Ustawienia > Mapowanie pól niestandardowych.
- Wybierz, które pola Shopify związane z zamówieniami, produktami lub cechami klientów chcesz synchronizować z niestandardowymi polami w ECDP.
- Upewnij się, że pola w ECDP zostały utworzone, aby ułatwić mapowanie.
Synchronizacja zamówień i klientów
- Informacje o zamówieniach: informacje o zamówieniach wraz ze statusami są wysyłane do ECDP automatycznie, bez dodatkowej konfiguracji.
- Informacje o klientach: dane klientów są synchronizowane automatycznie za pomocą natywnej integracji Shopify z ECDP, łącznie z informacjami o zapisach (subskrypcjach).