How to add a confirmation message to your newsletter subscription?
Double opt-in is an effective way to grow your mailing list with verified email addresses. The process involves signing up via a form and clicking a verification link in the confirmation message. This type of message can also be sent to customers added to the database via API.
Each new ExpertSender CDP account comes with a system confirmation, marked as Default message. If you want to use your own confirmation, you can easily create it in our editor. You can mark it as default if you want to permanently replace the system message.
What are the benefits of double opt-in?
- Your database contains only verified email addresses – your messages reach genuinely interested recipients.
- It’s GDPR-compliant – proves that the recipient agreed to contact (i.e., personal data processing) by clicking the confirmation link.
- Improves email deliverability – the number of hard bounces in each send is low, and your sender reputation stays safe.
- Helps maintain database hygiene – subscription confirmation sent to an email effectively prevents fake email addresses and spam traps from appearing in the database.
How the double opt-in process works
- The recipient signs up through a form or is added to your database via API.
- The consent gets the Awaiting confirmation status and the platform sends the confirmation message.
- Optional: up to two reminders go out after a set time, if you configure them.
- The recipient clicks the confirmation link and lands on a landing page.
The consent status changes to granted.
How to create a confirmation message?
You can add your own confirmation or use the ready-made content available under the name Confirm your subscription. You can, of course, edit its content. If you want to create a confirmation from scratch, follow these steps:
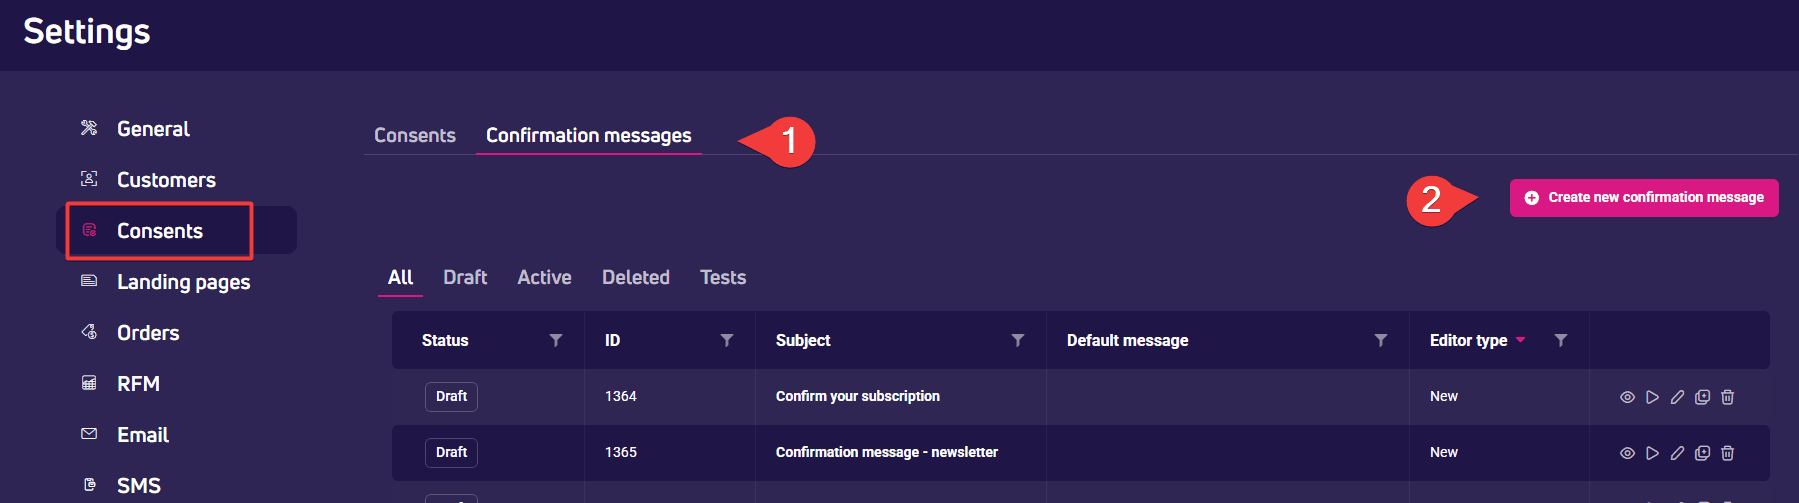
- In the side panel, select Settings > Consents > Confirmation messages.
- Click the Create new confirmation message button.

- Clicking will open a simplified version of the content editor.
- In the Basic settings tab, fill in the Subject and From fields.
- Select tracking options.
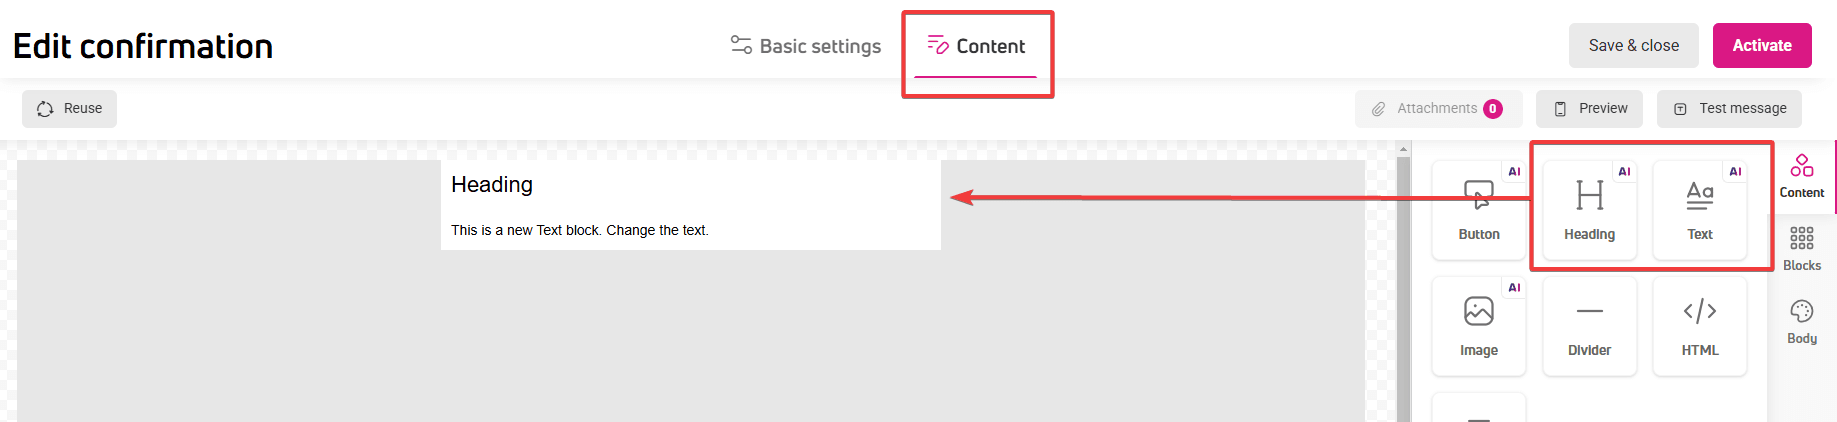
- Go to the Content tab.

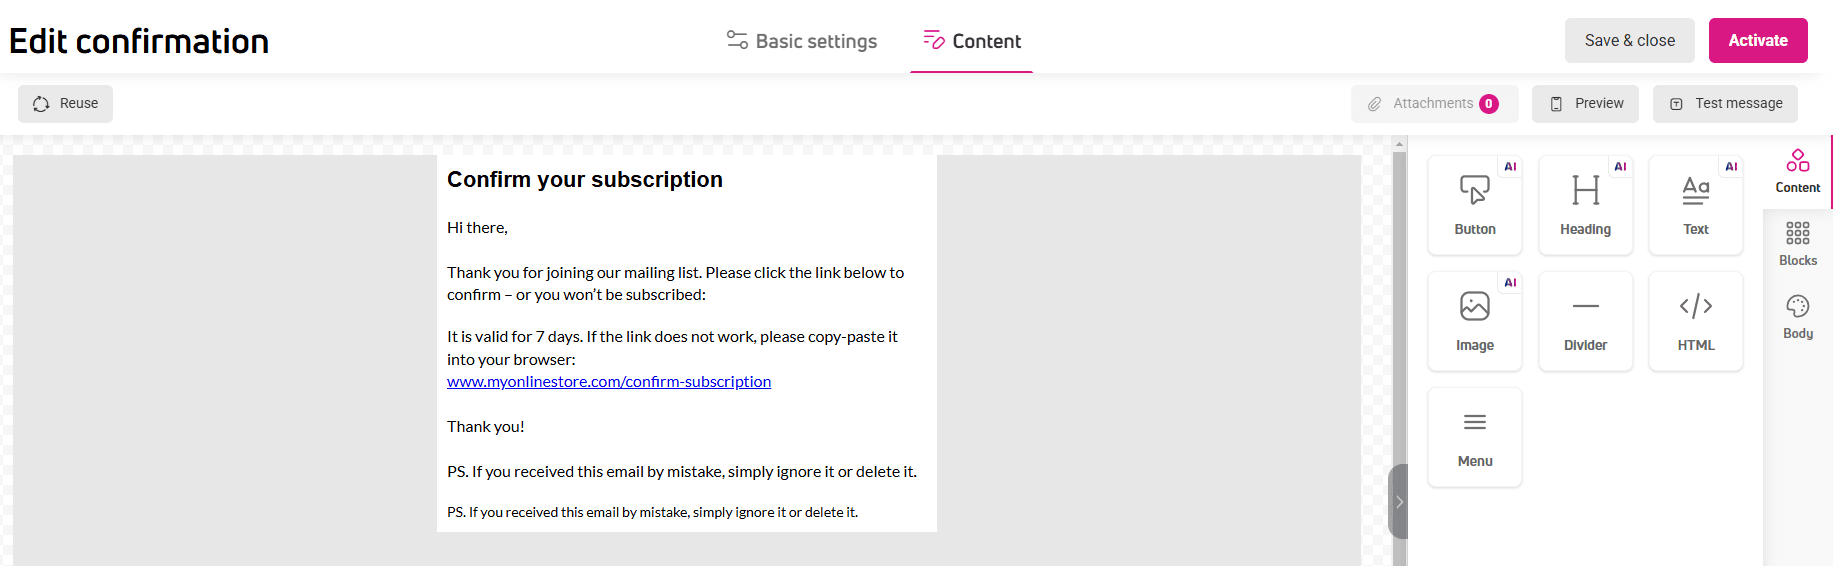
- Add the confirmation message text.

Add a confirmation link as a button
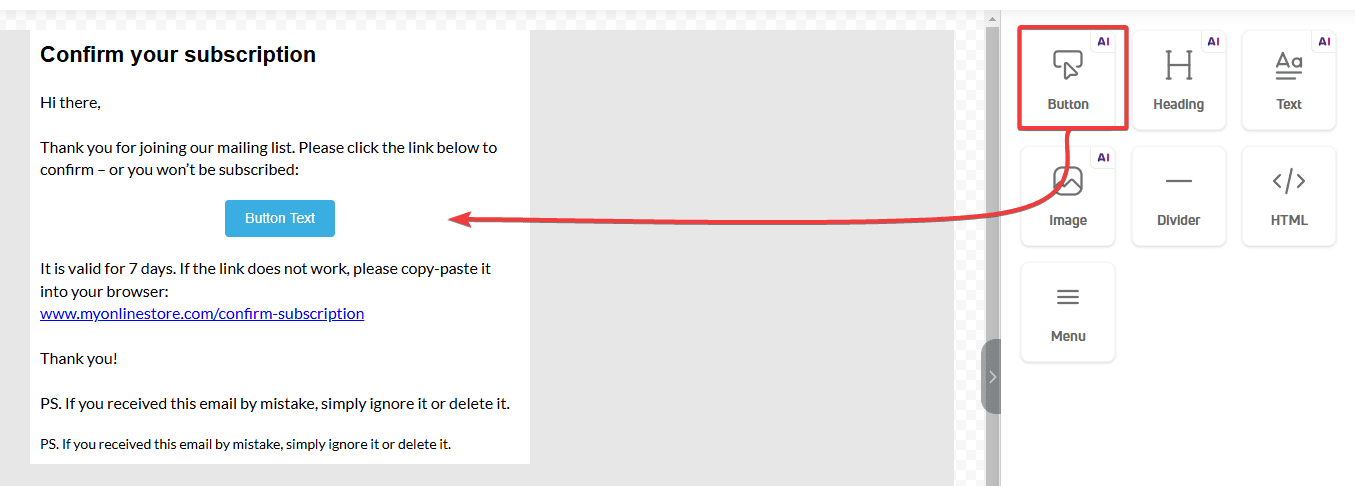
- In the text, add a Button block that will redirect the recipient to the subscription confirmation page when clicked.

- Click the button you just added. This will give you access to the button settings panel.
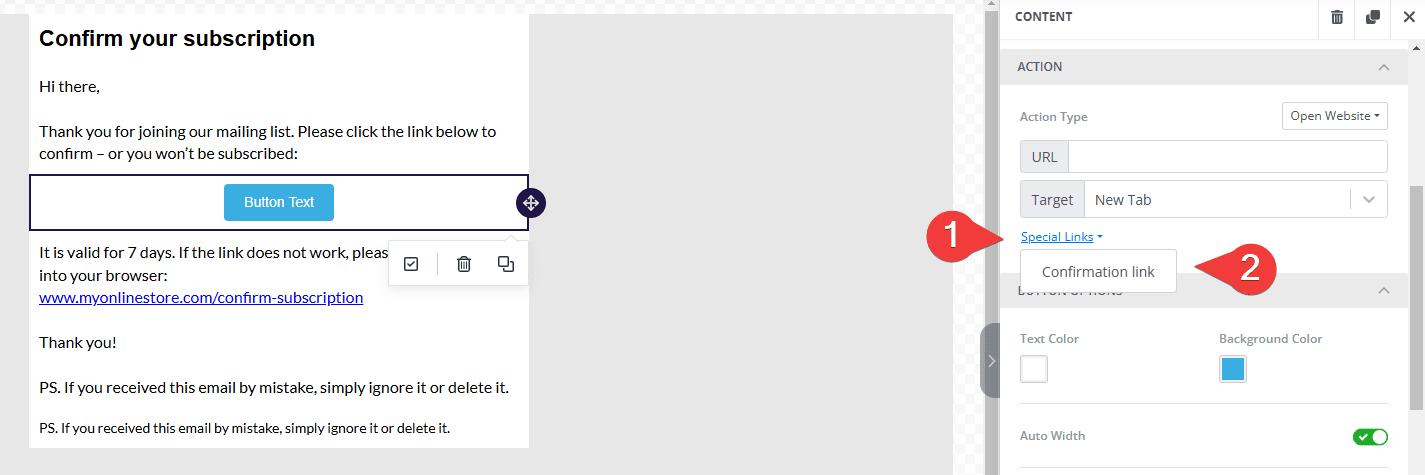
- In the side panel, click Special links.
- Select Confirmation link.

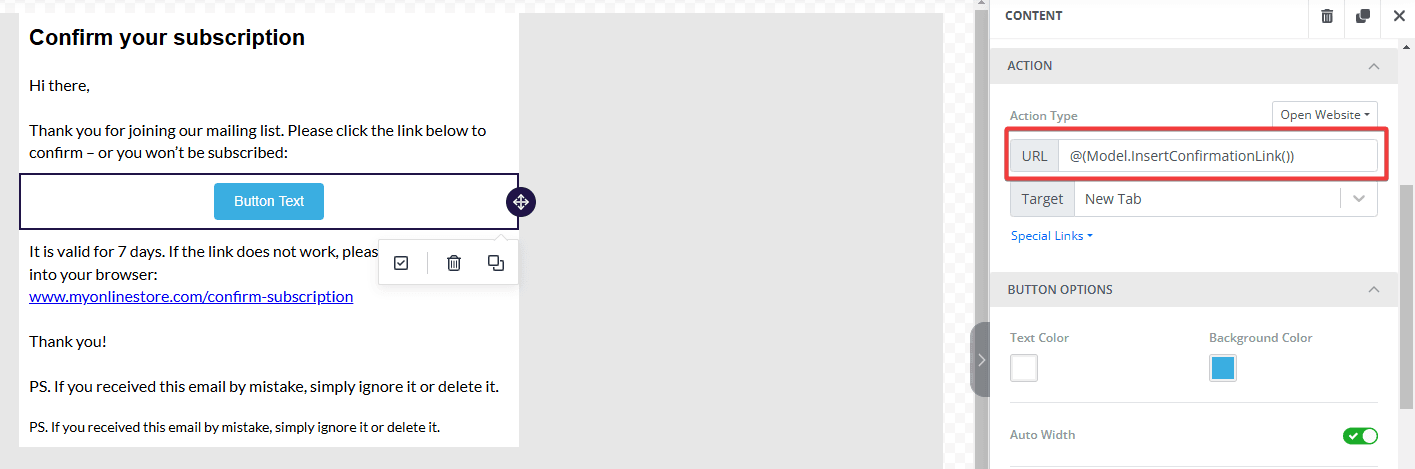
- In the side panel, in the URL section, dynamic content will appear that automatically redirects the recipient to the subscription confirmation page.

- Add button text:
- Return to the button block in the workspace.
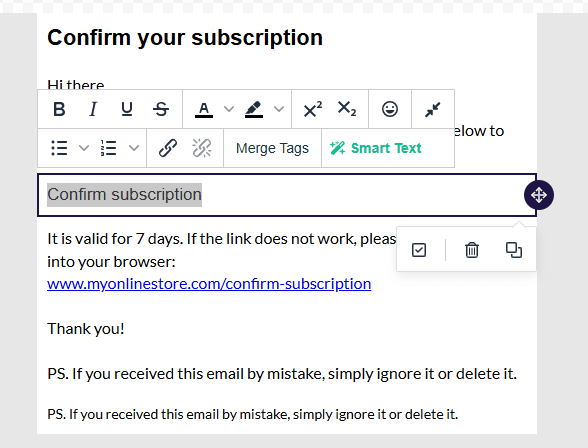
- Select the text visible on the button and add your own call-to-action.
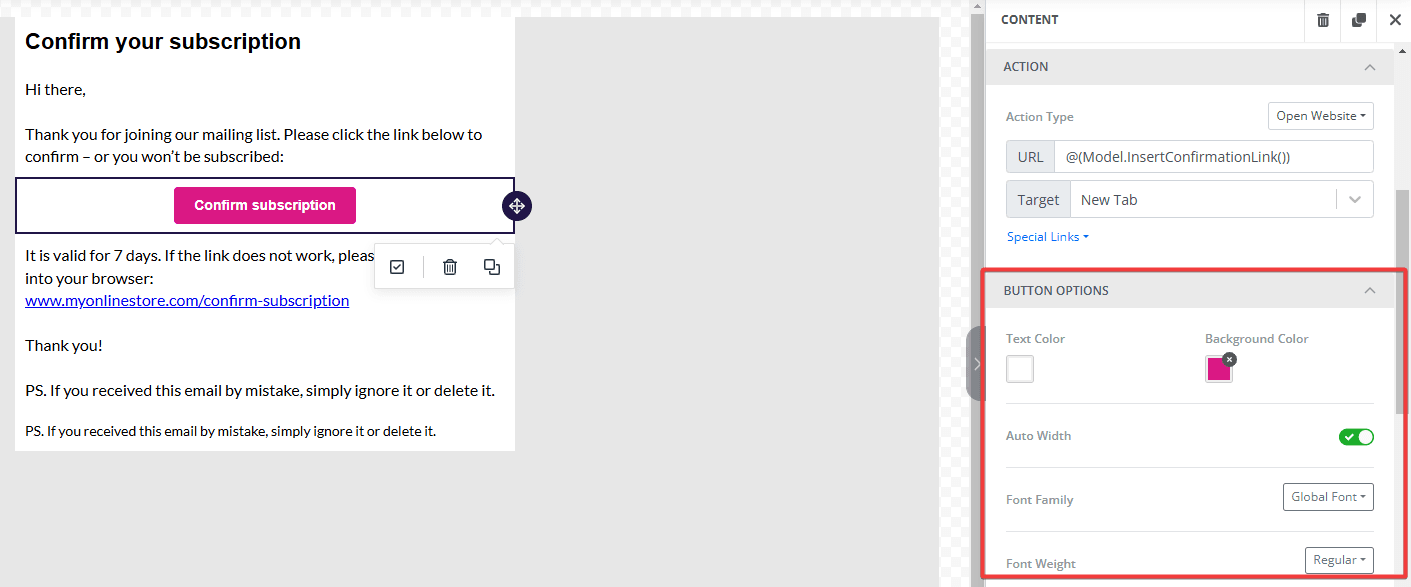
- In the following sections, adjust the button appearance to your preferences.

- When the message is ready, click Activate in the top right corner to launch it.
- If you want to add reminders, click the dropdown button on the left side of the editor. You can add up to two reminders, now or later. For instructions, read How to create a reminder for a confirmation message.
Add a confirmation link as text
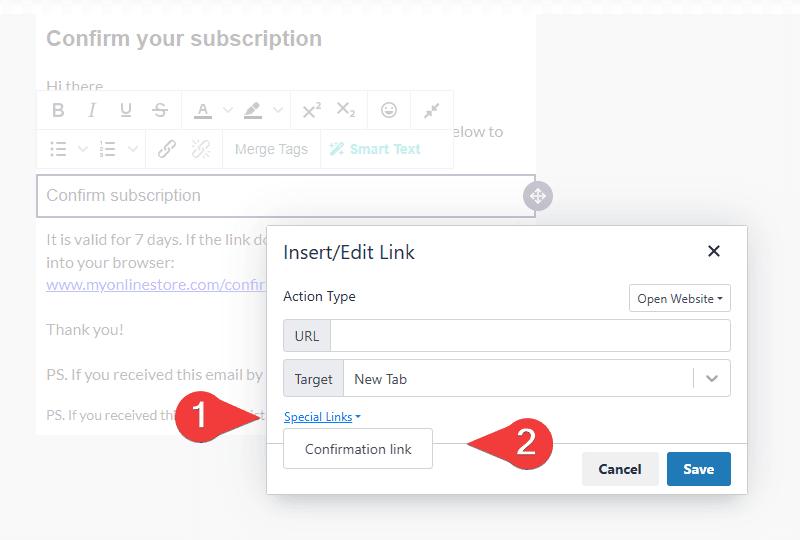
- Select the text that will redirect the recipient to the subscription confirmation page when clicked.
- In the context menu, click Insert/edit link.

- A window with link settings will appear.
- Click Special links.
- Select Confirmation link.

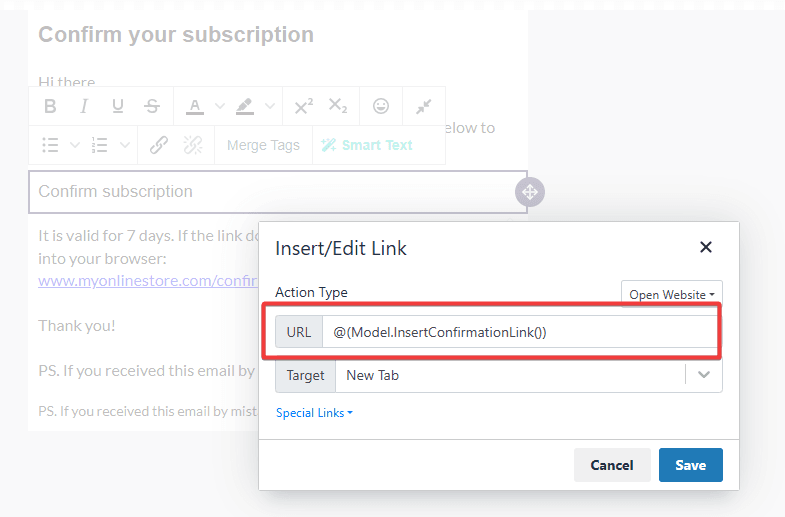
- In the URL section, dynamic content will appear that automatically redirects the recipient to the subscription confirmation page.

- Save the settings.
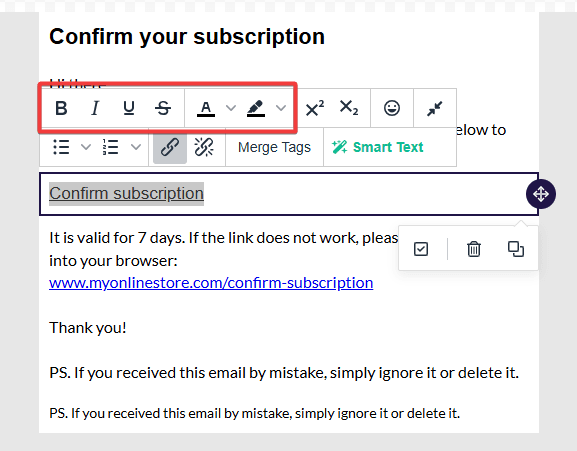
- If you want to edit the link appearance, select the text again.
- In the context menu, choose the link color and underline.

How to set a selected confirmation message as default ?
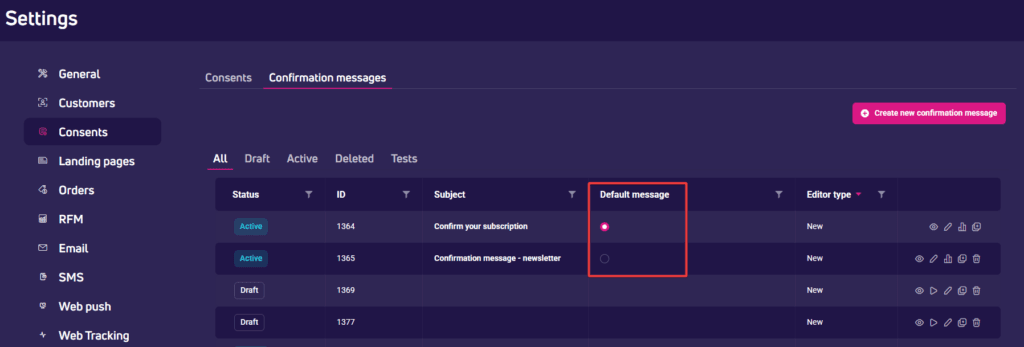
- Make sure the confirmation message has an Active status.
- In Settings, go to the Landing pages tab and select Confirmation messages.
- Find the appropriate confirmation in the list.
- In the Default message column, mark your chosen confirmation.
Landing pages for subscription confirmation
The confirmation link in the message leads to a landing page informing that the signup, e.g., for the newsletter, was successful.
You can redirect recipients to:
- Your landing page, designed specifically for this purpose, e.g., www.yourstore.com/confirm-subscription.
- System page, available in the platform. Use it if your confirmation page isn’t ready yet.
If you want to use your own designed confirmation page:
- In the side panel, select Settings > Landing pages.
- In the Subscription confirmation pages section, in the Successful subscription field, paste the link to your prepared page.

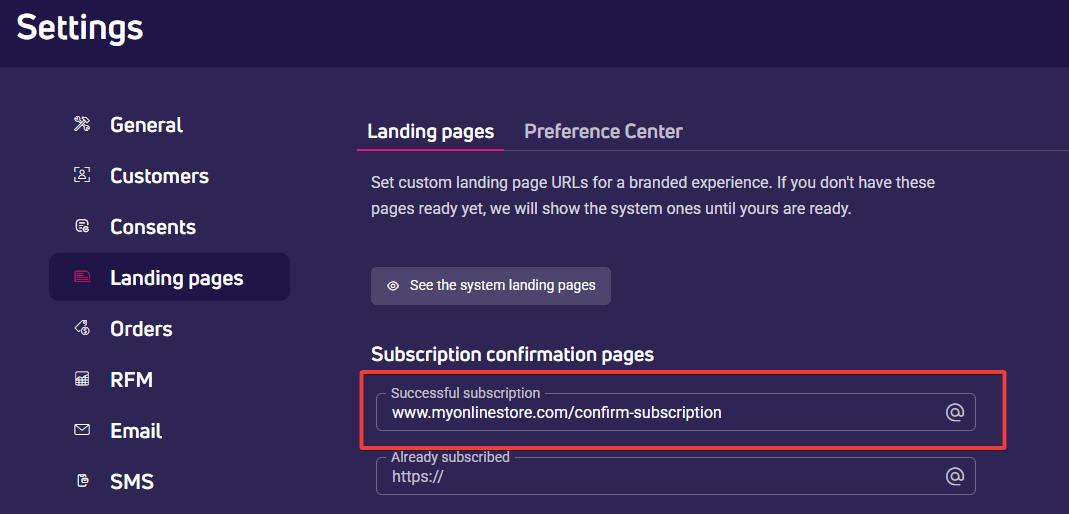
In the same section, you’ll also find a field for a link to a page informing that the address already exists in your database. Here, you can paste a link to your own page or use our system page.
If you prefer to use the system page, leave the Successful subscription field empty. When creating the confirmation, use the Confirmation link dynamic content as we described in How to create a confirmation message?
That’s all – when the user clicks the link in the confirmation message, they’ll be redirected to the system page.
You can also set up the Expired link page. This is where recipients land when they click the confirmation link after 30 days. You’ll find it in Settings > Landing pages, in the Broken link page section.
What happens after the confirmation message is sent?
Sending the confirmation doesn’t close the double opt-in process. Below we explain how long the confirmation link works and what happens to a consent the recipient never confirmed.
How long does the confirmation link work?
The confirmation link is valid for 30 days from the moment the message was sent.
- If the recipient clicks the link after that time, they land on the Expired link page.
- If the recipient clicked the link earlier and the signup is already confirmed, they land on the Already subscribed page.
You can replace both pages with your own in Settings > Landing pages.
How long does the Awaiting confirmation status last?
Indefinitely. The platform doesn’t clear or delete consents with the Awaiting confirmation status automatically. The status changes only when:
- the recipient clicks the confirmation link in a valid message,
- another process, import or integration updates the consent.
The link expiring after 30 days doesn’t change the consent status. In practice this means your database can hold recipients who have had the Awaiting confirmation status for many months.
Why does the date next to the Awaiting confirmation status change?
The date shows the last update of the consent record, not the moment of the original signup. It changes, among other cases, when:
- you send another confirmation message via API with the force parameter,
- another consent appears for the same customer, for example the recipient withdrew their consent, signed up again and didn’t confirm the signup.
This is why you can see a current date next to someone who tried to sign up a year ago.
To check where the last change came from, open the customer’s Customer 360 profile. In the Consents table, the Last change and Change source columns show the date and the source of the most recent update of that consent.
How to add a reminder to a confirmation message?
Reminders are messages sent a few days after a user subscribes to a newsletter. They significantly reduce the cost of acquiring new contacts and increase the number of subscribers.
If you want to add a reminder, you can do so while creating confirmation emails. For instructions, read How to create a reminder for a confirmation message
How to send a subscription confirmation message after a form is submitted?
- In the side panel, select Automation > Forms > Create form.
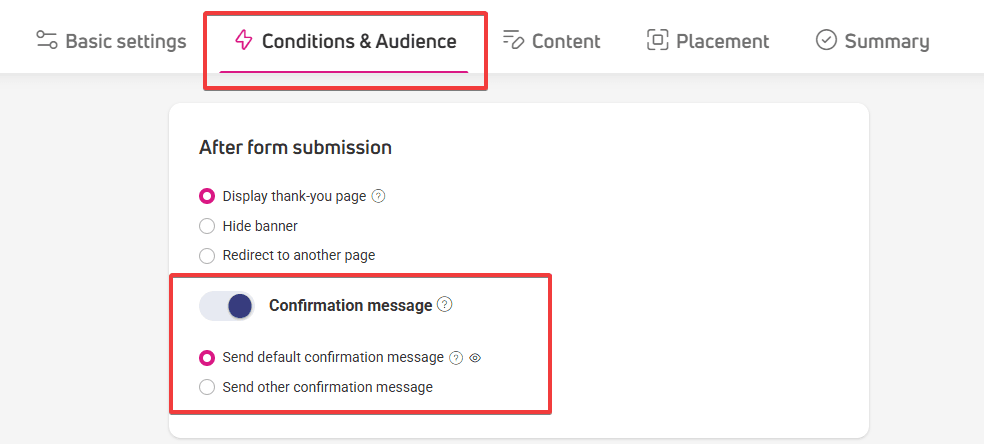
- Go to Conditions & Audience.
- In the After form submission section, toggle the Confirmation message option
- Click:
- Send default confirmation message to send a confirmation message set as a default in Settings > Consents > Confirmation messages.
- Send other confirmation message and select any other confirmation from the list.

- After form activation, the confirmation will be sent automatically to every recipient who fills out the form.
Confirmation messages – frequently asked questions
Can I send a reminder to everyone with the Awaiting confirmation status?
No. A reminder only reaches people who are still within the time window set in your reminder configuration, which is at most about two weeks from the moment the confirmation message was sent. People who signed up a month or a year ago won’t get a reminder, even if you turn reminders on today.
The platform also doesn’t allow sending a newsletter or any other campaign to all unconfirmed addresses. This limitation is intentional and protects your sender reputation.
You have two options:
- Set up reminders in advance, before you start adding new customers to the double opt-in process. For instructions, read How to create a reminder for a confirmation message.
- Send the confirmation again via API, if you want to reach people who didn’t confirm their consent earlier. See: How to send the confirmation message again to a customer who didn’t confirm their consent?
Can one confirmation message handle multiple consents?
Yes. When creating a signup form, you can indicate several consents to be granted. When the recipient clicks the confirmation link in the message, all selected consents will be activated simultaneously.
Do I need a separate confirmation message for each consent?
This isn’t necessary. You can:
- Use the default confirmation message for all forms.
- Create a dedicated message for a specific form, regardless of the number of consents it contains.
How to send a confirmation message after adding a customer via API?
- Transfer customer data to the platform using the POST method.
- In the consentsData > consents parameter, set the following values:
- id — ID number of the consent granted by the customer. You can find the numbers in the table located in Settings > Consents > Consents.
- value — indicates consent status. Enter ‘AwaitingConfirmation‘, which means the consent is waiting for customer confirmation. Using this status will trigger automatic sending of the subscription confirmation message.
- Send the data to the platform.
- You’ll receive a 201-status response, meaning the customer’s consent status has been changed, and we’ve sent them a confirmation message.
When integrating via API, you have more flexibility:
- You can specify which confirmation message should be sent.
- You can pass one or more consents for confirmation.
- If you don’t specify a particular message, the system will send the message set as default.
What happens if the recipient already has an active consent?
If the recipient has already given consent, and you receive an API request with the same consent but with the status “AwaitingConfirmation,” the consent status will not change. It will still be recorded in the system as granted (i.e., with the status ‘True’).
How to send the confirmation message again to a customer who didn’t confirm their consent?
- Transfer customer data to the platform using the POST method.
- In the consentsData parameter, set the following values:
- consents > value — enter AwaitingConfirmation for the consent in question.
- force — enter true.
- confirmationMessageId — optional, the ID of the confirmation message. If you skip this field, we’ll send the message set as default.
- Send the data to the platform.
The force parameter sends another confirmation link even if the customer received such a message before. This is the only way to restart the double opt-in process for older records.
Keep in mind that using the force parameter updates the date next to the consent status.