Webhooks
Webhooks let ECDP send customer events to your own system as soon as they happen. You can use them to keep your CRM or ERP in sync with consent changes, or to follow message deliveries, opens and clicks, without polling the API.
Events you can send
Each webhook sends one type of event. Choose a category, then an event type in that category:
- Consents – Consent given, Consent awaiting confirmation, Consent confirmed, Consent revoked.
- Email – Send, Delivery, Bounce, Complaint, Open, Click.
- SMS – Send, Bounce, Click.
- Web push – Send, View, Click.
- Mobile push – Send, View, Click.
If one operation changes several consents of a customer at once, ECDP sends a separate request for each changed consent. To see what each request contains, go to Webhook payloads.
When ECDP sends consent events. ECDP sends a consent event when a customer’s consent changes because:
- the customer submits a web form, or is created from your website by the web tracking script. A single opt-in consent sends Consent given. A double opt-in consent sends Consent awaiting confirmation.
- the customer clicks the confirmation link in a double opt-in email. ECDP sends Consent confirmed.
- you add, update or delete the customer through the API, in the ECDP panel or in the preference center. ECDP sends Consent given, Consent awaiting confirmation or Consent revoked for each consent that changed.
- the customer unsubscribes with the link in an email or SMS or from a web push message, or a spam complaint revokes their consents. ECDP sends Consent revoked.
- the customer subscribes to web push, or a mobile device is registered. ECDP sends Consent given.
ECDP doesn’t send consent events for customer imports, mass actions in the panel or scenario actions that set customer data.
Creating a webhook
- Go to Settings > Webhooks.
- On the Webhooks tab, click Create webhook.
- Enter a Name.
- Select a Category and an Event type.
- If you chose Consents, you can use Limit to specific consents to pick one or more consents. If you leave it empty, the webhook triggers for every consent in the business unit.
- In Destination URL, enter the address that should receive the events. It must start with https://.
- If your system requires authentication, fill in Authentication header name and Authentication header value. The name is filled in with ApiKey by default, and you can change it to match your system, for example to Authorization or X-API-KEY. ECDP adds this header to every request, including the test request.
- Click Verify connection. ECDP sends a test request to your address. The result appears next to the button.
- When the test succeeds, click Activate. The webhook starts working right away.
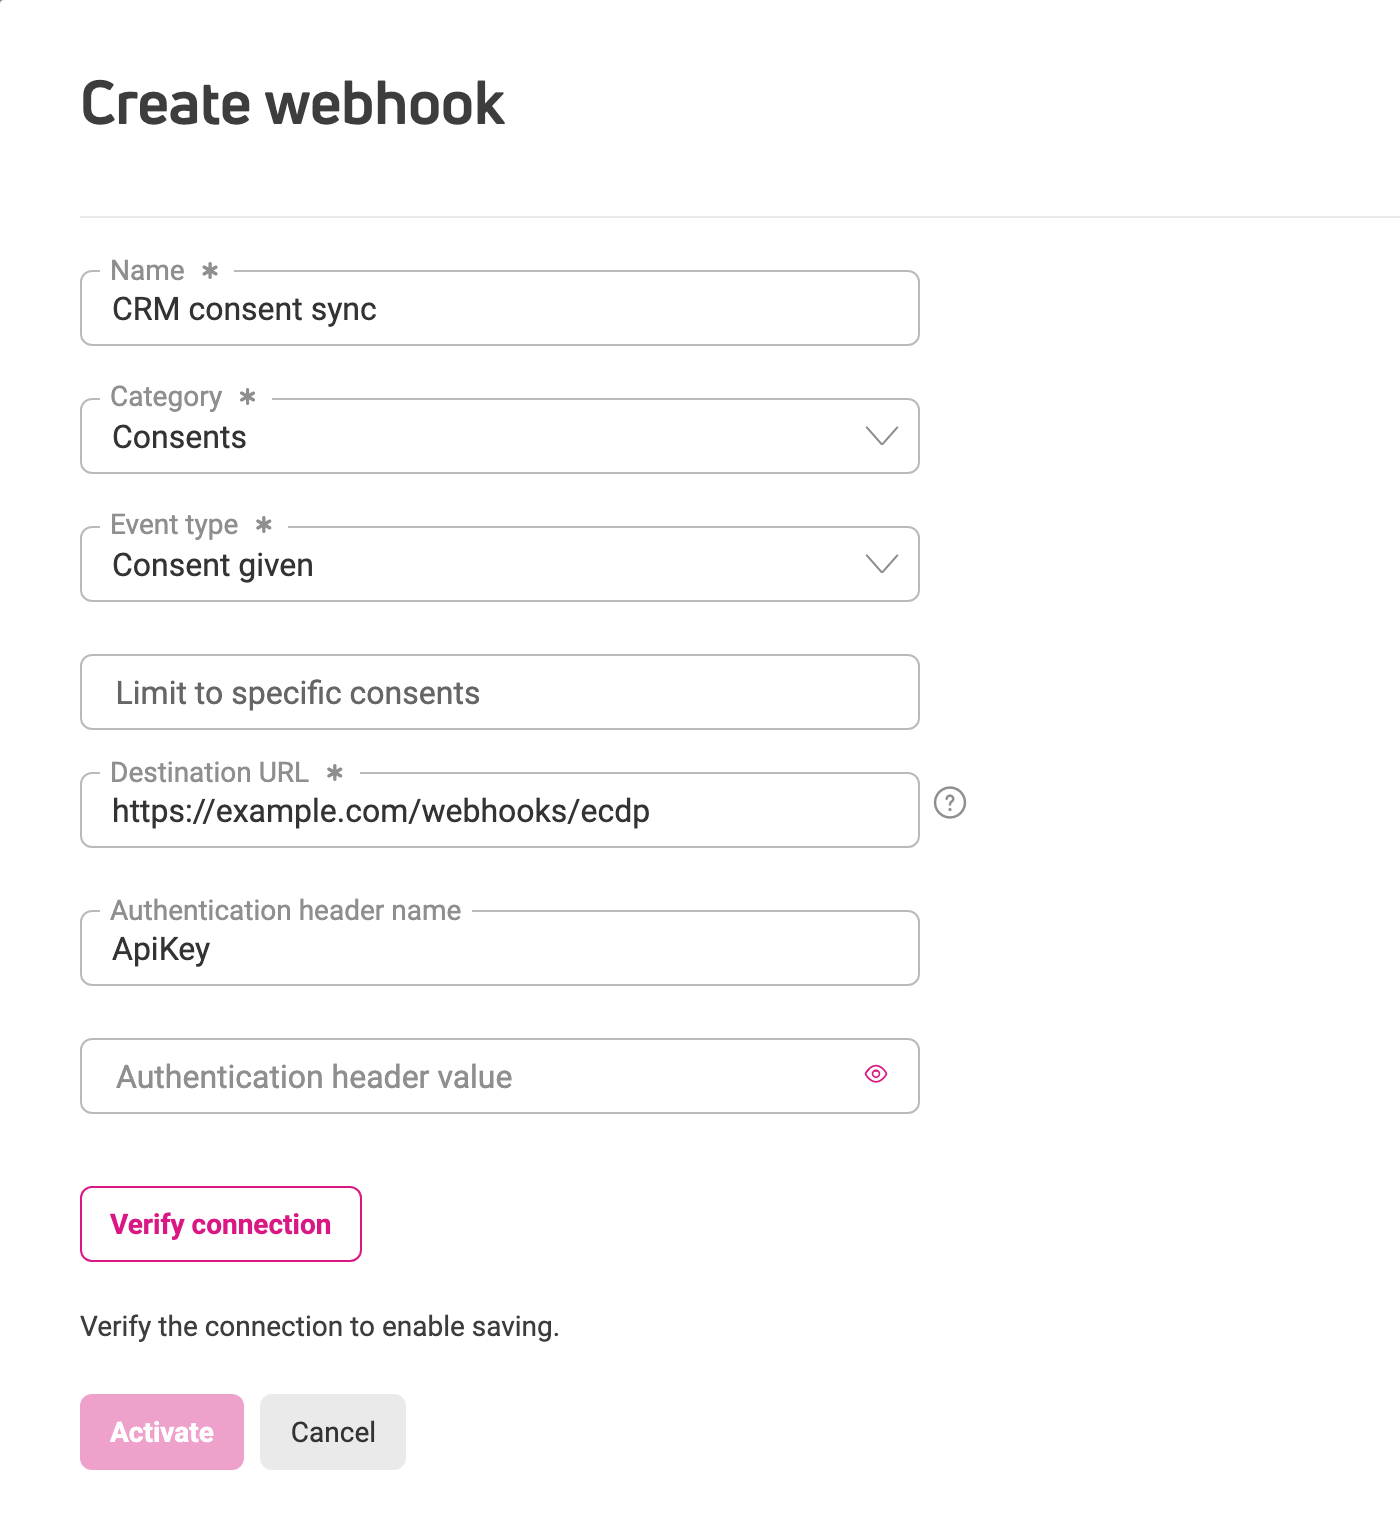
Helpful tip: You can’t save a webhook until the connection test succeeds. Until then, a hint under the buttons tells you what to do.
How the connection test works
- The test request contains the fields of the selected event filled with sample data, for example customer ID 123 and an example.com address. It never contains real customer data. Some fields can differ slightly from a real request, so use Webhook payloads as the reference.
- The test passes when your system answers with a 2xx or 4xx code, because the address is reachable. With 4xx, the result shows the code and the response, so you can see that your system rejected the sample data.
- The test fails when your system answers with 3xx or 5xx, doesn’t answer in time, or the connection fails.
- The test is not a delivery. It doesn’t appear in the logs and doesn’t change the last request result and date on the webhook list.
Managing webhooks
The Webhooks tab lists your webhooks with their name, status, event type, result and date of the last request, and date of the last edit. The result and date show the last finished delivery, after all retries. Before the first delivery, the result column shows a dash.
- Active – the webhook delivers events. You can deactivate it, edit it, or open its logs.
- Inactive – the webhook doesn’t deliver events. You can activate it, edit it, delete it, or open its logs.
- Deleted – hidden by default. Select Show deleted webhooks above the table to see it. You can restore it or open its logs.
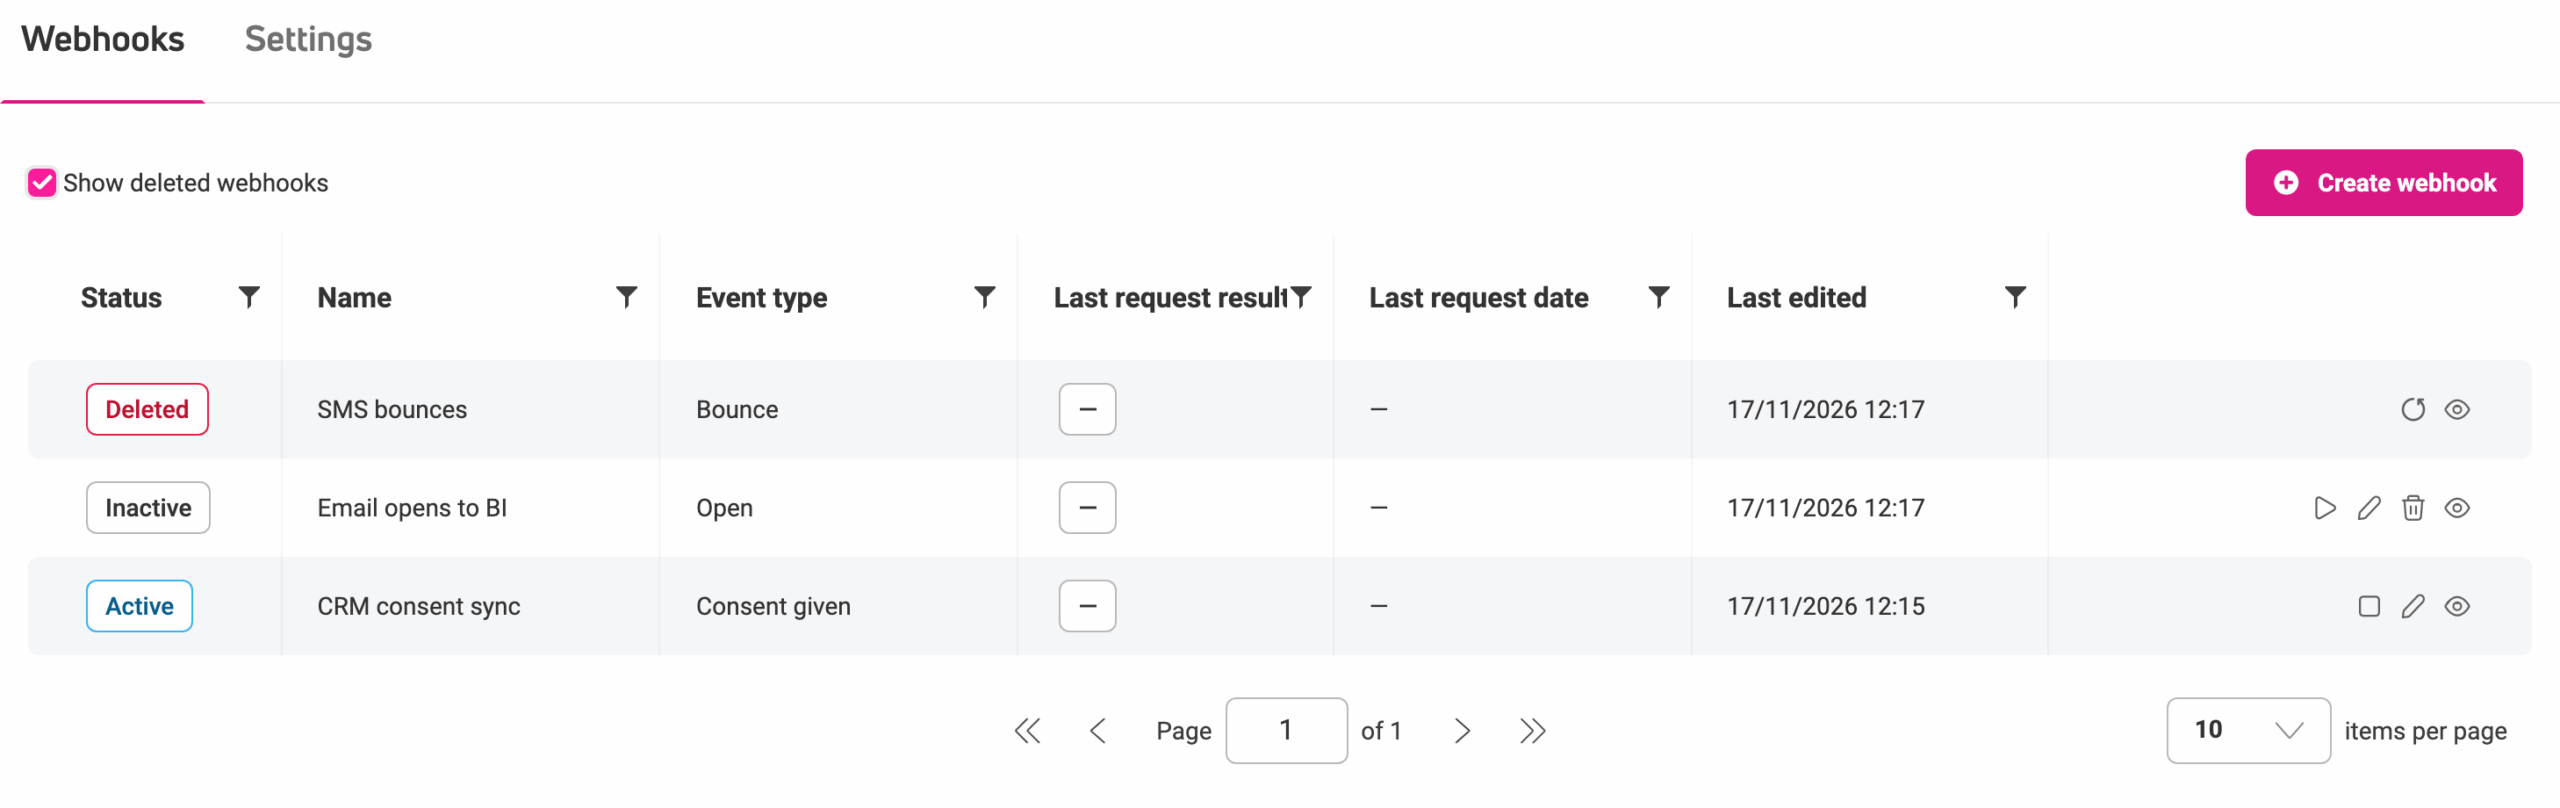
Point to an icon in a row to see its name, for example Deactivate, Edit or View logs. To delete a webhook, click the delete icon and confirm in the window that opens.
Editing: you can edit a webhook in any status. To save changes, verify the connection again and click Update. The webhook keeps delivering while you edit, and its status doesn’t change.
Limit of active webhooks: you can have several webhooks for the same event, for example to send it to a few systems. By default, you can have up to 4 active webhooks for the same event type. If creating or activating a webhook would exceed the limit, ECDP shows Active webhook limit reached for this event. and doesn’t save or activate the webhook. The limit also applies when you change the event type of an active webhook. A restored webhook is inactive, so ECDP checks the limit when you activate it. Deactivate or delete a webhook you don’t need and try again.
How delivery works
- ECDP sends each event as a request to your destination URL shortly after it happens. It doesn’t guarantee instant delivery. When the volume of events is high, for example during a large campaign, webhooks can arrive with a delay.
- One event creates one delivery for each active webhook set up for it, with no duplicates. If a business unit has no active webhook for an event type, ECDP doesn’t send anything.
- A delivery succeeds only when your system answers with a 2xx code.
- If your system answers with 3xx, the attempt fails and ECDP doesn’t follow the redirect or try again.
- If your system answers with 4xx other than 408 and 429, it rejected the data. The attempt fails and ECDP doesn’t try again.
- If your system answers with 5xx, 408 or 429, doesn’t answer in time, or the connection fails, ECDP tries again right away, with no delay between attempts, up to the retry limit set for your business unit. The retry limit counts the repeats after the first request, so a limit of 2 means up to 3 requests in total.
- After the last attempt, the event is marked as failed in the logs. ECDP doesn’t retry it again later.
- ECDP never deactivates a webhook on its own, even when deliveries keep failing. Check the last request result in the list and the logs.
- ECDP sends requests only to public https:// addresses. It can’t reach addresses in a private network.
- All dates in requests use the time zone of your business unit, in ISO 8601 format with the UTC offset.
Webhook settings for your business unit
On the Settings tab in Settings > Webhooks, you set values that apply to every webhook in the business unit:
- Response timeout (ms) – how long ECDP waits for an answer to each request. If your system doesn’t answer in this time, the attempt counts as failed. You can enter a value from 100 to 10,000. The default is 3,000.
- Retry limit – how many times ECDP repeats a failed delivery after the first request. You can enter a value from 0 to 5. With 0, ECDP doesn’t retry. The default is 2, which means up to 3 requests in total.
- Log retention (days) – how long webhook log entries are kept. You can enter a value from 1 to 90. The default is 30.
Click Save when you’re done.
Checking deliveries in the logs
Go to Settings > Logs and open the Webhooks tab. You can also click View logs in a webhook’s row. ECDP opens this tab with the Webhook column already filtered to that webhook.
The table shows the Result (Successful or Failed), the ID, the Webhook, the date and time the entry was created (Created at) and the number of Attempts. One delivery is one entry, however many times ECDP had to retry it. Attempts shows how many requests it took, and the entry shows the result of the last attempt. An event delivered on the third try is one entry with 3 attempts. The logs show deliveries of events only, not connection tests. Newest entries are at the top, and you can filter by any column.
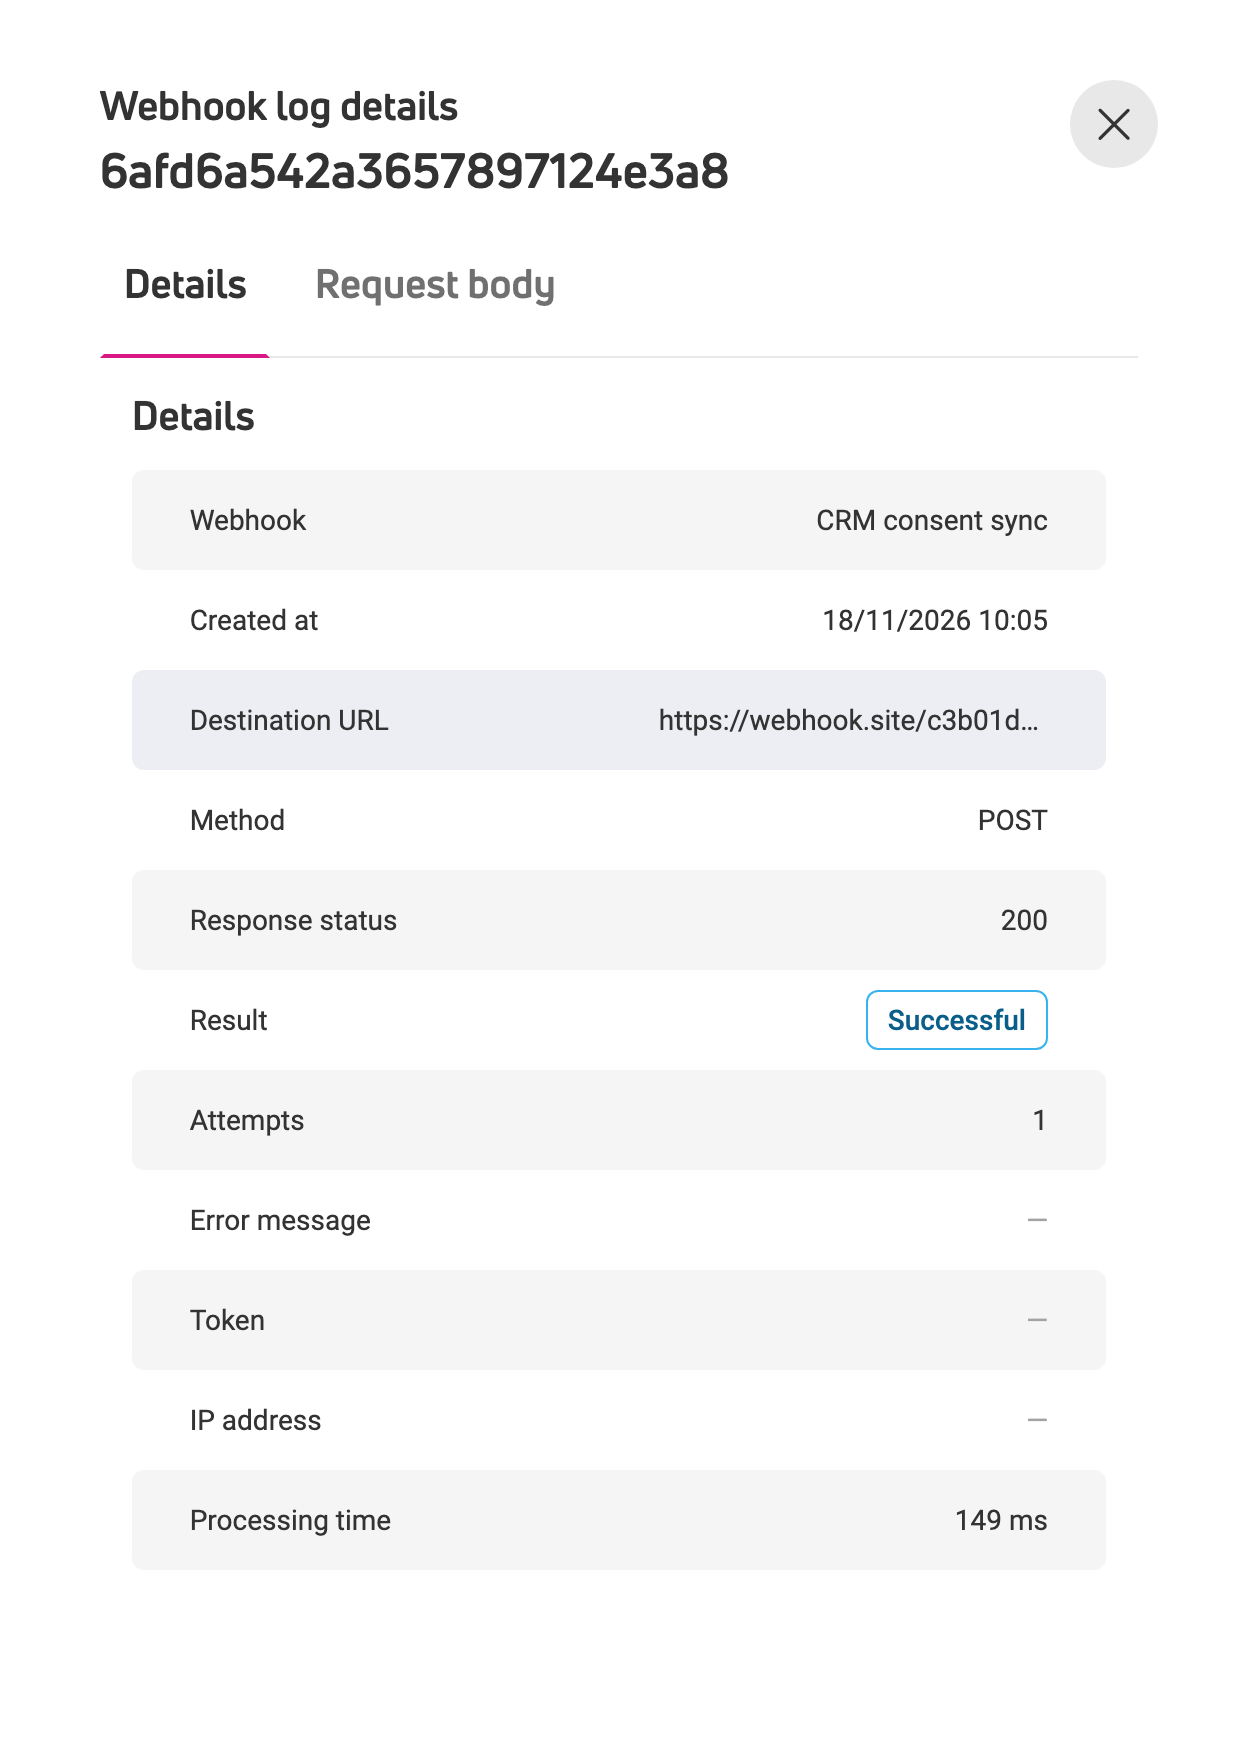
Click the eye icon at the end of a row to open the Webhook log details panel:
- Details – the webhook, creation date, destination URL, method, response status, result, number of attempts, error message, token and processing time. For errors, the error message is what your system returned, or a short description of the problem. The token is always masked, or empty if the webhook has no authentication header.
- Request body – the JSON request body, formatted for easier reading. Click the copy icon in the field to copy it.
Helpful tip: Entries older than the retention period are removed and stop appearing in search results. If you’re diagnosing recurring failures, review them before they expire.
Webhook payloads
This section describes the requests ECDP sends to your destination URL when a webhook is triggered.
Request format
- ECDP sends each event as a POST request. The body is a single JSON object (UTF-8), and the Content-Type header is application/json.
- If you set an authentication header in the webhook, ECDP adds it to every request under the name and with the value you entered.
- Every event creates a separate request. For example, if one API call changes three consents of a customer, you get three requests.
- The test request contains sample data and can differ slightly from a real request. Use this section as the reference.
- In the JSON text, characters such as + and & can be written as \u002B and \u0026. Every JSON parser reads them correctly, so you don’t need to handle them separately.
- Field names use camelCase. eventType is the name of the event, for example Send. The same name is used in several channels, for example Send and Click, so use the other fields to tell the channel apart.
- ECDP leaves out fields that have no value. It doesn’t send them as null. It also leaves out crmId, email, phone, channel and version when they are empty.
- The request doesn’t contain your API key, the destination URL or the webhook name.
Fields in every event
| Field | Type | Description |
| eventId | string (UUID) | The unique ID of the event. If ECDP retries a delivery, the retry has the same eventId, so you can use it to spot duplicates on your side. If several webhooks react to the same event, each of them receives the same eventId. |
| eventType | string | The event type, for example ConsentGiven, Send or Click. |
| category | string | The event category: Consents, Email, Sms, WebPush or MobilePush. |
| eventDate | string (ISO 8601) | When ECDP published the event. It’s not the time of the original send, click or callback. The date is in the time zone of your business unit, with whole seconds and the UTC offset, for example 2026-08-26T12:05:33+02:00. |
| customerId | number | The customer’s ID in ECDP. |
| crmId | string | The customer’s CRM ID. Sent only when it’s available. |
| string | The customer’s current email address. Sent only when it’s available. | |
| phone | string | The customer’s current phone number in international format, with the country prefix and no spaces. Sent only when it’s available. |
ECDP takes the contact details from the customer’s data at the moment it builds the request. They don’t have to be the same email address or phone number that was used for the original send. Customer identifiers aren’t limited to the channel of the event: an SMS event can include email too.
Consent events
Event types: ConsentGiven, ConsentAwaitingConfirmation, ConsentConfirmed, ConsentRevoked. Besides the common fields, these events contain:
| Field | Type | Description |
| consentId | number | The ID of the consent. |
| consentName | string | The name of the consent. |
| channel | string | The channel of the consent: Email, Sms, WebPush or MobileApplication. ECDP leaves it out for a general consent. |
Example: ConsentGiven
{
  "eventId": "11111111-1111-4111-8111-000000000001",
  "eventType": "ConsentGiven",
  "category": "Consents",
  "eventDate": "2026-08-26T12:05:33+02:00",
  "customerId": 12345,
  "crmId": "CRM-DEMO-12345",
  "email": "customer@example.com",
  "consentId": 10,
  "consentName": "Email communication consent",
  "channel": "Email"
}
Example: ConsentRevoked for a general consent. There is no channel field.
{
  "eventId": "11111111-1111-4111-8111-000000000004",
  "eventType": "ConsentRevoked",
  "category": "Consents",
  "eventDate": "2026-08-26T12:08:33+02:00",
  "customerId": 12345,
  "crmId": "CRM-DEMO-12345",
  "consentId": 11,
  "consentName": "General consent"
}
When a customer confirms a double opt-in consent, you get a ConsentConfirmed event only, without an additional ConsentGiven.
Email events
Event types: Send, Delivery, Bounce, Complaint, Open, Click. Send means the email was sent, not that it reached the recipient. Besides the common fields, these events contain:
| Field | Events | Description |
| messageId | All | The ID of the message (number). |
| messageType | All | The type of the message: Newsletter, Scenario or Confirmation. |
| messageSubjectOrName | All | The subject of the message. If the message has no subject, it’s an empty string. |
| version | All | The variant the customer received in an A/B test: A, B, C and so on, or Winner for a copy of the winning version. Sent only for messages with an A/B test. |
| bounceReason | Bounce | The reason for the bounce: UserUnknown, MailboxFull, Blocked, Unknown or Other. |
| bounceType | Bounce | The type of the bounce: Hard, Soft, Transparent, Block or Other. |
| targetUrl | Click | The final address of the link the customer clicked, not the tracking redirect. It includes all parameters, also those ECDP adds to the link, such as UTM parameters. |
Example: Send
{
  "eventId": "11111111-1111-4111-8111-000000000005",
  "eventType": "Send",
  "category": "Email",
  "eventDate": "2026-08-26T12:09:33+02:00",
  "customerId": 12345,
  "email": "customer@example.com",
  "messageId": 2001,
  "messageType": "Newsletter",
  "messageSubjectOrName": "Sample message",
  "version": "A"
}
Example: Bounce
{
  "eventId": "11111111-1111-4111-8111-000000000007",
  "eventType": "Bounce",
  "category": "Email",
  "eventDate": "2026-08-26T12:11:33+02:00",
  "customerId": 12345,
  "email": "customer@example.com",
  "messageId": 2001,
  "messageType": "Newsletter",
  "messageSubjectOrName": "Sample message",
  "bounceReason": "UserUnknown",
  "bounceType": "Hard"
}
Example: Click
{
  "eventId": "11111111-1111-4111-8111-000000000010",
  "eventType": "Click",
  "category": "Email",
  "eventDate": "2026-08-26T12:14:33+02:00",
  "customerId": 12345,
  "email": "customer@example.com",
  "messageId": 2001,
  "messageType": "Newsletter",
  "messageSubjectOrName": "Sample message",
  "targetUrl": "https://shop.example.com/products/demo"
}Delivery, Complaint and Open have the same fields as Send. Complaint has no field describing the complaint.
SMS events
Event types: Send, Bounce, Click. Send means the SMS was sent, not that it reached the phone. Besides the common fields, these events contain:
| Field | Events | Description |
| messageId | All | The ID of the message (number). |
| messageType | All | The type of the message: Newsletter or Scenario. |
| failureReason | Bounce | The status reported by the SMS gateway when the message wasn’t delivered, for example a status code with its name. ECDP passes it on unchanged, so it isn’t a closed list of values and depends on the gateway. |
| targetUrl | Click | The final address of the link the customer clicked. It includes all parameters, also those ECDP adds to the link, such as UTM parameters. |
Example: Bounce
{
  "eventId": "11111111-1111-4111-8111-000000000012",
  "eventType": "Bounce",
  "category": "Sms",
  "eventDate": "2026-08-26T12:16:33+02:00",
  "customerId": 12345,
  "phone": "+12025550123",
  "messageId": 3001,
  "messageType": "Newsletter",
  "failureReason": "DEMO_UNDELIVERABLE"
}
Web push events
Event types: Send, View, Click. Send means the notification was sent to the push provider, not that it was displayed. Besides the common fields, these events contain:
| Field | Events | Description |
| messageId | All | The ID of the notification (number). |
| messageType | All | The type of the notification: Newsletter or Scenario. |
| websiteId | All | The ID of the website (number). |
| targetUrl | Click | The final address of the link the customer clicked. It includes all parameters, also those ECDP adds to the link, such as UTM parameters. |
Example: Click
{
  "eventId": "11111111-1111-4111-8111-000000000016",
  "eventType": "Click",
  "category": "WebPush",
  "eventDate": "2026-08-26T12:20:33+02:00",
  "customerId": 12345,
  "messageId": 4001,
  "messageType": "Newsletter",
  "websiteId": 100,
  "targetUrl": "https://shop.example.com/news/demo"
}
Mobile push events
Event types: Send, View, Click. Send means the notification was sent to the push provider, not that it was displayed. Besides the common fields, these events contain:
| Field | Description |
| messageId | The ID of the notification (number). |
| messageType | The type of the notification: Newsletter or Scenario. |
| mobileApplicationId | The ID of the mobile application (number). |
| deviceId | The public ID of the customer’s device (string). |
Example: Send
{
  "eventId": "11111111-1111-4111-8111-000000000017",
  "eventType": "Send",
  "category": "MobilePush",
  "eventDate": "2026-08-26T12:21:33+02:00",
  "customerId": 12345,
  "crmId": "CRM-DEMO-12345",
  "messageId": 5001,
  "messageType": "Scenario",
  "mobileApplicationId": 200,
  "deviceId": "demo-device-001"
}
View and Click have the same fields. Mobile push events don’t contain a link.
Can webhooks send consent changes made by import?
No. Consent changes made by importing customer data don’t trigger webhooks. The same applies to mass actions and to scenario actions that set customer data. For the operations that do send consent events, see Events you can send.